Monday 28 February 2022

Bibimbap (Mixed Rice)

I love bibimbap. It's the dish that introduced me to Korean food and it's still one of my favourites. But it's always been one of those things that I only ever get from restaurants. I've never made my own bibimbap at home. As usual though, Aaron makes things easy and approachable and my first foray into homemade bibimbap was a huge success. TF and I both loved it and so did the Kidlet. She said it was a "super favourite" and asked for it in her lunch tomorrow as well.

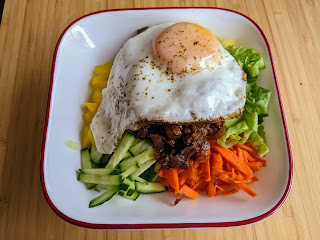
I played a bit fast-and-loose with the vegetables and toppings, but you can get away with doing that with dishes like this. Aaron recommended carrots, zucchini, shiitake mushrooms, lettuce, salted daikon with gochugaru, soy bean sprouts, cucumbers, saucy ground beef, and a sunny side up egg. We didn't have the zucchini, bean sprouts, or any fresh daikon, so we swapped them out for bell pepper and danmuji (pickled daikon). And we swapped out the ground beef for chopped, thinly sliced beef. Really though, I think as long as you have rice, at least a few different veggies, some protein (meat, tofu, tempeh, seitan, etc.), and an egg... you're good to go! Make it what you want.


Bibimbap

Slightly adapted from Aaron & Claire

Ingredients

Vegetables

All of the veggies should be considered optional, but you should try to make sure you have at least four different things if possible.
  • shiitake mushrooms, sliced
  • cucumber, julienned
  • bell pepper, thinly sliced
  • lettuce, cut into bite-sized pieces
  • cabbage, shredded
  • corn
  • fresh daikon or danmuji, julienned
  • coarse sea salt
  • fine gochugaru
  • carrot, julienned
  • zucchini, julienned

Beef

  • 1 onion, chopped
  • 4 green onions, chopped
  • 1 Tbsp. sugar
  • 1 Tbsp. minced garlic or garlic paste
  • 5 Tbsp. light (regular) soy sauce
  • 3 Tbsp. oyster sauce
  • 1 Tbsp. sesame oil
  • 200g beef, ground or thinly sliced
  • pepper, to taste

Sauce

  • 3 Tbsp. gochujang
  • 1 Tbsp. corn syrup
  • 1 Tbsp. water

Assembly

  • cooked rice (~3/4 c. per person)
  • sesame oil (1 tsp. per person)
  • eggs (1 per person)

Directions

Vegetables

  1. If you're using dried mushrooms, soak them in hot water for a while before you start cooking. Sometimes they can take a long time to soften up. If you're using fresh, you can just slice them while prepping the rest of the veggies.
  2. Chop all your veggies.
  3. If using fresh daikon, sprinkle some salt on it and let it sit for at least 15 minutes. Then drain off any liquid and sprinkle with gochugaru.
  4. Cook the carrot in a little oil until slightly softened. Sprinkle with a little salt if you wish.
  5. Give the zucchini the same treatment. Be careful not to overcook it!
  6. Cook the mushrooms in a little oil too. Season with sesame oil, pepper, and either salt or soy sauce. (I like soy sauce.)
  7. Set the veggies aside while you get everything else ready.

Beef

  1. Combine onion, green onion, sugar, garlic, soy sauce, oyster sauce, and sesame oil in a bowl.
  2. Cook beef in a little oil and season with some pepper.
  3. Pour in the sauce and cook over medium-low until most of the liquid has evaporated.

Sauce

  1. Combine gochujang, corn syrup, and water and mix well.

Assembly

  1. Put some rice in a bowl and drizzle with a teaspoon of sesame oil.
  2. Top with veggies. Try to keep each veggie separate so you get lots of different colours each in their own section.
  3. Place a spoonful of beef in the centre.
  4. Fry an egg1 and place it on top.
  5. Serve with sauce on the side.
  6. Instruct diners to add some sauce to their bowl and then mix everything up before eating.


1 Sunny side up is generally preferred. The runny yolk acts as a sauce for the rice and veggies. I like to do "sunny side up in the shade" where you cover the pan so that the egg steams a little bit and sets the thin film of albumen over the yolk. This makes the yolk look a little cloudy, so it's not as aesthetically pleasing, but I don't mind that. If you're not big on runny yolks, you could have your egg scrambled or boiled instead. Or if you don't like fried eggs, soft poached eggs would also work quite well. Much like with the vegetables, there's a lot of flexibility here. Back

Friday 25 February 2022

Chocolate Sourdough Waffles

My sourdough starter got neglected for a long time, so it was feeling a little lethargic. I've been trying to revive it over the past few days and these waffles seemed like a nice way to use a bit more starter. (Plus they looked delicious!)


Chocolate Sourdough Waffles

Slightly adapted from King Arthur Baking

Ingredients

  • 225g ripe (fed) sourdough starter, 100% hydration
  • 290mL cold water
  • 170g hard (strong/high grade/bread) whole wheat flour
  • 1/2 c. Dutched (alkalized) cocoa
  • 1/2 c. malted milk powder
  • 1 tsp. baking powder
  • 1/2 tsp. coarse sea salt, ground
  • 1/2 tsp. ground cinnamon
  • 3/4 c. sugar
  • 130g dark chocolate, chopped
  • 2 large eggs
  • 6 Tbsp. unsalted butter, melted
  • 2 tsp. vanilla extract

Directions

  1. In the evening: combine starter, water, and flour. Mix well, cover, and let stand at room temperature overnight.
  2. In a separate bowl, combine cocoa, malted milk powder, baking powder, salt, cinnamon, sugar, and chocolate. (This can also be done the night before if desired.)
  3. In the morning: add eggs, butter, and vanilla to the starter.
  4. Stir in cocoa mixture.
  5. Heat up your waffle iron and make waffles according to waffle iron instructions.
  6. Waffles will be quite soft when they first come out of the waffle iron but will crisp up after a minute or two. Try to allow for maximum airflow so they don't sweat and get soggy.
  7. For extra-crisp waffles you can pop them into a 95°C (200°F) oven for a couple of minutes before serving.
  8. Serve with whipped cream and/or fresh berries. (Straberries and raspberries go particularly well!)

Thursday 24 February 2022

Gimbap

Gimbap may look like sushi, but it has its own unique taste. The rice gets sesame oil mixed in after cooking rather than the usual rice vinegar and sugar. And the fillings are very different. Whereas I tend to associate sushi mostly with raw fish and veggies, gimbap relies much more heavily on cooked ingredients. And, of course, you always have to have some danmuji!

Gimbap is extremely flexible. This means there isn't just one recipe for it. As long as you have rice and nori, you can add pretty much whatever you want. What you'll find below is a general pattern with suggestions for fillings. It can be fun to provide lots of them and let everyone roll their own gimbap at the table. Underneath the general recipe, I've included some suggested combinations, but don't feel that you have to stick to these. Make it what you want!


Gimbap

Slightly adapted from Aaron & Claire

Ingredients

Rice

  • 1 c. short-grain white rice
  • 1 c. water
  • 1 tsp. sesame oil
  • 1/4 tsp. coarse sea salt, ground

Assembly

  • egg
  • tuna salad
  • sautéed spinach
  • sautéed carrots
  • ham and/or sausage
  • pork belly
  • bulgogi
  • red cabbage, shredded
  • bell pepper, thinly sliced
  • cucumber, cut into sticks
  • avocado, sliced
  • kimchi
  • danmuji
  • immitation crab sticks
  • ssamjang
  • perilla leaves
  • lettuce
  • nori sheets

Directions

Rice

  1. Add rice and water to InstantPot and pressure cook on high for 4 minutes.
  2. Allow for a 10-minute natural relese, then fluff the rice and mix in the sesame oil and salt.
  3. Keep it warm and covered until ready to use so it doesn't dry out.

Preparation

  1. If using egg: Beat the egg(s) very well. Add a little bit of mirin if you like. Heat a pan with a little oil and pour in a thin layer of egg. Cover the pan so the egg cooks all the way through. Repeat until all the egg is used. Use cooked egg as is or chiffonade as desired.
  2. If using tuna salad: Prepare your tuna. Drain and mix with mayo. I like to add a little wasabi, minced onion, and chopped green onion/scallion.
  3. If using carrot: Julienne the carrot and cook it in a little butter or oil until tender-crisp.
  4. If using spinach: For fresh spinach, blanch it briefly first. Frozen spinach can be used directly. Sauté in a little sesame oil with some garlic.
  5. If using ham: Cut it into sticks and cook until slightly browned and crisp on the outside.
  6. If using pork belly: Cut into slices and fry until cooked through.
  7. If using bulgogi: Have it ready in advance or make this quick "bulgogi".
  8. Get any other toppings or inclusions ready.

Assembly

  1. Spread a portion of rice (maybe 1/2 a cup or so) onto the nori sheet. Aim to cover ~3/4 of the sheet in a thin layer of rice.
  2. Add whatever fillings you like in a line along the middle of the rice.
  3. Roll up the nori and rice around the fillings. Press firmly. Wet the edge of the nori to help it stick to itself.
  4. Coat the blade of a sharp knife in sesame oil and cut the roll into slices.

Suggested Combinations

(Nori and rice are implied.)
  • egg and kimchi
  • tuna, kimchi, egg, carrot, bell pepper, danmuji, perilla leaves and/or lettuce
  • lettuce, egg, danmuji, carrot, bulgogi, ssamjang, and avocado
  • cabbage, cucumber, carrot, bell pepper, egg, and avocado
  • egg, danmuji, ham, immitation crab, spinach, carrot
  • lettuce, egg, danmuji, kimchi, bell pepper, pork belly, ssamjang
  • danmuji, carrot, bell pepper, spinach, cucumber

Wednesday 23 February 2022

Quick "Bulgogi"

So, my understanding is that "proper" bulgogi is marinated in a delicious marinade full of Asian pear and soy sauce and sesame oil and gochujang and all sorts of other delightful stuff. This is not that. This is a very quick, easy, bulgogi-like substance that gives you some of the same flavour without the effort. It can be a good quick fix for recipes that have lots of other components like gimbap or bibimbap.

Quick Bulgogi

From Aaron & Claire

Ingredients

  • 100g shaved/very thinly sliced raw beef
  • 1/2 Tbsp. sugar
  • 1 Tbsp. light (regular) soy sauce
  • 1/2 Tbsp. garlic paste
  • 1 tsp. sesame oil
  • black pepper, to taste

Directions

  1. Mix everything in a bowl. Massage it with your hands a bit.
  2. Heat a little oil in a pan and add the beef and any residual marinade.
  3. Cook until beef is done. If using for gimbap or something else that will be sensitive to excessive moisture, keep cooking until the liquid is gone.

Tuesday 22 February 2022

Mandu Gangjeong (Dumplings in Sweet Sauce)

Fried dumplings coating in a sweet and mildly spicy sauce. It's extra-good if you deep fry the dumplings, but pan-frying works well too. Aaron calls for 12 dumplings for this amount of sauce, but I felt like that was too much sauce for the amount of dumplings. (Maybe my dumplings are smaller.) I think this amount of sauce would probably be about right for 24 dumplings, but adjust according to your own tastes and the size of your dumplings.

Mandu Gangjeong

Slightly adapted from Aaron & Claire

Ingredients

  • 2 Tbsp. oil
  • 24 frozen dumplings
  • 1 Tbsp. gochujang
  • 1 Tbsp. gochugaru
  • 2 Tbsp. sugar
  • 1 Tbsp. oyster sauce
  • 6 Tbsp. corn syrup
  • 1 Tbsp. light (regular) soy sauce
  • 1 Tbsp. garlic paste (or minced fresh garlic)
  • 5 Tbsp. ketchup
  • 1 green onion, chopped
  • 1 tsp. sesame seeds

Directions

  1. Heat oil over medium-low heat.
  2. Add dumplings in a single layer and cook (slowly) until browned and crispy on the bottom. As each side becomes crispy, turn them to cook another side until as much of the surface as possible has been crisped.
  3. Meanwhile, combine gochujang, gochugaru, sugar, oyster sauce, corn syrup, soy sauce, garlic, and ketchup and mix well.
  4. Once dumplings are crisped all over, pour in the sauce and stir to coat the dumplings all over.
  5. Cook until sauce thickens and clings to the dumplings.
  6. Sprinkle with green onions and sesame seeds and serve.

Monday 21 February 2022

Danmuji (Korean Pickled Radish)

I love gimbap. I've only had it once before, but it really made an impression on me.

I know that, to look at photos of it, you might just think it looks like sushi. But it really does have its own unique flavour. The rice is seasoned with sesame oil and the danmuji gives it a very distinctive sweet and sour kick. You can put all sorts of other things in it. Occasionally homemade gimbap may even forgo the danmuji (and just use egg and/or kimchi), but the radish really makes it special -- at least for me.

One of the main reasons I've never made gimbap before is because I've never been able to find the danmuji for it. Maybe I've just overlooked it at the Asian grocery store, but I've never seen it there. But I finally decided that if I couldn't buy it, maybe I could try making it. I've been told that proper danmuji takes more than a month to make. This isn't that. This is a quick pickle that I just tossed together last night. So I'm sure it's not super authentic. But I'm hoping that it'll still give me some of that characteristic danmuji flavour.

A note on vinegars: The original recipe calls for 1 1/2 c. of unseasoned rice vinegar to which you add water, sugar, and salt (among other things). I only had seasoned rice vinegar. And only about a cup at that. So I did some substitutions. I think you could probably make this entirely with seasoned rice vinegar and just omit the sugar and salt called for. I made it with a 1:1 mix of seasoned rice vinegar and cane vinegar, so I put half the sugar and a little less than half the salt called for. To be absolutely sure you get the right proportions and flavour, it's best to use unseasoned rice vinegar as suggested. But, in a pinch, you can swap things around a bit and adjust the other ingredients as needed.

Danmuji

From Serious Eats

Ingredients

  • 1 1/2 c. water
  • 1 1/2 c. unseasoned rice vinegar (see note above)
  • 1/2 c. sugar
  • 1 Tbsp. kosher salt
  • 1 tsp. ground turmeric
  • 2 cloves garlic, halved lengthwise
  • 2 bay leaves
  • 15 black peppercorns
  • 450g daikon radish, cut into long strips or discs as preferred

Directions

  1. Combine water, vinegar, sugar, salt, turmeric, garlic, bay leaves, and peppercorns and bring to a boil.
  2. Remove from heat and add daikon.
  3. Press a paper towel into the surface of the brine to ensure the diakon is completely submerged and not in contact with the air. Set aside for 1-2 hours.
  4. Transfer daikon and its brine to a clean jar. Store in fridge until ready to use.

Sunday 20 February 2022

Rabokki (Ramyun + Tteokbokki)

I had intended this to be a sort of fridge clean-out dinner. Sadly my fried tofu had gone off, so the protein was a little lacking. And I forgot to boil the egg in advance, so the everything else was bit overcooked by the time the egg was ready to go. It was still tasty, but it would've been improved by better planning and organization.


Rabokki

Slightly adapted from Aaron & Claire

Ingredients

  • 2 Tbsp. gochugaru
  • 2 1/2 Tbsp. sugar
  • 1/2 Tbsp. ramyun powder
  • 2 Tbsp. gochujang
  • 2 Tbsp. corn syrup
  • 1 Tbsp. light (regular) soy sauce
  • 1/2 Tbsp. oyster sauce
  • 1 Tbsp. mirin
  • 1/2 Tbsp. dashida (or beef stock concentrate)
  • black pepper, to taste
  • 200g rice cakes
  • 2 Korean fish cakes (or fried tofu), cut into bite-sized pieces, divided
  • 1 onion, sliced
  • 2 green onions, sliced
  • 3 c. water
  • 1 c. cabbage, cut into bite-sized pieces
  • 1-2 hard-boiled egg(s)
  • 1 package ramyun (soup kind)
  • 2 slices cheese (optional)

Directions

  1. Combine gochugaru, sugar, and 1/2 Tbsp. of powder from the ramyun.
  2. Add gochujang, corn syrup, soy sauce, oyster sauce, mirin, dashida/beef stock, and pepper and stir to combine.
  3. For best results, cover and chill overnight.
  4. If using frozen rice cakes, soak them in cold water for 20 minutes, then drain.
  5. Add rice cakes, half the fish cakes, half the onion, and half the green onions to a pot along with the water.
  6. Bring to a boil over medium-high heat.
  7. Cook for a couple minutes, stirring occasionally.
  8. Reduce heat to low.
  9. Andd the remining fish cakes, onion, and green onions.
  10. Add the cabbage, egg(s), ramyun noodles, and falkes/dried veggies from the ramyun package.
  11. If desired, top with cheese, sesame seeds, and more green onions.
  12. Cook until noodles are done (2-3 minutes).
  13. Serve with fried dumplings for dipping in the sauce.


Variations

Vegetarian Version

Ingredients

  • 2 Tbsp. gochugaru
  • 2 1/2 Tbsp. sugar
  • 1/2 Tbsp. ramyun powder
  • 2 Tbsp. gochujang
  • 2 Tbsp. corn syrup
  • 1 Tbsp. light (regular) soy sauce
  • 1/2 Tbsp. vegetarian oyster sauce
  • 1 Tbsp. mirin
  • 1/2 Tbsp. vegetable stock concentrate
  • black pepper, to taste
  • 200g rice cakes
  • 2 fried tofu, cut into bite-sized pieces/slices, divided
  • 1 onion, sliced
  • 2 green onions, sliced
  • 3 c. water
  • 1 c. cabbage, cut into bite-sized pieces
  • 1-2 hard-boiled egg(s)
  • 1 package ramyun (soup kind)
  • 2 slices cheese (optional)

Vegan Version

  • 2 Tbsp. gochugaru
  • 2 1/2 Tbsp. raw sugar or 5 1/2 tsp. agave syrup
  • 1/2 Tbsp. ramyun powder
  • 2 Tbsp. gochujang
  • 2 Tbsp. corn syrup
  • 1 Tbsp. light (regular) soy sauce
  • 1/2 Tbsp. vegetarian oyster sauce
  • 1 Tbsp. mirin
  • 1/2 Tbsp. vegetable stock concentrate
  • black pepper, to taste
  • 200g rice cakes
  • 2 fried tofu, cut into bite-sized pieces/slices, divided
  • 1 onion, sliced
  • 2 green onions, sliced
  • 3 c. water
  • 1 c. cabbage, cut into bite-sized pieces
  • 1 package ramyun (soup kind)
  • 2 slices non-dairy cheese (optional)

Saturday 19 February 2022

Caramelized Onion Sourdough Biscuits

I haven't been baking much bread lately. Or really doing much baking full stop. Which means the sourdough starter has been getting increasingly hungry and acidic in the fridge. I could bake bread with it, but the way I tend to do bread means that I would only use a tiny portion of it. The rest would still be in the fridge. Hungry. So I figured the first thing to do is probably make some sort of quick bread or cake that will allow me to use up a bunch of discard. Once the remaining starter's been fed a few times and is looking little happier and more lively, I can get to the bread.

I have plenty of sourdough discard recipes already. Including some very nice sourdough biscuits. But what can I say? I like trying new things! So I decided to go prowling through the King Arthur website again and see what they had that looked good. And these onion biscuits seemed just the thing.

I think the only thing I'd change if I were to make these again is to add maybe 1 Tbsp. of water to the dough. The biscuits were delicious, but I think the dough could've used just a hint more moisture. I might also consider adding some grated or diced Cheddar cheese. Cheese and onion is such a good combination. I think some old Cheddar would be really excellent in these biscuits!


Caramelized Onion Sourdough Biscuits

Slightly adapted from King Arthur Baking

Ingredients

Onion

  • 1 Tbsp. unsalted butter
  • 1 Tbsp. brown sugar
  • 1 onion, halved and sliced thin

Biscuits

  • 1 c. all-purpose flour
  • 2 tsp. baking powder
  • 1/2 tsp. coarse sea salt, ground
  • 1/2 c. unsalted butter, chilled
  • 2-3 Tbsp. chopped fresh chives1
  • 225g sourdough discard (unfed starter)
  • 1 Tbsp. water (optional)

Dircections

Onion

  1. Melt butter over medium-low heat.
  2. Add sugar and onion and cook, covered, for 30-40 minutes, stirring occasionally.
  3. Remove from heat and cool completely.

Biscuits

  1. Preheat oven to 220°C (425°F) and grease a baking sheet.
  2. Combine flour, baking powder, and salt and mix well.
  3. Cut in butter.
  4. Add chives, cooled onion, and starter and mix until just combined.
  5. If the dough is not quite coming together, add the water. It should be fairly dry and only just cohesive (or even not quite cohesive).
  6. Dump onto a floured surface and press flat.
  7. Fold in half and press flat again.
  8. Repeat previous step four or five times pressing to a thickness of 2-3cm after the last fold.
  9. Cut out circles of desired size (5-7cm works well) and transfer to prepared baking sheet.
  10. Combine scraps, fold and press once more, and cut out a couple more circles.
  11. Bake at 220°C (425°F) for 15 minutes.
  12. Transfer to wire rack to cool.


1 Whoops! Just realized I forgot the chives. Oh well... still delicious! Back

Friday 18 February 2022

Seeded Sourdough Soda Bread

My starter desperately needed to be used. I started by making some biscuits, but it was still looking pretty sluggish, so I picked out this soda bread recipe as well. I haven't actually had a chance to taste the bread yet, but it looks nice, so I'm pretty much just going by that at this point. I can always come back and update later if I have any more thoughts after trying it.

Photo goes here.

Seeded Sourdough Soda Bread

Slightly adapted from King Arthur Baking

Ingredients

  • 275g soft (plain/standard/pastry) whole wheat flour
  • 150g all-purpose flour
  • 100g mixed seeds1
  • 1 tsp. baking soda
  • 1/2 tsp. coarse sea salt, ground
  • 225g sourdough starter, 100% hydration (ripe or discard is fine for this)
  • 1/4 c. unsalted butter, melted
  • 3 Tbsp. honey
  • 3/4 c. milk

Directions

  1. Preheat oven to 205°C (400°F) and grease a baking sheet.
  2. Combine the flours, seeds, baking soda, and salt and mix well.
  3. Add the starter, butter, honey, and milk and stir to combine.
  4. Knead it for a few strokes on a lightly floured surface. (It won't develop the same strech or suppleness as a yeasted dough; that's fine.)
  5. Divide the dough into two equal portions and shape each one into a ball. (Again, you won't be able to get a smooth sheet of gluten like with yeasted dough. That's expected.
  6. Place the dough balls on the prepared baking sheet.
  7. Cut a deep cross/X into the top of each ball.
  8. Bake at 205°C (400°F) for 30 minutes.


1 I used a mix of poppy seeds, sesame seeds, sunflower seeds, pumpkin seeds, and millet. Whole flax seeds would also work well if you have them, but I only had ground. Flaked grains would also be nice: wheat, rye, oat, kamut, etc. I might also be worth experimenting with whole wheat berries or cracked grains: wheat, rye, bulgur, etc., but they may require some soaking before being added to the dough and that could mess with the hydration, so I'd not willing to recommend them without some cautions. Give it a go if you're feeling adventerous though! Back

Thursday 17 February 2022

King Oyster Smagyupsal Bowls

I got some king oyster mushrooms on a whim because they were on sale last week. A few of them got used up in the hotpot we had for dinner a couple nights ago, but the rest have been sitting in the fridge waiting for me to come up with something to do with them. Luckily the Woks of Life had me covered. I decided to give their Korean barbecue bowls a try. This worked out doubly well since I had to run out to the grocery store to pick up some much-needed road salt today and came across some discount "Korean-style" meatballs. Since the Kidlet is currently off mushrooms (again), I figured the meatballs would make a good replacement.

I was pretty tired today, so this felt like a lot of work. But it's not actually that onerous. Especially if you already have some ssamjang on hand and opt to garnish it with plain sliced scallions rather than making the scallion salad (pajeori).


King Oyster Samgyupsal Bowls

Slightly adapted from Woks of Life

Ingredients

  • 2 Tbsp. oil + extra for cooking
  • 2 tsp. liquid smoke
  • 3/4 tsp. sesame oil
  • 1/4 tsp. sugar
  • 1/4 tsp. coarse sea salt, ground
  • 2 large king oyster mushrooms, sliced lengthwise
  • 1 small onion, sliced into discs
  • 4 cloves garlic, halved lengthwise
  • 1 bell pepper1, sliced into rings
  • 1-2 c. cooked rice2
  • 2-4 leaves green or red leaf lettuce, cut into bite-sized pieces
  • 2 Tbsp. ssamjang
  • 2 Tbsp. kimchi3
  • 1 recipe pajeori

Ingredients

  1. Combine the oil, liquid smoke, sesame oil, sugar, and salt and beat with a whisk to mix thoroughly.
  2. Heat a little oil in a pan (I like to use cast iron for this) and add the mushroom slices. Brush them with the oil mixture.
  3. Once the mushrooms have started to brown on the bottom, flip them over and brush the other side with the oil mixture.
  4. While the second side is cooking, add the onion, garlic, and pepper slices to the pan.
  5. Once everything is well-browned on both sides, remove it from the pan.
  6. Divide the rice between two bowls.
  7. Top each with half the mushrooms, onion, garlic, peppers, lettuce, ssamjang, kimchi, and pajeori.
  8. Mix and enjoy!


1 The original recipe called for 2 long hot peppers, but I opted for 1 bell pepper since I figured that would be a bit more appealing to the Kidlet. Back
2 The folks over at Woks of Life recommend ~1 c. of rice per person. I like to go a little lighter on the rice and heavier on the toppings. I think I only did ~1/2 c. of rice per person. Tailor it according to your tastes. Back
3 If you would like to keep this recipe vegetarian, make sure to get vegan kimchi (or omit it). If you're aiming for a vegan meal, check to make sure your sugar is vegan too. (Some sugars use bone char in their production.) Back

Wednesday 16 February 2022

Ricotta

We have a lot of milk right now. We have a lot of milk and it's about a week past it's best before. It's still fine, but I know its days are numbered at this point. This means it's time to make cheese! My go-to is normally paneer since we eat a lot of curries and it's nice to be able to make a good lactose-free paneer for TF. But I had my eye on this "breakfast cake" that called for ricotta, so I figured I might as well do that instead.

Traditionally ricotta is a whey cheese. You make a cultured cheese like mozzarella or Parmesan or something. The cheesemaking process causes the casein proteins to separate out (along with a lot of the other milk solids) and that's what makes up your cheese curds. What's left behind is whey. And that whey is full of whey protein. To get that to separate out, you need heat and acid. So you cook your whey, add a bunch of vinegar (or other acid), and then strain out the new curds that form. Those curds are your ricotta.

That's the traditional way of making ricotta. That's not what I did here. Honestly, a lot of commercial ricotta isn't even made that way these days. I made "whole milk ricotta". So, instead of adding acid and heat to a big pot of whey, you just put regular milk through the same process. So... basically the exact same as making paneer but without the pressing at the end. I also don't tend to keep cooking the paneer after the milk has curdled. I just heat it up, add the acid, and then drain it almost immediately. With the ricotta, I like to hold it at temperature for a while before draining it. I also don't drain it as thoroughly as paneer. This makes for a nice, soft, high-moisture cheese. Great for baking or enjoyed fresh drizzled with a little olive oil, salt, and pepper.

Note: This method can also be used to make traditional whey ricotta but you will need A LOT more whey in order to produce the same amount of cheese since a lot of the milk solids will have already been removed by the first cheesemaking process. Also, this will not work with whey from a direct acidified cheese since the acid pulls out the whey protein as well as the casein.

Whole Milk Ricotta

Ingredients

  • 2L whole (3.25%) milk
  • ~1/4 c. vinegar or lemon juice

Directions

  1. Heat milk to 85°C (185°F).1
  2. Add a few Tbsp. of vinegar and give it a stir. If the whey still looks milky, add a little more vinegar. Once the whey looks clear (it will still have some colour, but will become much less turbid), stop adding vinegar and stop stirring.
  3. Cover and hold at 85°C (185°F) for 30 minutes.
  4. Use butter muslin or a double layer of cheesecloth to strain the curds from the whey. You can be more or less thorough about the straining depending on how wet or dry you want your cheese to be.
  5. Use in your favourite cake or pasta recipes or drizzle with a bit of olive oil, salt, and pepper and serve with crackers.


1 The InstantPot works great for this. I just use the slow cook "low" setting. Back

Tuesday 15 February 2022

Berry Breakfast Cake?

I ran across this recipe on the King Arthur Flour website. I bookmarked it because I thought it sounded tasty, but I also question their concept of "breakfast". This is basically a cheesecake. It uses ricotta rather than cream cheese and a higher proprotion of flour than I'm used to seeing in cheesecakes, but it's still pretty much just a crust-less cheesecake with fruit in. To me, it is unequivocally dessert, not breakfast. I mean, I'm not going to tell you when or how to eat your cake -- have it whenever you please -- but I am planning to enjoy mine as a pleasant after-dinner treat.


Berry Breakfast Cake

Slightly adapted from King Arthur Baking

Ingredients

  • 3 large eggs
  • 1/2 c. sugar
  • 1 c. ricotta
  • 1 c. sour cream
  • 6 Tbsp. unsalted butter, softened
  • 1 tsp. vanilla extract
  • 1 c. all-purpose flour
  • 1/4 tsp. coarse sea salt, ground
  • 1 1/4 tsp. baking powder
  • 1 1/2 c. fresh or frozen blueberries1

Directions

  1. Preheat oven to 180°C (350°F) and grease a 20cm (8") round cake pan.
  2. Beat eggs with sugar until light and thickened (~3 minutes).
  3. Beat in ricotta, sour cream, butter, and vanilla.
  4. Mix in flour, salt, and baking powder.
  5. Pour batter into prepared pan and sprinkle berries on top.
  6. Bake at 180°C (350°F) for 40-65 mintues (less for fresh berries, more for frozen).
  7. Serve with icing sugar and or cinnamon sprinkled on top.


1 We were low on blueberries, so I ended up using 1/2 c. each of blueberries and raspberries. Back

Monday 14 February 2022

Glazed Carrots

I needed another vegetable dish to round out tonight's dinner and this looked pleasingly simple. I halved the sugar and salt, but I think I probably should've halved the butter as well. It was fine, but I think I would've preferred a higher carrot:glaze ratio.


Glazed Carrots

Slightly adapted from The Modern Proper

Ingredients

  • 2 Tbsp. unsalted butter
  • 900g carrots, cut into sticks
  • 2 Tbsp. brown sugar
  • 1/4 tsp. coarse sea salt, ground
  • 1/2 tsp. black peppercorns, ground

Directions

  1. Melt butter over medium heat.
  2. Add carrots and cook for 10 minutes, stirring occasionally.
  3. Add sugar and cook for another 2 minutes.
  4. Add salt and pepper and cook for 1 minute more.

Sunday 13 February 2022

White Bean and Sausage Skillet

Tasty, easy, one-pan meal. A little light on veggies, maybe, but nothing that an extra vegetable-heavy side dish wouldn't fix.

White Bean and Sausage Skillet

Slightly adapted from The Modern Proper

Ingredients

  • 2 Tbsp. olive oil
  • 2 large sausages1 (~350g total)
  • 4 c. cooked cannellini beans2
  • 1 1/2 c. chicken or vegetable stock, divided
  • 2 Tbsp. garlic paste
  • 1/2 tsp. dried thyme
  • 1/4 tsp. black peppercorns, ground
  • 1/4 tsp. coarse sea salt
  • 4-6 c. chopped fresh or frozen kale
  • 1 Tbsp. lemon juice
  • 1/2 c. grated Parmesan
  • red pepper flakes (optional)

Directions

  1. Heat oil over medium-low heat.
  2. Cook sausages until nicely browned on the outside and fully cooked.
  3. Remove sausages from pan, slice, and set aside.
  4. Add beans, 1 c. of stock, garlic, thyme, pepper, and salt.
  5. Cover and simmer for ~5 minutes.
  6. Mash a few of the beans. (You can do this right in the pan if you're using cast iron.)
  7. Add the sliced sausages and kale, cover, and cook for another 5 minutes or so. Add more stock as necessary to achieve/maintain desired consistency.
  8. Remove from heat and stir in lemon juice and Parmesan.
  9. Top with additional Parmesan and pepper flakes (if desired) and serve.


1 The original recipe called for smoked sausage. I swapped it out for what I had on hand and changed the cooking procedure accordingly. Back
2 I cooked mine in the InstantPot with some garlic, olive oil, white pepper, sage, onion, and a bay leaf. I didn't add any salt to the beans during cooking. If you salt your beans or use tinned beans (which usually have salt added), I would recommend omitting the salt called for later in this recipe. Back

Saturday 12 February 2022

Mushroom & Leek Bread Pudding

I've had my eye on this bread pudding recipe for a while. It took me a few weeks to gather all the ingredients, but I finally managed to make it. The Kidlet wasn't a fan, but TF and I both liked it. (Although I think it could've done with even more pancetta.)

Mushroom & Leek Break Pudding

Slightly adapted from The Modern Proper

Ingredients

  • 2 Tbsp. olive oil
  • 1 Tbsp. unsalted butter
  • 50-100g pancetta, diced
  • 1/4 c. chopped walnuts or pecans4 (optional)
  • 1 large or 2 medium leeks, white and light green parts only, sliced
  • 1 onion, chopped
  • 450g cremini mushrooms, sliced
  • 1 Tbsp. chopped fresh tarragon
  • 1/4 c. dry white wine
  • 0-1 tsp. coarse sea salt3
  • 1 tsp. black peppercorns, ground
  • 1/3 c. chopped fresh flat-leaf parsley
  • 4 large eggs
  • 1/2 c. heavy (35%) cream
  • 1 c. whole (3.25%) milk
  • 1 c. chicken stock1
  • 170g gruyere, grated, divided
  • 5 c. chopped stale bread2

Directions

  1. Heat oil and butter over medium heat.
  2. Add pancetta and cook until slightly crisp.
  3. Add leek and onion and cook until softened and lightly brown (~10 minutes).
  4. Add mushrooms, tarragon, wine, salt, and pepper and cook until liquid is gone.
  5. Remove from heat and stir in parsley.
  6. In a bowl, beat eggs with cream, milk, chicken stock, and ~2/3 of the gruyere.
  7. Stir in mushroom-leek mixture and bread chunks.
  8. Let the mixture stand for 20-30 minutes so the bread absorbs most of the liquid.
  9. Grease a 23x33cm (9x13") pan and preheat oven to 180°C (350°F).
  10. Dump the mixture into the prepared pan and top with the remaining cheese.
  11. Bake at 180°C (350°F) for 30-40 minutes.


Variations

Vegetarian Version

Ingredients

  • 2 Tbsp. olive oil
  • 2 Tbsp. unsalted butter
  • 6 Tbsp. chopped pecans5
  • 1 large or 2 medium leeks, white and light green parts only, sliced
  • 1 onion, chopped
  • 450g cremini mushrooms, sliced
  • 1 Tbsp. chopped fresh tarragon
  • 1/4 c. dry white wine
  • 0-1 tsp. coarse sea salt
  • 1 tsp. black peppercorns, ground
  • 1/3 c. chopped fresh flat-leaf parsley
  • 4 large eggs
  • 1/2 c. heavy (35%) cream
  • 1 c. whole (3.25%) milk
  • 1 c. vegetable or mushroom stock
  • 170g gruyere, grated, divided
  • 5 c. chopped stale bread


1 Only just now realized that I completely forgot to add the chicken stock. I thought it seemed a little dry! Oh well... Back
2 The original recipe calls for using fresh bread and baking it in the oven for a few minutes to get it a bit toasty and really dry and thirsty. My bread was already extremely stale, so I didn't bother with this step. If you're using fresh or only slightly stale bread, give it 10-15 minutes in a 350°F oven to get it ready to go before proceeding with the rest of the recipe. Back
3 The original recipe called for 2 tsp. of salt. I thought that sounded like a lot, so I did my usual and halved the salt. I found 1 tsp. to be about right, but I also forgot the chicken stock. If you're using a commercial broth or stock, it will likely already be quite salty. I'd probably leave out the salt entirely if using commercial stock. I might put in 1/2 tsp. if using a relatively lightly salted homemade stock. Back
4 The original recipe didn't call for any nuts and I didn't use any, but I think they'd go really well in this dish. I really liked it as it was, but I think the extra texture and flavour from the nuts would really kick it up a notch. Back
5 I've upped the amount of nuts for the vegetarian version because I think they become more essential when you omit the pancetta. And I think the slightly sweeter pecans will be a better match in this case. Back

Friday 11 February 2022

Pajeori (Korean Scallion Salad)

This makes a tasty garnish/condiment for rice bowls. Drying off the scallions after their ice water bath is a bit of a pain, but otherwise it's very easy. Adjust the gochugaru according to your taste. I made it extra mild to accommodate the Kidlet.

Pajeori

Slightly adapted from Woks of Life

Ingredients

  • 8-10 scallions
  • 1 Tbsp. light soy sauce
  • 1 tsp. sugar
  • 1 tsp. sesame oil
  • 2-4 tsp. gochugaru
  • 1 Tbsp. toasted sesame seeds

Directions

  1. Cut the scallions into 5cm lengths and then jullienne and place immediately into a bowl of ice water.
  2. Let soak in ice bath for 10 minutes.
  3. Remove scallions from ice bath and dry off (either with paper towels or using a salad spinner).
  4. Toss scallions with soy sauce, sugar, sesame oil, gochugaru, and sesame seeds.

Thursday 10 February 2022

Ssamjang (Korean Dipping Sauce)

You can get ready-made ssamjang at many Asian grocery stores, but I didn't have any easily to hand, so this recipe was a life-saver. If you are looking to buy ready-made ssamjang, look for the green tub. (Red tub is gochujang, brown tub is doenjang, green tub and ssamjang.)

Ssamjang

Slightly adapted from Maangchi

Ingredients

  • 1/4 c. doenjang1
  • 1 Tbsp. gochujang
  • 1 scallion, minced
  • 1/4 c. minced onion
  • 1 clove garlic, minced
  • 2 tsp. honey
  • 2 tsp. sesame oil
  • 2 tsp. toasted sesame seeds

Directions

  1. Combine all ingredients and mix well.
  2. Serve as a dipping sauce or topping with rice, veggies, meat, or anything else that strikes your fancy!


1 I didn't have any doenjang on hand and I really didn't want to have to leave the house again today, so I made do with a mix of white miso paste and hoisin sauce. Red miso generally makes a better substitute for doenjang, but I didn't have any of that either. I used 2 Tbsp. of white miso + 2 Tbsp. of hoisin in place of the doenjang. My ssamjang was delicious! Back

Wednesday 9 February 2022

Mayo Ramen

I don't remember much about this one. It was a while ago. It looks tasty?


Mayo Ramen

Aaron & Claire

Ingredients

  • 1 packet ramen
  • 1 tsp oyster sauce
  • 1 tbsp unsalted butter
  • mayo
  • 1 green onion, sliced
  • gochugaru

Directions

  1. Bring water to a boil
  2. Add noodles and flakes; reserve seasoning powder
  3. Once noodles are almost done, drain, reserving ½ C water
  4. Increase heat to high and add oyster sauce and half the seasoning powder
  5. Once liquid is almost gone, add butter and mix well
  6. Top with mayo, green onion, and gochugaru

Tuesday 8 February 2022

Tomato-Egg Ramen

The ramen train has no brakes! Except when we run out of ramen, or I forget the write up the recipes, or we just aren't in the mood for it. But apart from that...

This one is quick and easy and slightly more vegetable-y out of the box than the others thanks to the presence of an entire tomato in it.

Tomato-Egg Ramen

Aaron & Claire

Ingredients

  • 1 packet ramyun
  • 1 tomato, chopped
  • ¼ yellow onion, sliced
  • gochugaru to taste
  • 1 tsp white or cane vinegar
  • 1 green onion, sliced
  •  1 egg, beaten

Directions

  1. Add tomato and onion to the water and bring to a boil.
  2. Add seasoning packet and mash the tomato in the water.
  3. Add noodles, gochugaru, and vinegar.
  4. When noodles are ready, add green onion and pour over egg; do not stir.

Monday 7 February 2022

Mississippi Mud Pie

I've had my eye on this recipe for weeks! First I didn't have all the ingredients, then I didn't have the energy, and then I ended up using up half the ingredients I'd gotten in other recipes. But I finally managed to get both the energy and the ingredients yesterday and decided to give it a go (with the Kidlet's help). She says it's the most delicious thing she's ever tasted. I'm not sure I'd go that far, but it is very good and very chocolate-y.

I did have some issues with the baking times for the brownie layer, but I think that could probably be solved by nudging the oven temperature up a bit. And, other than that, everything worked very well.

Since I've been feeling pretty "low battery" the last few weeks, I decided to simplify my life by buying a ready-made chocolate cookie crumb pie crust. I've included the instructions to make it from scratch below, but I just skipped this step and went straight to preparing the brownie layer. I'm sure a homemade crust would've been even better, but it was still plenty good with a store-bought crust and it made for an easy way to shave a bit of time and effort from the recipe, so I went with that.


Mississippi Mud Pie

Slightly adapted from Cook's Country June/July 2016

Ingredients

Crust

  • 25 chocolate wafer cookies, broken into coarse pieces
  • 4 Tbsp. unsalted butter, melted

Brownie Layer

  • 114g dark chocolate, chopped
  • 3 Tbsp. unsalted butter
  • 3 Tbsp. oil
  • 1 1/2 Tbsp. Dutched cocoa
  • 2/3 c. brown sugar
  • 2 large eggs
  • 2 tsp. vanilla extract
  • 1/8 tsp. coarse sea salt, ground
  • 3 Tbsp. all-purpose flour

Topping

  • 10 chocolate wafer cookies
  • 2 Tbsp. icing (powdered/confectioners') sugar
  • 1 Tbsp. Dutched cocoa
  • 2 Tbsp. unsalted butter, melted

Mousse

  • 170g milk chocolate, chopped
  • 1 c. heavy (35%) cream, chilled
  • 2 Tbsp. Dutched cocoa
  • 2 Tbsp. icing (powdered/confectioners') sugar

Directions

Crust

  1. Preheat oven to 180°C (350°F)1.
  2. Process cookie pieces in food processor until finely ground2.
  3. Add melted butter and pulse until combined.
  4. Press the crumbs firmly into the bottom and up the sides of a 23cm (9") pie plate. (The bottom of a dry measuring cup works well for this.)
  5. Bake until set (~15 minutes).
  6. Transfer to wire rack and set aside.

Brownie Layer

  1. If the oven isn't already hot from baking the pie crust, preheat it to 180°C (350°F).
  2. Combine chocolate, butter, oil, and cocoa and microwave in short bursts, stirring frequently, until melted and well-combined.
  3. In a separate bowl, combine sugar, eggs, vanilla, and salt and mix well with a whisk.
  4. Add chocolate mixture and whisk until combined.
  5. Stir in flour.
  6. Pour brownie mixture into pie crust. (It's okay if the crust is still warm.)
  7. Bake until edges are set and toothpick/cake tester comes out with a thin layer of batter when poked into the centre (15-20 minutes).
  8. Transfer to wire rack to cool for 1 hour, then transfer to fridge to chill for another hour.

Topping

  1. Meanwhile, line a baking sheet with parchment paper or a silicone baking mat.
  2. Place cookies in a Ziploc bag and crush them with a rolling pin. Aim for most of the pieces to be around 1cm (1/2") across.
  3. Add sugar and cocoa to the bag and shake it up to mix.
  4. Add the cookie mixture to the melted butter and stir to combine and moisten all the dry ingredients.
  5. Spread cookie mixture onto prepared baking sheet and bake at 180°C (350°F) for 5-10 minutes.
  6. Set aside to cool.

Mousse

  1. Once brownie layer is chilled, melt the chocolate for the mousse. Set aside to cool for ~10 minutes.
  2. Microwave 3 Tbsp. of the cream for ~20 seconds.
  3. Mix the cocoa into the warm cream until smooth and homogeneous.
  4. Stir in sugar and remaining cream.
  5. Whip the cream until soft peaks form.
  6. Once the chocolate has cooled to ~30°C (90°F), mix in ~1/3 of the whipped cream. This is just to loosen the chocolate, so don't worry too much about whether or not the cream gets deflated.
  7. Now that the chocolate has been loosened, you should be able to carefully fold in the remaining cream.
  8. Spoon the mousse over the pie and spread right to the edges.
  9. Sprinkle with the cooled cookie chunk topping.
  10. Cover and chill for at least 3 hours3.
  11. Cut into slices and serve.
  12. Totally optional but very good: Top each slice with a little sweetened whipped cream before serving.


1 The original recipe calls for a 325°F oven, but I found that I had to bake my brownie layer for nearly twice as long as the recipe called for, so I've upped the temperature a bit here in the hopes of coming closer to the recommended baking times. If you find your oven tends to run hot or cold you may need to adjust differently. Back
2 It may also be possible to do this in a blender. I don't know, I didn't try it. I think food processor would probably work better though. If in doubt you can always do what I did and bypass the issue with a pre-made crust. Back
3 We were feeling impatient so we tossed our pie in the freezer to chill. I found that 20 minutes in the freezer was enough to set the mousse firmly enough to be sliceable. Back

Sunday 6 February 2022

Soy Sauce Tteokbokki

I had something else planned for dinner tonight, but then I couldn't get a bunch of the ingredients, so I had to come up with something else. My most recent trip to the Asian grocery store resulted in me coming home with a bag of frozen Korean-style rice cakes, so I decided to try one of Aaron and Claire's tteokbokki recipes. I was going to try to make the "classic" dish with the gochujiang sauce, but the Kidlet wasn't feeling up for anything spicy today, so I opted for this non-spicy soy sauce rendition instead. And then, because I wanted to turn it into a one-pot meal, I upped the protein a little bit and added a bunch of extra veggies.


Soy Sauce Tteokbokki

Adapted from Aaron & Claire

Ingredients

  • 1 1/2 Tbsp. sugar
  • 1/2 Tbsp. light soy sauce (or Korean regular soy sauce)
  • 1 Tbsp. oyster sauce
  • 1/2 Tbsp. mirin
  • 1 clove garlic, minced
  • 1 tsp. sesame oil
  • 2 Tbsp. oil
  • 150g ground beef (or Beyond Meat)
  • pepper, to taste
  • 3 large shiitake mushrooms, chopped
  • 1 carrot, minced
  • 2 green onions, chopped
  • 250g Korean-style rice cakes
  • 1 c. green peas (optional)
  • 2 or 3 baby bok choy, chopped (optional)
  • 1 c. water
  • 1 tsp. dark soy sauce (optional)
  • 1 tsp. sesame seeds

Directions

  1. If you're using frozen tteokbokki, soak them in cold water for ~20 minutes before proceeding with the recipe.
  2. Mix sugar, light soy sauce, oyster sauce, mirin, garlic, and sesame oil in a bowl and set aside.
  3. Heat the oil in a wok over medium heat.
  4. Add the beef and stir-fry. Season to taste with pepper.
  5. Add the mushroom, carrot, green onions, and rice cakes and stir-fry for ~1 minute.
  6. Add the peas and bok choy (if using) and stir-fry for another 30 seconds.
  7. Add the water and sauce, bring to a boil over medium heat, and cook for another 5 minutes, stirring occasionally.
  8. Stir in dark soy sauce for a darker colour if desired.
  9. Garnish with sesame seeds and serve.

Saturday 5 February 2022

Green Onion & Pork Ramen

More ramen recipes. We made this one with soy ramen, but I think it would also be tasty with spicy garlic shin ramen.

I've written it up mostly as originally described, with unseasoned ground pork and a single ramen packet. In practice we made some modifications; lacking ground pork, we used a mix of chinese and spicy italian sausage, and halved the amount of ramen seasoning (since those already contain salt).

 If cooking more than one batch at a time, scale up the water sublinearly -- say, 600mL or so for two ramens.

Green Onion & Pork Ramen

Aaron & Claire

Ingredients

  • 1+2 green onions, chopped and divided
  • 1-2 garlic cloves, thinly sliced
  • 80-100g ground pork1
  • ½ yellow onion, chopped
  • 1 packet ramen
  • cabbage or other greens to taste

Directions

  1. Cook 2 of the green onions and the garlic in a bit of oil until fragrant.
  2. Add yellow onion, pork, and ramen seasoning and stir-fry until delicious.
  3. Add cabbage (if using), ramen vegetable flakes, and ~400mL water and bring to a boil.
  4. Add the noodles and turn/stir as needed until fully cooked.
  5. Garnish with remaining green onion and serve.


1 You can also use cubed or deskinned sausage, but in that case half the amount of ramen seasoning, since it's already seasoned. Back

Friday 4 February 2022

腐皮青菜 (Tofu Skin with Greens)

Okay, so before I get into the actual recipe, a brief musing about text and names. When possible, I really like giving the names of dishes in the original language. For languages that don't use the Roman alphabet I tend to use a Romanized transliteration of the name and then give an English name in brackets afterward. I do this because I can't read or write the original language and often all I have is the Romanized name anyway. However, this breaks down a bit when it comes to Chinese dishes.

I've been learning Mandarin since last summer. Or well... I've been doing the Mandarin lessons on Duolingo since last summer anyway. I know that, while Duolingo is a great for practice, the consensus is that isn't not really the best for actually learning a new language from scratch. But, the point is that I can actually read and write a little Chinese now. And I often do have the name of the dish easily to hand. Great, so I can write it in Hanzi (汉字) and give a parenthetical translation. Except that leaves out the Pinyin (拼音). So now I need three versions of the name. And I've been struggling with a good way to format that. I think for some recipes I've just left out the Pinyin. For others I've worked it into the recipe description. There are probably even a few older posts where I've given Pinyin (or some other Romanized spelling) and English without any Hanzi. But I'd like for all three to be present and prominent. So, I think from now on I'll just put a little name section somewhere in the post to make it easy to see the Hanzi, Pinyin, and English separate from the rest of the text.

Hanzi/汉字:腐皮青菜
Pinyin/拼音:fǔ pí qīng cài
English/英语:Tofu Skin with Greens

腐皮青菜

Slightly adapted from Woks of Life

Ingredients

  • 1 tsp. fresh ginger1, minced
  • 5-6 cloves garlic, minced
  • 3/4 tsp. coarse sea salt
  • 2 tsp. sesame oil
  • 1/2 tsp. sugar
  • 1/4 tsp. white pepper, ground
  • 1/4 c. water, divided
  • 1 tsp. cornstarch
  • 3 Tbsp. oil
  • 350g bok choy, cut into bite-sized pieces
  • ~2 c. chopped fresh tofu skins2 (cut into bite-sized pieces)

Directions

  1. Prep the garlic and ginger and set them aside. If using fresh ginger, keep it separate from the garlic. If using garlic paste, they can be mixed together.
  2. In a small bowl, combine the salt, sesame oil, sugar, and white pepper.
  3. Get 2 Tbsp. of the water ready in a separate bowl.
  4. In a final bowl, combine the remaining 2 Tbsp. of water with the cornstarch.
  5. Preheat the wok over medium-high heat.
  6. Drizzle in the oil.
  7. Once the oil is good and hot add the ginger. Stir-fry the ginger for ~30 seconds, then add the garlic. If using ginger paste, add it and the garlic at the same time.
  8. Stir-fry the garlic for ~10 seconds, then turn the wok up to high and add the bok choy.
  9. Stir-fry the bok choy for ~1 minute, then add the sesame oil mixture.
  10. Stir-fry for another few seconds, then add the 2 Tbsp. of water.
  11. Add the chopped tofu skins on top of the bok choy. DO NOT STIR!
  12. Cover and steam for 1 minute.
  13. Stir the cornstarch mixture and pour it over the stir-fry.
  14. Mix well and serve.


1 I swapped in a generous teaspoon of ginger paste here. Back
2 Or dried tofu skins that have been soaked until softened and briefly boiled/blanched. Back

Thursday 3 February 2022

萝卜丝煎饼 (Shredded Radish Pancakes)

I initially encountered this recipe as "Chinese Turnip Pancakes". This gets a bit confusing. I always thought that Chinese turnip, Chinese radish, and daikon were the same thing. But I've seen a couple sites now that talk about the differences between them or mention how the recipes calls for one, but you can substitute the other. However, a lot of the Chinese turnip dishes that I'm familiar with seem to have "lobok", "luobo", or “萝卜” in the name. All words for radish/daikon. So, I'll admit to still being a little confused about Asian root vegetables. I made these with shredded red daikon. They were delicious. If you find another root vegetable that you think might work, give it a try and see what happens!

Hanzi/汉字:萝卜丝煎饼
Pinyin/拼音:luó bo sī jiān bing
English/英语:Shredded Radish Pancakes


萝卜丝煎饼

From Woks of Life

Ingredients

Sauce

  • 1 Tbsp. light soy sauce
  • 1 Tbsp. water
  • 1 tsp. honey
  • 1 green onion, chopped
  • black vinegar (optional)
  • chili oil (optional)
  • oyster sauce (optional)

Pancakes

  • 1 Chinese sausage (腊肠)1 or 2-3 thick slices bacon, chopped
  • 2 Tbsp. dried shrimp (optional)
  • 1 c. all-purpose flour
  • 1 Tbsp. cornstarch
  • 1 tsp. coarse sea salt, ground
  • 1/8 tsp. white pepper, ground
  • 1 large egg
  • 1 1/4 c. water
  • 1 tsp. sesame oil
  • 1 Tbsp. toasted sesame seeds + extra for cooking
  • 2 scallions, chopped
  • 1 c. shredded2 daikon (Chinese radish/Chinese turnip/萝卜/lobok/luobo)

Directions

Sauce

  1. Combine all sauce ingredients and mix well. If you'd like it spicy, add some chili oil. For sour, use a bit of black vinegar. I added ~1 Tbsp. of oyster sauce to mine just because I like the flavour and think it goes well with daikon.

Pancakes

  1. If using bacon or an uncooked sausage, cook it until done, but not crispy. Some recipes call for stir-frying the scallions and shredded daikon before mixing it into the batter as well. I didn't do this, but feel free to give it a go.
  2. Rinse and chop the shrimp (if using).
  3. Combine the flour, cornstarch, salt, and pepper and mix well.
  4. Add the egg, water, sesame oil, and 1 Tbsp. of sesame seeds and whisk to form a smooth batter.
  5. Stir in the scallions, daikon, sausage (or bacon), and dried shrimp (if using).
  6. Heat a heavy skillet over medium heat.
  7. Pour in a little oil and then sprinkle a few sesame seeds in the middle of the pan.
  8. Pour ~1/4 c. of batter on top of the seeds and spread it thin.
  9. Sprinkle top of pancake with more sesame seeds.
  10. Cook for ~3 minutes.
  11. Flip and cook for 2 more minutes.
  12. Flip and cook for 1 more minute on the first side.
  13. Filp again and cook the second side for another minute.
  14. Repeat cooking procedure for remaining batter.
  15. Cut into wedges and serve with dipping sauce.


1 "Lap cheong" in Cantonese. I had a different kind of Chinese sausage, smaller and sweeter than lap cheong. I used two to make up for the smaller size and cooked them a bit first since they weren't ready-to-eat straight out of the package. Back
2 I shredded my diakon on the large holes of a box grater. This worked fine, but I'd be tempted to try it on the small holes for a finer texture next time. Back

Wednesday 2 February 2022

Vegetable Chow Mein

I was hit by a sudden craving for Chinese food last night. The problem with getting such cravings these days is that I've been spoiled by good home cooking. Ordering Chinese take-away always sounds great in my head. And I know it always used to taste great. But these days I tend to find it a little lacklustre. I mean, all the Americanized deep-fried sugary things are still... well, deep-fried and sugary and that does hold a certain appeal. But anything that doesn't come with a crunchy coating and/or a sticky sauce tends to be a little disappointing to me these days.

So, instead of ordering take-out, I turned to the Woks of Life blog in search of inspiration. I settled on their vegetable lo mein recipe as it looked like it'd be fairly quick and easy to prepare and also had enough veggies that I figured I could turn it into a one-wok meal. I ultimately ended up using dried thin white noodles for this dish. I think that probably technically makes it chow mein rather than lo mein, but I'm not sure.

I was about to say that I'd be tempted to bump up the veggies next time, but I just realized that the reason we had so many noodles for the amount of veg is that I forgot to account for the weight of fresh vs. dried noodles. No wonder it seemed like so many noodles! I guess I should seek out the fresh noodles next time. Whoops!


Vegetable Chow Mein

Slightly adapted from Woks of Life

Ingredients

  • 1-2 cloves garlic, minced
  • 1 scallion, sliced, green and white parts separated
  • 125g mushrooms2, sliced
  • 150g five-spice dry tofu (五香豆腐干), sliced thin
  • 1 bell pepper, julienned
  • 1 carrot, julienned
  • At least 2 c. of other vegetables: snow peas, bean sprouts, napa cabbage, bok choy, choy sum, mustard greens, etc.
  • 1 tsp. sugar
  • 1 tsp. boiling water
  • 1 Tbsp. dark soy sauce
  • 2 Tbsp. light soy sauce
  • 1 tsp. sesame oil
  • 1/8 tsp. five-spice powder
  • 450g fresh white or lo mein noodles1
  • 1 Tbsp. oil
  • 1 Tbsp. shaoxing wine

Directions

  1. Chop all the veggies and tofu and set them aside. The garlic, white parts of the scallion, and mushrooms can all go in the same bowl/buffer. The bell pepper, carrots, and tofu can go together. And any remaining veggies (minus the green parts of the scallion) can go into a third bowl to wait. The green parts of the scallion should be kept separate and used as a garnish at the end.
  2. Dissolve the sugar in the boiling water.
  3. Combine the sugar-water with the soy sauces, sesame oil, and five-spice powder and set aside.
  4. Cook the noodles according to package directions. Drain, rinse with cold water, set aside.
  5. Heat wok over high heat.
  6. Add oil and swirl to coat wok.
  7. Toss in mushroom mixture and stir-fry for a minute or so. Nudge the heat down a little if needed, but the veggies should be cut very thin and the wok should be very hot and everything should cook fast. This is why you prepped everything in advance!
  8. Add the carrot-pepper combo, give it a quick toss and then drizzle in the wine and cook for another minute or so. If the wok seems too dry, toss in some water (or a bit of mushroom soaking liquid if you're using dried mushrooms).
  9. Add the remaining veggies and stir-fry for 30-60 seconds.
  10. Quickly loosen the noodles by running them under some warm water and then toss them into the wok.
  11. Give the sauce mixture a quick stir and pour it in.
  12. Mix and toss the noodles to combine everything and coat them in the sauce.
  13. Top with the green parts of the scallion and serve with hot sauce and/or chili oil.


1 Remember to reduce the quantity of noodles accordingly if starting with dried noodles! Back
2 Cremini, shiitake, oyster, or king oyster. If you don't have any fresh mushrooms, feel free to rehydrate a few dried ones and use them instead. Back

Tuesday 1 February 2022

Seeded Sourdough

I was going to wait until after I'd made this recipe again before I wrote it up. I kind of messed it up this time, so I didn't really feel I could give it a fair review or accurate notes. But I'm not sure when or if I'll get around to making it again, so I decided to just get it out of the way now. With the understanding that the water measurement may be slightly off since I forgot to zero out the scale.

Seeded Sourdough

Slightly adapted from Sourdough Companion

Ingredients

  • 100g (100% hydration) fed/active/ripe sourdough starter
  • 900g hard (strong/high grade/bread) whole wheat flour
  • 50g gluten (vital wheat) flour
  • 50g rye flour
  • 750mL water, divided
  • 20g salt
  • 150-200g seeds1

Directions

  1. First get your starter all ready to go. If it's been in the fridge, feed it a couple times before baking with it. I like to do a 1:1:1 feeding in the morning and then a 1:2:2 feeding in the evening. It's then ready for baking by the following morning.
  2. Mix the flours together.
  3. Make a well in the centre and pour in 700mL of the water.
  4. Mix from the centre outward until all the flour is incorporated.
  5. Cover and let stand for 1 hour.
  6. Add the starter and knead/mix it into the dough.
  7. Boil some water and mix the salt with 50mL of boiling water.
  8. Once the salt has completely dissolved and the water has cooled to warm rather than hot, add it to the dough and work it in.
  9. Add the seeds and work them in as well.
  10. Adjust the consistency of the dough as desired. I found I needed to work in a little more water, but that may have been because I put the wrong amount in to start with.
  11. Cover and let rest for 1 hour.
  12. Stretch and fold the dough. Invert, cover, and let rest for another hour.
  13. Keep folding and resting for 4-6 hours (depending on room temperature).
  14. When dough seems pleasantly lively, divide it into two equal portions and round each one.
  15. Cover and rest for 20-30 minutes.
  16. Shape each ball into a loaf and place in a floured banneton.
  17. Cover and proof in fridge overnight (12-16 hours).
  18. Preheat oven to 230°C (450°F) and boil some water.
  19. Grease a baking sheet and sprinkle with cornmeal.
  20. Turn loaves out onto prepared baking sheet and slash as desired.
  21. Pour some boiling water into a large pan and place it on the bottom oven rack.
  22. Place the bread on the middle rack and bake (with steam) at 230°C (450°F) for ~15 minutes.
  23. Reduce oven temperature to 180°C (350°F) and remove water pan.
  24. Bake at 180°C (350°F) for another 30-40 minutes.
  25. Once loaves are done, turn off the oven but leave the loaves inside for 10 minutes.
  26. Remove from oven and transfer to wire rack to cool.
  27. Cool completely before cutting.


1 For this batch I used 100g millet, 40g sesame seeds, 10g dried onion, and 3g caraway seeds. Sunflower seeds, pumpkin seeds, and flax seeds would also be great choices. Or you could go in more of a spicy-savoury direction and mix in things like coriander, cumin, and red pepper flakes. This bread has a lot of scope for experimentation. Back