Sunday 31 May 2020

Maccheroni alla Salsiccia e Ricotta (Pasta with Sausage and Ricotta)

I'm always happy to return to Hazan's Classic Pasta Cookbook and this recipe is no exception. We find that his recipes are often heavy on the pasta and light on the sauce, while we prefer the opposite (especially when—as is almost always the case—cooking with store-bought dry pasta rather than fresh, home-made noodles), so we increased the pasta amount slightly but doubled the sauce. The result was a hit with everyone.

As written it calls for maccheroni. We made it with a mix of cavatappi and whole-wheat fusilli; I suspect it would work well with any reasonably compact, high surface area pasta.

We also added some garlic, because who doesn't like garlic? The original recipe doesn't call for any, but...

Maccheroni alla Salsiccia e Ricotta

The Classic Pasta Cookbook p.117

Ingredients

  • 1¼ lb dry pasta
  • 4 tbsp butter
  • 1 large yellow onion, finely chopped
  • 3 garlic cloves, minced
  • 1 lb mild Italian pork sausage, crumbled
  • 3 C tinned whole peeled tomatoes, in their juice, coarsely chopped
  • 1 C whole-milk ricotta
  • 4 tbsp freshly torn basil
  • ½ C freshly grated parmesan

Directions

  1. In the background, cook the pasta al dente.
  2. Melt the butter in a dutch oven over medium-high heat.
  3. Add onion and cook until it softens and turns golden.
  4. Add the garlic and cook until fragrant, 30-60 seconds.
  5. Add the sausage and cook, stirring occasionally, until it has browned lightly.
  6. Stir in the tomatoes, season with salt and pepper, and continue cooking until the tomatoes have reduced and the butter and sausage fat have begun to separate from the sauce.
  7. Reduce heat to medium and stir in the ricotta and basil.
  8. Remove from the heat and add the pasta and parmesan. Mix together and serve.

Friands

The Lancaster tart I made yesterday used up a bunch of the leftover lemon curd I had stashed in the fridge, but left me with even more extraneous egg whites. I already had three left over from last weekend's baking exploits and the tart produced two more! I considered making an angel food cake, but in the end decided to flip through Edmonds since I know there are a few recipes in there that make use of egg whites. I love angel food cake, but I wanted to try something I hadn't done before.

Edmonds has a recipe for friands that calls for five egg whites -- perfect! -- plus a bunch of ground almonds and lemon zest and I kind of liked the idea of sticking with lemon-almond theme this weekend. If you're not on a lemon kick, the lemon zest can be swapped out for vanilla extract. Different flavour, but just as tasty.

These little almond cakes were apparently originally baked in small rectangular tins. Muffin tins work just fine if you don't have anything like that though.


Friands

Slightly adapted from Edmonds Cookery Book

Ingredients

  • 1/3 c. soft (plain/standard/pastry) flour
  • 1/2 tsp. baking powder
  • 1 c. icing (powdered/confectioners') sugar
  • 1 1/2 c. ground almonds
  • 1/4 tsp. coarse sea salt1, ground
  • 5 egg whites
  • 170g unsalted butter, melted
  • 2 tsp. lemon zest or 1 tsp. vanilla extract
  • sliced almonds, to decorate

Directions

  1. Grease and flour a friand or muffin tin and preheat oven to 180°C (350°F).
  2. Sift together flour, baking powder, and icing sugar.
  3. Add ground almonds and salt and mix well, preferably with your fingers, breaking up any lumps.
  4. In a separate bowl, beat egg whites until frothy and foamy all the way through, but not yet stiff.
  5. Gently fold egg whites into dry ingredients.
  6. Mix in butter and lemon zest/vanilla extract.
  7. Spoon batter into prepared tin and decorate tops with almond slices.
  8. Bake at 180°C (350°F) for 20 minutes.
  9. Remove from tin and place on wire rack to cool.


Variations

Gluten-Free

This recipe is pretty ideal for conversion to gluten-free baking as it only using a very small amount of flour to begin with and the flour it does use is low-protein/gluten. The recipe as published in Edmonds actually calls for gluten free flour. I just used regular soft/pastry flour as that's what I had on hand and no one in this household is actually gluten-intolerant. Swapping the gluten-free flour back in again makes for an easy gluten-free treat.

Ingredients

  • 1/3 c. gluten-free plain or all-purpose flour
  • 1/2 tsp. baking powder
  • 1 c. icing (powdered/confectioners') sugar
  • 1 1/2 c. ground almonds
  • 1/4 tsp. coarse sea salt1, ground
  • 5 egg whites
  • 170g unsalted butter, melted
  • 2 tsp. lemon zest or 1 tsp. vanilla extract
  • sliced almonds, to decorate


1 The original recipe doesn't call for any salt, but also doesn't specify unsalted butter. The default in NZ is generally understood to be salted butter. Since I was using unsalted butter, I added a small amount of salt to compensate. Back

Poppy Seed Filling

So, it turns out that you need a dedicated poppy seed grinder to grind poppy seeds. I tried using a blender, both with an without liquids without any luck. Lots of movement inside the blender, but no actual grinding going on. Apparently a coffee/spice grinder works, but my spice grinder can only handle a few tablespoons at a time. Not really practical when you have 250g of poppy seeds to grind! I've been told a meat grinder can be made to work if you use the finest plate and push down very hard. But I don't have one of those either. My grain mill might've worked, but I didn't really want to disassemble it to clean out the wheat and put the steel burrs in. In the end I just ended up using whole poppy seeds. The texture, of course, was different from what poppy seed filling is supposed to be like, but it seemed fine otherwise.

A word of warning: taste your poppy seeds before using them! When you're just scattering a few on the crust of your baked goods it doesn't matter so much. Even mixing a few tablespoons into the batter, the flavour and quality of the seeds doesn't matter that much. When you're making poppy seed filling though, the quality really matters. If your seeds taste bitter, that will come through strongly in the filling. Taste you seeds first! Make sure you have good ones.

Kolaches: top centre and bottom left with poppy seed filling

Poppy Seed Filling

Slightly adapted from Budapest Cooking Class

Ingredients

  • 125mL milk
  • 100g icing (powdered/confectioners') sugar
  • 250g poppy seeds, ground1
  • 1 tsp. lemon zest
  • 2 Tbsp. raisins (optional)

Directions

  1. Sift icing sugar into milk and bring to a boil.
  2. Remove from heat and stir in ground poppy seeds, lemon zest, and raisins (if using).
  3. Cool completely before using to fill your baked goods.


1 You will need a poppy seed grinder to achieve this. If you don't have one, the filling can be made with whole poppy seeds, but the texture will be quite different. Back

Saturday 30 May 2020

Cashew Tofu

This is presented as a "quick recipe" in Cook's Country, using chicken instead of tofu. I question their definition of quick; the tofu takes longer to prep, but even accounting for that, there's a fair amount of preparation needed before you start the actual cooking part, which does go pretty quickly.

Relative to the original recipe, we bumped up the amount of cashews a bit, and doubled the amount of marinade since the tofu soaks it up much more aggressively than chicken does. The original also includes some ingredients that are substitutions for shaoxing wine and black vinegar; since we have both on hand, we de-substituted them.

It goes well with sesame-ginger bok choi.

Cashew Tofu

Cook's Country

Ingredients

  • 1½ lbs extra firm tofu, frozen, thawed, pressed, and drained
  • 4 tbsp cornstarch
  • 2 tbsp shaoxing wine
  • 2 tsp toasted sesame oil
  • 3+2 tbsp light soy sauce
  • 1+1 tbsp dark soy sauce
  • ⅓ C hoisin sauce
  • ½ C water
  • 1 tbsp black vinegar
  • 3 tbsp corn oil
  • 1½ C raw cashews
  • 2-3 celery ribs, sliced on bias ¼" thick
  • 6 scallions, white parts sliced thin, green parts cut into 1" pieces
  • 2 garlic cloves, minced
  • 1 tsp ginger paste
  • ½ tsp red pepper flakes

Directions

  1. Slice the tofu into ½" pieces.
  2. Whisk together cornstarch, shaoxing wine, sesame oil, 3 tbsp light soy, and 1 tbsp dark soy. Toss with tofu and set aside as the tofu absorbs the marinade.
  3. Whisk together remaining 2 tbsp light and 1 tbsp dark soy, hoisin sauce, water, and black vinegar.
  4. Heat oil in a large skillet over medium heat. Add cashews and cook, stirring constantly, until rich golden brown, 4-6 minutes (10+ if cooking from frozen). Remove cashews with a slotted spoon and set aside; retain oil.
  5. Add tofu and cook, stirring frequently, until brown and starting to crisp, 5-10 minutes.
  6. Add celery, scallion whites, garlic, ginger, and pepper flakes and cook until celery begins to soften, ~2 minutes.
  7. Add hoisin mixture, bring to a boil, and simmer until sauce thickens, another 2-4 minutes.
  8. Remove from heat and stir in scallion greens and cashews.

Lancaster Tart

I had some lemon filling/curd left over after making my kolaches last weekend. I also had some frozen pastry kicking around the chest freezer that wanted to be used. It wasn't the "rich sweet shortcrust pastry" called for by the recipe, but I'm not really bothered by that. I don't generally find sweet shortcrust worth the extra effort. (And neither does anyone else if North American recipes and grocery stores are anything to judge by. Recipes here don't tend to call for sweet shortcrust and grocery stores don't sell it. I could make it from scratch and I have done before but, as noted, I don't generally feel it's worth it. It doesn't make that much of a difference and it's a lot harder to handle than standard pie pastry.)

With the pastry and the lemon curd already sorted, this pie was pretty easy to throw together. The author calls it a cousin of the Bakewell Tart, and I can definitely see the family resemblance. The jam has been replaced with lemon curd over which a lemon-almond custard is poured. It doesn't have as strong an almond flavour as a standard Bakewell tart, but I enjoy the burst of lemon you get in its place. TF and the Kidlet both loved it as well.

The original recipe is written for a shallow 23cm (9") tart tin. I absent-mindedly grabbed my 9" American-style pie plate which is much deeper than the shallow tin called for. I ended up doubling the amount of lemon curd called for (1/2 c. rather than 1/4 c.) and used an extra tablespoon of brown sugar over it (2 Tbsp. vs. 1), but left the amount of almond custard the same. I'm happy with the results this gave me. You may want to adjust the proportions if you're using a different sized tin though.

Lancaster Tart, assembled and decorated by the Kidlet

Lancaster Tart

Slightly adapted form the Book of Old Tarts by Elizabeth Hodder

Ingredients

  • 175g of sweet shortcrust pastry
  • 1/2 c. lemon curd
  • 2 Tbsp. brown sugar
  • zest of 2 lemons
  • 115g unsalted butter, softened
  • 150mL heavy (35%) cream
  • 55g ground almonds
  • 115g sugar
  • 2 large egg yolks
  • 1 large egg

Directions

  1. Blind bake your pie crust according to your favourite method.
  2. Preheat oven to 170°C (325°F).
  3. Spread the lemon curd in the bottom of the baked pie shell.
  4. Sprinkle with brown sugar.
  5. Combine lemon zest, butter, cream, almonds, sugar, egg yolks, and egg and mix very well. (I used an immersion blender.)
  6. Pour almond mixture into the pie shell and smooth the top.
  7. Decorate with sliced almonds and/or any extra bits of pastry.
  8. Bake at 170°C (325°F) for 40-50 minutes.
  9. Warm with extra lemon curd and/or whipped cream.

Sesame-Ginger Bok Choy

If I'd been thinking clearly, I would've cooked up some bok choy to go with last night's cashew tofu. I was not very awake yesterday though, so I didn't think of it 'til dinner was just about to be served. I did up the bok choy this morning so that it could be served with the leftovers for lunch today. I think it makes a nice combo. Especially since the tofu is decidedly lacking in the vegetable department.

Sesame-Ginger Bok Choy and Cashew Tofu over brown rice

Sesame-Ginger Bok Choy

Slightly adapted from Spend with Pennies

Ingredients

  • 6-8 heads baby bok choy
  • 1 tsp. sesame oil
  • 2 tsp. light soy sauce
  • 1 tsp. dark soy sauce
  • 1 tsp. shaoxing wine
  • 1 Tbsp. water
  • 1/4 tsp. chili flakes
  • 1 Tbsp. canola (or other neutral) oil
  • 2 cloves garlic, minced
  • 1 tsp. fresh ginger, minced

Directions

  1. Rinse the bok choy very well.
  2. Separate the stems from the leaves. Roughly chop both keeping them separate.
  3. Combine sesame oil, soy sauces, wine, water, and chili flakes and set aside.
  4. Heat canola oil over medium heat.
  5. Add garlic and ginger and cook for 1-2 minutes.
  6. Add bok choy stems and cook for another 3-4 minutes.
  7. Add sauce and leaves and cook for 2 minutes more.

Wednesday 27 May 2020

Ranch Quick Bread

The hot humid weather has arrived. It's 28°C right now. Yesterday it was 30! I still have a bunch of baking that I'd like to do. But I don't want to heat up the house by keeping turning the oven on. So I decided to look into the possibility of doing my baking on the barbecue. It's a little harder to precisely control the temperature, sure. No thermostat or anything, so you've gotta keep an eye on the thermometer and adjust the flame manually, but it seemed like it should be possible.

I did a bit of rummaging around online and it looks like the general consensus is to use indirect heat and open the lid as little as possible. I found one source that recommended trying to get the grill ~25°F hotter than you'd normally bake it in the oven since you'd be losing a lot of heat from opening the lid and it wouldn't be as easy to recoup the losses on the barbecue. I found another source that recommended dramatically reducing the baking time since the barbecue creates more bottom heat and more convection than a standard oven. I think a lot of it is going to have to do with your specific barbecue, your technique/accuracy, and the recipe you're trying to make. My quick bread took ~10 minutes longer than specified for the oven recipe, but I've never actually tried cooking it in the oven to see how closely the bake time aligns with the recipe. In addition, I didn't exactly have a stable temperature for this bake. I think it probably averaged out to about the right spot -- assuming my grill thermometer is at all accurate, which it might not be -- but it started out quite hot and then dropped a bit too cool toward the middle of the bake before inching back up to somewhere in and around 350°F for the rest of the bake. The bread came out alright though, so I'm not complaining!

I think, with a little more practice, I could probably get the flame settings dialed in to get a more steady temperature and a consistent bake. And I'm certainly happy with this as a first attempt! It's baked through and tasty. Not burnt on the outside, not raw on the inside. To look at it, you wouldn't know it wasn't baked in a standard oven. I think this barbecue baking thing has promise!


Ranch Quick Bread

Slightly adapted from The Kitchn

Ingredients

  • 3 c. all-purpose flour
  • 2 tsp. baking powder
  • 1/2 tsp. baking soda
  • 1 tsp. onion powder
  • 1 tsp. garlic powder
  • 3/4 tsp. coarse sea salt, ground
  • 1/2 tsp. black peppercorns, ground
  • 2 large eggs
  • 1 c. buttermilk
  • 1/4 c. unsalted butter, melted
  • 1/4 c. chopped fresh dill
  • 1/4 c. chopped fresh chives
  • 1 c. cottage cheese

Directions

  1. Grease and flour a 23x13cm (9x5") loaf pan.
  2. Whisk together flour, baking powder, baking soda, onion powder, garlic powder, salt, and pepper.
  3. In a separate bowl, combine eggs, buttermilk, butter, dill, and chives.
  4. Stir cottage cheese into egg mixture.
  5. Pour wet ingredients into dry and stir to combine.
  6. Dump batter (which will be quite stiff) into prepared pan. Press into corners and smooth the top.
  7. Bake at 180°C (350°F) for 40-60 minutes. For barbecue baking, set up your grill for indirect heat and adjust the flames/coals to achieve the desired temperature. Setting the left and right flames to "low" and turning the middle off worked well for me.
  8. Let cool in pan for ~15 minutes.
  9. Run a knife or spatula around the edge of the pan and turn the loaf out onto a wire rack to cool.

Tuesday 26 May 2020

Extra Soft Dinner Rolls

With eggs, honey, dairy, plenty of butter, and a measure of soft flour included in the dough, these rolls are incredibly tender and high rising. I did find them somewhat lacking in structural integrity. They were very tender, but also a bit crumbly. Of course, that could be because I overproofed them slightly. I was trying to give them a very full proof and overshot the mark slightly. Only by about 5 or 10 minutes by the look of it, but enough that they sank a bit in the oven and the gluten had broken down a bit. I'll be sure to get them in the oven promptly next time.

Extra Soft Dinner Rolls

From the Laurel's Kitchen Bread Book

Ingredients

  • 2 tsp. active dry yeast
  • 1 c. warm water
  • 3 Tbsp. honey
  • 1 c. buttermilk
  • 1 large egg
  • 750g hard (strong/bread/high grade) whole wheat flour
  • 150g soft (plain/pastry/standard) whole wheat flour
  • 2 tsp. coarse sea salt
  • 1/4 c. unsalted butter

Directions

  1. Dissolve the yeast in the warm water and set aside for ~10 minutes.
  2. Dissolve the honey in the buttermilk and mix in the egg.
  3. Combine the flours and salt and mix thoroughly.
  4. Make a well in the centre of the dry ingredients and pour in the yeast mixture.
  5. Mix a bit of the flour into the liquids in the centre to form a loose batter.
  6. Pour the buttermilk mixture into the batter in the centre of the bowl.
  7. Gradually mix flour into liquids working from the centre outward.
  8. Once most of the flour has been incorporated, turn the dough and any remaining flour out onto the work surface and begin kneading.
  9. Knead for at least 12 minutes, working in a bit more water or flour as needed. (Err toward a softer, looser dough.)
  10. Begin working in the butter by smearing it on the work surface and kneading the dough on top of it until the butter has been incorporated.
  11. Once all the butter has been worked in and the dough is thoroughly kneaded and very supple, shape it into a ball and place in a covered bowl to rise.
  12. Allow to rise until 1cm deep fingerprint (made with a wet finger) no longer fills in (1-2 hours).
  13. Knock back, reshape into a ball, and return to covered bowl to rise again.
  14. Allow to rise the same as before, until finger print is no longer returned. The second rise shouldn't take more than an hour.
  15. Knock back dough and divide into four equal portions.
  16. Round each portion and pull the gluten taut across the top. Cover and let rest for at least 10 minutes.
  17. Divide each portion into six equal pieces and round each one.
  18. Place dough balls in a greased 28x40cm (11x16") pan, cover, and set aside to rise.
  19. Allow to rise for 45-60 minutes. Only let them go to 60 minutes if your room is fairly cool (20°C or less).
  20. Bake at 200°C (400°F) for 20 minutes.

Monday 25 May 2020

Sourdough Waffles

There's probably going to be a lot of experimentation with sourdough recipes over the next little while. I've got a nice whole wheat starter that's happily chugging away. For a while I was just sort of rolling it over into each new batch of bread. Just toss in the starter and leave out the yeast and let it do its thing. Pinch off a bit of the dough and mix it with water to become the starter for next time. And that method does work just fine. The problem is that sometimes it gets hungry before I want to make bread again. Or sometimes I want to make a bread that really does want fresh yeast without that sourdough tang. That's fine, but I can't just ignore the starter in the meantime.

I suppose I could just feed it without baking anything, but the jar isn't really big enough for that. And even if I did move it into a larger container, that'll only buy me another week or two before I'm out of space again and facing the same problem. This is where discards come in. You toss out enough starter to give you room to feed it (and room for it to expand afterward). Except I hate just tossing all that starter into the compost. Especially when I've been grinding most of the flour by hand. So I've been experimenting with various non-bread sourdough recipes. Some of these are specifically discard recipes, which is great, because you can just toss a bunch of unfed starter in and then feed the remainder to keep it nice and healthy and active. Others are recipes that require fed starter. This is a little trickier in that you'll still need space to feed the starter and let it expand afterward, same as you would do with bread. But it's still a nice option for using up a bit of starter in a way that doesn't involve bread.

These sourdough waffles are interesting. They mostly follow the pattern for a standard yeasted overnight waffle, but a few of the ingredients are left out of the batter until the next morning. The eggs, butter, salt, and baking soda are left out until just before the waffles are cooked. I assume this is due to the batter being fermented at room temperature rather than in the fridge like other yeasted waffles I've seen. My guess is that the warmer fermentation is to compensate for the fact that you're using discard rather than fed and fully activated starter. The warmer temperature will give the yeast a bit of a boost and let it get going even though the starter is a bit sluggish going in.

I was surprised to find so much buttermilk in a sourdough recipe. The starter is already acidic, so adding a large quantity of another acidic ingredient was surprising. The rationale for using buttermilk is that you don't have to worry about it going off while sitting out overnight since it's already got active bacteria cultures in it. It'll get more sour overnight, but it won't go "off".

These waffles didn't come out quite as light and crispy as the (non-sourdough) overnight yeasted waffles I tried out a couple weeks ago, but they were still pleasingly light and crisp. I did find them quite sour though. TF said they weren't overly sour, but I think I would've preferred them a bit less so. I'd be inclined to swap out the buttermilk for milk next time and let it ferment in the fridge instead of on the counter. They're still tasty waffles and I'll definitely try them again in the future. It'll be interesting to see how the cooler, less fermented batter fares in the flavour department.

Sourdough Waffles

Adapted from King Arthur

Ingredients

  • 1/4 c. unsalted butter, cut into 4 pieces
  • 2 c. milk
  • 2 c. all-purpose flour
  • 2 Tbsp. sugar
  • 225g unfed sourdough starter (100% hydration)
  • 2 large eggs
  • 1/2 tsp. coarse sea salt, ground
  • 1 tsp. baking soda

Directions

  1. Add butter to milk and heat gently until butter is melted and milk is warm. Set aside.
  2. Whisk sugar into flour.
  3. Whisk eggs into warm milk mixture.
  4. Whisk starter and milk mixture into flour mixture.
  5. Cover and set in the fridge to ferment for 12-24 hours.
  6. Preheat your waffle iron.
  7. In the morning, sprinkle the salt and baking soda over the surface of the batter and whisk it in.
  8. Pour some batter into the waffle iron, close, and cook until golden and crispy.
  9. Remove waffle from iron and repeat with remaining batter.
  10. Serve with maple syrup, icing sugar, whipped cream, fresh fruit, nut butter, and/or jam.

Sunday 24 May 2020

Kolaches

TM ended up with too many poppy seeds and gave us nearly half a kilo of them. I wasn't sure what to do with that many poppy seeds except make poppy seed filling. Originally I was thinking of making beigli (kind of like a poppy seed-filled yeasted jelly roll), but then I found this recipe for kolaches and couldn't resist giving it a try. They came out beautifully! I'm really pleased with them. Although I did accidentally make 4 times as much blueberry filling as I'd intended. Whoops!

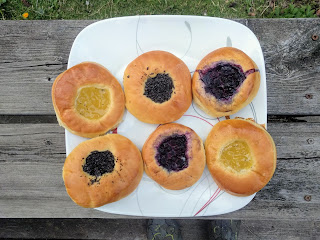
Lemon, poppy seed, and blueberry filled kolaches.

Kolaches

From Taste of Home

Ingredients

  • 2 c. milk, warmed to ~40°C
  • 1/2 c. sugar, divided
  • 4 tsp. active dry yeast
  • 820g all-purpose flour, divided
  • 1 tsp. coarse sea salt
  • 4 large egg yolks
  • 1/4 c. butter, softened
  • 2 c. filling of choice
  • 1 large egg white

Directions

  1. Stir 1 Tbsp. of the sugar into the warm milk.
  2. Dissolve yeast in milk and set aside for ~10 minutes.
  3. Combine ~300g of the flour with the salt and remaining sugar.
  4. Mix in the egg yolks, butter, and yeast-milk mixture.
  5. Once thoroughly combined, gradually mix in remaining flour1.
  6. Knead for 6-8 minutes2.
  7. Shape dough into a ball and place smooth side down in a large greased bowl. Flip it greased side up. Cover the bowl and set it to rise. Rise is finished when dough no longer returns wet fingerprint. This took ~1 hour for me.
  8. Knock dough back, shape into a ball, and return to covered bowl to rise again. Second rise took ~45 minutes for me.
  9. Knock the dough back again. Unless you have a very large surface to work with and will be able to bake all the kolaches at once, divide the dough into two equal portions. Shape one into a ball, return it to its covered bowl, and place in the fridge to slow it down a bit while you shape and bake the others.
  10. Roll the remaining dough out to a thickness of 12 or 13mm.
  11. Use a 5cm round cutter3 to cut out circles of dough and place them on a greased pan. Cover and set to rise for 20-30 minutes. (Exact time will vary depending on the temperature of the room.)
  12. Once rounds are fully risen, press down firmly in the centre making a depression ~2.5cm across.
  13. Fill depression with filling.
  14. Brush tops of dough with egg white.
  15. Bake at 180°C (350°F) for 10-15 minutes.
  16. Place kolaches on wire rack to cool.
  17. Remove the remaining dough from the fridge and roll it out and cut it as with previous portion. Cover, allow to rise, fill, glaze, and bake as before.
  18. Collect any scraps of dough, knead them together and roll them out to make the last batch of kolaches.


1 The original recipe calls for using this mixing procedure. They also give a range for the flour (~800-875g) and mixing in as much of the remaining flour as needed to make a "stiff dough". My instincts for an enriched dough like this was that it should be a very soft dough. I used 820g of flour. This initially made a very soft sticky dough. I resisted the urge to add more flour, and by the time it was kneaded, it had come together into a beautifully silky and elastic delight. Recipes that give ranges of flour like that and ask you to add it before kneading make me nervous. Knead it at least partway first, then adjust with more flour our water as needed. And, with very few exceptions (bagels and pretzels being notable ones), it's usually better to err toward too wet over too dry.
Given how I prefer to mix my dough and how this recipe came out, I'd be inclined to skip dividing the flour in the future. Just mix the sugar and salt into the full measure of flour, make a well in the centre, mix it to a batter consistency, and then gradually incorporate the rest of the flour into the liquids working from the centre outward. Knead it for a few minutes, evaluate whether it needs to be adjusted, finish kneading and off you go! Back
2 Normally bread would need to be kneaded for much longer, but the all-purpose flour has a lower gluten content than hard/strong/bread flour. I found 8 minutes seemed just about right for my dough. Back
3 I tried a variety of sizes (as you may be able to tell from the photo). After experimenting with sizes ranging from 5cm to ~7.5cm in diameter, I decided that I liked the smallest ones the best. Back

Petaluma Rye

I abused this recipe quite a bit. First I halved it. Then I converted it to use sourdough starter. And then I converted that to a sponge method. I think it's gonna be okay in the end but it was touch-and-go for a while. I was going for a very stiff sponge since I wanted to do a long room temperature ferment. I think I may have made it a bit too stiff though. I also didn't properly feed and activate my starter before using it. (I've been a bit stingy on my feedings and the starter is a bit more sluggish than it probably should be.) This all contributed to a very, very slow rise. The sponge hardly did anything overnight and the full dough, once it was mixed and kneaded, took ~9 hours to complete its first rise!

I think next time I'd try making the sponge a little wetter. If I'm still not happy with the results I get from that, I'll see if adding a bit of fresh yeast when mixing up the full dough improves matters. If nothing else, it should help speed up the rise (which is mostly what I'm after here). I think I probably also should've swapped the buttermilk out for milk since the starter is already lowering the pH. Leaving out the lemon juice might've been a good idea as well.

What follows is not what I did this time, but rather my notes-to-myself ideas for what I'd like to try next time.

Petaluma Rye

Adapted from the Laurel's Kitchen Bread Book

Ingredients

Sponge

  • 100g hard (bread/strong/high grade) whole wheat flour
  • 1 tsp. coarse sea salt
  • 6 Tbsp. water
  • 1 Tbsp. honey
  • 1 c. sourdough starter (100% hydration)

Full Dough

  • 1/2 c. + 2 Tbsp. milk
  • 1 Tbsp. lemon juice
  • 1 Tbsp. oil
  • 175g hard (bread/strong/high grade) whole wheat flour
  • 65g rye flour
  • 1/2 Tbsp. caraway seeds

Directions

Sponge

  1. Combine the flour and salt.
  2. Dissolve the honey in the water.
  3. Make a well in the centre of the flour and pour in the starter and the honey-water.
  4. Mix to form a stiff dough.
  5. Cover and let sit at room temperature for 18 hours.

Dough

  1. Combine the lemon juice and oil with the milk.
  2. Combine both flours and the caraway seeds.
  3. Add milk mixture to sponge and squish and squeeze until it's thoroughly mixed.
  4. Make a well in the centre of the flour mixture and pour in the sponge mixture.
  5. Mix, working from the centre outward.
  6. Once most of the flour has been incorporated, turn the dough out onto a work surface and begin kneading.
  7. Knead for ~10 minutes.
  8. Shape into a ball and place in a covered bowl to rise.
  9. Once dough no longer returns a wet fingerprint, knock it back.
  10. Shape into a ball and return to bowl to rise again.
  11. Knock back again, shape into a ball, and pull gluten taut across the top surface.
  12. Cover and let rest for 10 minutes.
  13. Shape into a loaf by pressing flat, folding into thirds, and rolling up.
  14. Place in a greased loaf pan, cover, and set to rise for ~45 minutes.
  15. Bake at 180°C (350°F) for 45 minutes.

Saturday 23 May 2020

Korean-style Sloppy Joes with Kimchi Slaw

This Cook's Country recipe card delivers on being quick and easy to put together; it took me a while to put together because I was chopping up stewing meat rather than using ground beef, but using ground beef it would come together extremely quickly! The only change in this recipe relative to the original is that it calls for frying an onion in the pan along with the beef.


Korean-style Sloppy Joes with Kimchi Slaw

Cook's Country

Ingredients

  • 1 C kimchi, chopped
  • ¼ C mayo
  • ½+¼ tsp ground pepper
  • ½ C ketchup
  • 3 tbsp soy sauce
  • 2 tbsp toasted sesame oil
  • 1 tbsp packed brown sugar
  • 4 cloves of garlic, minced
  • 1 lb ground beef or finely chopped stewing beef
  • 1 large onion, chopped
  • 4 burger buns

Directions

  1. Combine kimchi, mayo, and ¼ tsp pepper in a medium-sized bowl.
  2. Combine ketchup, sesam oil, soy sauce, and garlic in a small bowl.
  3. Heat a pan over medium heat. Add a bit of oil and sautee the onion until it starts to soften and turn translucent.
  4. Add the beef and the remaining pepper. Cook until the beef is just browned.
  5. Add the sauce and cook until it thickens.
  6. Top each bun with saucy beef, then kimchi mix. Eat.

Split Pea Soup with Indian Flavours

This split pea soup recipe comes from the "contemporary curries" chapter of Raghavan Iyer's 660 Curries. The recipes in this section include fusion dishes from various regions -- Anglo-Indian mulligatawny, Indo-Chinese Hakka noodles, etc. -- as well as many of Iyer's own unique creations. This soup appears to be one of the latter.

I enjoyed this soup served over some leftover gatte ki tehri. It went with the dumplings particularly well. That said, I think I'd probably tweak it's not one of my favourites and I think I'd probably tweak it a bit next time. I'd like to try substituting flavourful ghee for the more neutral canola oil. I'd I think it'd also be interesting to swap out the dairy tang of yogurt with the citrus tang of lime + a bit of coconut milk. Hmm... or maybe even just leave out the dairy/coconut milk altogether and add a swirl of yogurt on top of each serving... That could be nice! I'd also be tempted to toss a few more veggies in with the peas. And to chop the tomato smaller and forgo the puréeing step at the end. I know that's a lot of changes. It's basically a whole different soup at that point. But sometimes that's what cooking is all about. Sometimes you find a recipe you really like, sometimes it's a flop, and sometimes you find something that has the potential to become something you really like.

Indian Split Pea Soup

Adapted from 660 Curries by Raghavan Iyer

Ingredients

  • 2 Tbsp. canola oil
  • 1 carrot, chopped
  • 3 ribs celery, chopped
  • 2 onions, 1 chopped, 1 halved and sliced thin
  • 5 cloves garlic, minced
  • 3/4 tsp. coarse sea salt, divided
  • 1/4 tsp. black peppercorns
  • 1 c. yellow split peas (chana dal), rinsed and picked over
  • 4 1/2 c. water, divided
  • 2 Tbsp. ghee
  • 1 tsp. cumin seeds
  • 2 (5cm x 2.5cm x 3mm) pieces of fresh ginger, chopped
  • 2 fresh green Thai or cayenne chilies, chopped
  • 1/2 tsp. ground turmeric
  • 1 large tomato, chopped
  • juice of 1 lime

To Serve

  • 1/2 c. plain yogurt
  • 2 Tbsp. chopped fresh cilantro
  • 6 Papads, toasted and crushed
  • 1/4 c. Fried Onion

Directions

  1. Heat the oil over medium heat.
  2. Add the carrot, celery, chopped onion, and garlic and cook until softened (~5 minutes).
  3. Add 1/4 tsp. of salt as well as the pepper and split peas.
  4. Add 4 c. of water and bring to a boil.
  5. Skim off any foam, reduce heat, cook, covered, stirring occasionally for 25 minutes.
  6. Meanwhile heat ghee over medium-high heat.
  7. Add cumin seeds and sizzle for 15-20 seconds.
  8. Add sliced onion, ginger, and chilies and stir-fry for ~5 minutes.
  9. Reduce heat to medium and cook for another 5 minutes.
  10. Add turmeric, tomato, remaining 1/2 c. of water, and remaining 1/2 tsp. of salt.
  11. Cook, uncovered, stirring occasionally, until tomato is cooked and sauce-like (~5 minutes).
  12. Add the tomato mixture to the peas and cook, partially covered, stirring occasionally, for another 15-20 minutes.
  13. Remove from heat and stir in lime juice.
  14. Serve topped with yogurt, cilantro, crushed papads, and fried onion.

Friday 22 May 2020

Sourdough Onion Fritters

The sourdough starter was threatening to climb right out of its jar after I fed it today. I'd already mixed up an overnight waffle sponge from the discard and it was getting pretty late in the day. I needed something that would use up starter and could be whipped up quickly. Something that wasn't bread or cookies or pancakes. This fritter recipe was exactly what the occasion called for.

TF and the Kidlet loved these fritters. I did too, but I think I would've liked them even more if they'd been a little less greasy. They soaked up a lot of oil during cooking. They also stuck like the Dickens! I'm not sure why they stuck so badly. There was lots of oil in the pan and it seemed to be a good temperature, but they were an absolute nightmare to try to pry off the pan and flip. On the bright side, the batter is incredibly easy to mix up. You can have these fritters mixed up and ready to go in the pan in five minutes!

I'm still going to explore other uses for sourdough starter, but this is a good one to keep in my back pocket.


Sourdough Onion Fritters

Slightly adapted from Cultures for Health

Ingredients

  • 3/4 c. sourdough starter (100% hydration or more)
  • 1/2 Tbsp. cornmeal
  • 1/2 Tbsp. sugar
  • 1/2 tsp. coarse sea salt, ground
  • 1/4 tsp. baking soda
  • 1/2 tsp. baking powder
  • 1 onion, chopped
  • fat for frying

Directions

  1. Whisk cornmeal, sugar, and salt into starter. Add a little more water if the batter seems too thick.
  2. Sprinkle baking powder and baking soda over the batter and whisk it in.
  3. Stir in onion.
  4. Heat oil (which should be 1-2cm deep) over medium heat.
  5. Drop spoonfuls of onion-studded batter into the hot oil.
  6. Once the bottoms have browned, flip them over and cook the other side. (Flipping may take some doing. They tend to stick.)
  7. Remove from oil and set on a paper towel-lined plate to drain.

Sourdough Chocolate Chip Cookies

Yeasted cakes are nothing new. Yeasts were the only leavening agent available for centuries. Baking soda is a relatively modern innovation. So, when looking for ideas on what to do with sourdough starter, I was unsurprised to see lots of recipes for cakes, biscuits, waffles, pancakes and, of course, breads. What I was not expecting to see was cookies! I've never heard of yeasted cookies before, let alone long-fremented sourdough cookies! This is something a bit different for sure. I can't wait to see how they come out.


Sourdough Chocolate Chip Cookies

Slightly adapted from Deliciously Organic

Ingredients

  • 1 c. unsalted butter, softened
  • 3/4 c. sugar
  • 1/2 c. brown sugar
  • 1/2 c. (~100g) fed sourdough starter
  • 2 tsp. vanilla extract
  • 1 large egg
  • 2 c. all-purpose flour
  • 100g oat flour
  • 1/2 tsp. baking powder
  • 1/2 tsp. baking soda
  • 1/4 tsp. coarse sea salt, ground
  • 200g dark chocolate, coarsely chopped or chocolate chips

Directions

  1. Cream butter with sugars and beat until light and fluffy.
  2. Mix in starter, vanilla, and egg.
  3. In a separate bowl combine flours, baking powder, baking soda, and salt.
  4. Mix dry ingredients into wet.
  5. Stir in chocolate chips.
  6. Cover and place in fridge to ferment for 72 hours.
  7. Make little balls of dough (~2 Tbsp. each) and place on a parchment-lined baking sheet.
  8. Flatten the balls slightly.
  9. Bake at 180°C (350°F) for 14-16 minutes.

Update:

I initially did this write-up while the cookie dough was still fermenting in the fridge. I've since had a chance to bake them off and try them. They tasty, but a bit more cake-y than I'd ideally like for a cookie, especially a chocolate chip one. I think next time I'd try swapping the proprotions of brown and granulated sugar, adding an extra egg, and leaving out the baking soda to help remedy this. Melting the butter and skipping the creaming step to avoid adding extra air should also help. And I do wonder how much the oat flour is contributing to the more cake-like texture. I'll leave it alone for now, but if they still come out less chewey than I'd like, I might try adjusting that next. I'd also be tempted to swap out half the all-purpose flour for whole wheat. Not as a texture thing, just to see how it affects the flavour. So, with that in mind, here're my suggestions for chewier sourdough chocolate chip cookies.

Chewier Sourdough Chocolate Chip Cookies

Ingredients

  • 1 c. unsalted butter, melted
  • 3/4 c. brown sugar
  • 1/2 c. sugar
  • 1/2 c. (~100g) fed sourdough starter
  • 2 tsp. vanilla extract
  • 2 large eggs
  • 1 c. all-purpose flour
  • 150g whole wheat flour
  • 100g oat flour
  • 1/2 tsp. baking powder
  • 1/4 tsp. coarse sea salt, ground
  • 200g dark chocolate, coarsely chopped


Thursday 21 May 2020

Mushroom-Topped Veggie Burgers and Sesame Slaw

HelloFresh had some new meals available this week and they sounded pretty appealing, so I ordered a box. The Kidlet saw burgers on the menu and immediately voted for those to be our first meal. I added some cheese and sambal olek to my burger since it seemed a little plain recipe as written. With those simple modifications though, I found this burger extremely tasty. I think a handful of arugula would've been a nice touch, but I was still excellent without it. I just figure adding a bit of extra veg is never a bad idea.


Mushroom-Topped Veggie Burgers and Sesame Slaw

Slightly adapted from HelloFresh

Ingredients

Sesame Slaw

  • 1/4 c. white wine vinegar
  • 2 Tbsp. sesame oil
  • 2 tsp. sugar
  • 1/4 tsp. coarse sea salt, ground
  • 1/4 tsp. black peppercorns, ground
  • 2 Tbsp. sesame seeds
  • 340g cabbage coleslaw mix

Veggie Burgers

  • 1/4 c. mayonnaise
  • 14g cilantro
  • 450g cremini mushrooms
  • 2 Tbsp. light soy sauce
  • 1/2 tsp. black peppercorns, ground
  • 2 1/2 Tbsp. canola (or other neutral) oil, divided
  • 4 Beyond Meat burger patties
  • 4 slices Cheddar cheese
  • 4 burger buns
  • 4 tsp. garlic butter
  • 4 Tbsp. sambal olek

Directions

Sesame Slaw

  1. Vigorously whisk oil into vinegar.
  2. Mix in sugar, salt, pepper, and sesame seeds.
  3. Toss cabbage mixture with dressing and set aside.

Veggie Burgers

  1. Separate cilantro leaves from stems. Set the leaves aside.
  2. Mince cilantro stems and mix them into the mayo and set aside.
  3. Slice the mushrooms thin and toss with soy sauce, pepper, and 2 Tbsp. of the oil.
  4. Place mushrooms on a parchment lined baking sheet and broil until tender (~5 minutes).
  5. Heat remaining 1/2 Tbsp. of oil over medium-high heat.
  6. Add the burger patties and cook until browned (3-4 minutes per side).
  7. Meanwhile, halve the buns, spread with garlic butter, and toast.
  8. Spread bottom buns with cilantro mayo, top with burger patty and cheese, add cilantro leaves on top, spread top bun with sambal olek and place it on top.
  9. Serve burgers with coleslaw.

Wednesday 20 May 2020

Cranberry-Date-Walnut Muffins

My starter was looking hungry and I didn't want to make more bread, so I poked around online for ideas on what I could use up a bit of starter in. I've made sourdough crêpes in the past and, while they were tasty, I wasn't really feeling the crêpes today. And I don't think we would've had enough eggs for it anyway.

There are actually a bunch of non-bread sourdough recipes up on the King Arthur website. I contemplated trying the biscuit recipe, but the Kidlet and I made buttermilk biscuits recently and that felt like too much of a repeat. I'll keep that one in my back pocket for another time. Same with the overnight sourdough waffles/pancakes. There were also some interesting-looking quick breads and muffins. I thought about giving the blueberry muffins or the pumpkin bread a try, but in the end the cranberry-date-walnut muffins were what really sang to me.

Usually I try to go by the book my first time through a recipe. I will admit, I did tweak this one a bit. I cut the sugar way back: 1 1/2 c. of dates and 3/4 c. sugar?! No way! I only put in 1/4 c. of sugar and the resulting muffins were still bordering on cloying. Definitely more dessert than breakfast. I also swapped out the (white) all-purpose flour for whole wheat flour. And, as usual, halved the salt. I'm happy with the muffins, but I'd definitely make even more changes next time: replace half the butter with applesauce, add a bit of cinnamon, replace some of the baking soda with baking powder, add more cranberries, and slightly reduce the baking temperature and extend the bake time. I think I'd probably reduce the sugar even further next time and try swapping in brown sugar in place of the granulated. The recipe below reflects all these changes.


Cranberry-Date-Walnut Muffins

Adapted from King Arthur Flour

Ingredients

  • 1/2 c. water
  • 1 1/2 c. chopped dates
  • 2 Tbsp. brown sugar
  • 1/4 c. unsalted butter
  • 1/4 c. unsweetened applesauce
  • 1 c. fresh or frozen cranberries, halved
  • 1/2 c. chopped walnuts
  • 2 large eggs
  • 1 tsp. vanilla extract
  • 1 c. sourdough starter
  • 150g (hard or soft) whole wheat flour
  • 1 Tbsp. baking powder
  • 1/2 tsp. baking soda
  • 1/4 tsp. coarse sea salt, ground
  • 1/2 tsp. ground cinnamon

Directions

  1. Combine water, dates, sugar, butter, and applesauce and bring to a boil over medium heat, stirring often.
  2. Remove from heat and stir in cranberries, walnuts, eggs, and vanilla.
  3. Stir starter into date mixture.
  4. In a small bowl, sift baking powder, baking soda, salt, and cinnamon into flour and mix well.
  5. Stir flour mixture into date mixture until just combined.
  6. Spoon into greased muffin tins.
  7. Bake at 190°C (375°F) for 22 minutes.
  8. Let cool in tins for 5 minutes.
  9. Remove from muffin tins and set on wire rack to finish cooling.


Variations

Vegan

I suspect this recipe would work particularly well in a vegan version. I think the flax eggs would complement the whole wheat flour and dates quite nicely.

Ingredients

  • 1/2 c. water
  • 1 1/2 c. chopped dates
  • 2 Tbsp. turbinado sugar
  • 1/4 c. coconut oil or vegan butter
  • 1/4 c. unsweetened applesauce
  • 1 c. fresh or frozen cranberries, halved
  • 1/2 c. chopped walnuts
  • 2 Flax Eggs
  • 1 tsp. vanilla extract
  • 1 c. sourdough starter
  • 150g (hard or soft) whole wheat flour
  • 1 Tbsp. baking powder
  • 1/2 tsp. baking soda
  • 1/4 tsp. coarse sea salt, ground
  • 1/2 tsp. ground cinnamon

Tuesday 19 May 2020

Picadillo-Style Beef Chili

This chili recipe looks a bit different than I'm used to: Potato? Olives? No beans? Can you even still call it chili at that point?! And the promise of a 30-minute meal, while tempting, was also a bit worrying to me. I needn't've been concerned though; it was fabulous! I actually really liked both the olives and the potatoes in it. It made for a really satisfying combo. And, with the addition of a salad, you actually have a pretty decent meal!

Picadillo-Style Beef Chili

Slightly adapted from Cook's Country April/May 2020

Ingredients

  • 500g lean ground beef
  • 1/2 tsp. coarse sea salt
  • 1 tsp. black peppercorns, ground
  • 1 onion, chopped
  • 1 chipotle in adobo, chopped
  • 1 1/2 Tbsp. chili powder
  • 3-4 cloves garlic, minced
  • 1 (800mL) can fire-roasted diced tomatoes
  • 2 c. vegetable broth
  • 450g Yukon Gold (or similar) potatoes, cut into 1cm cubes
  • 1/2 c. pimento-stuffed green olives, sliced

Directions

  1. Season beef with salt and pepper and coo over medium-high heat until beginning to brown (8-10 minutes).
  2. Stir in onion, chipotle, chili powder, and garlic and cook until softened (2-3 minutes).
  3. Stir in tomatoes, broth, and potatoes and bring to a boil.
  4. Reduce heat to medium, cover, and simmer until potatoes are tender (~15 minutes).
  5. Stir in olives.
  6. Serve with tortillas, sour cream, and hot sauce.

Monday 18 May 2020

Cranberry Pudding

"Are we planning anything that needs eggs?" TF asks me. "No," says I as I pack up all 12 of our remaining eggs to be given to TM.

I mean, to be fair, at the moment the question was asked, I wasn't planning anything that required eggs. But an hour or so later I suddenly desperately wanted to bake something. Not bread, we've already got lots and I'm way to tired today anyway. Something quick and easy. A cake or maybe some muffins! Oh right, those are things that generally require eggs. Drat! Cue an hour of aimlessly flipping through recipes muttering about eggs.

I wasn't in the mood for a pie or a crumble or shortbread, so that eliminated a lot of the non-bread egg-less options. I considered making scones or making muffins or quick bread with flax eggs in place of the chicken egg, but none of those quite tickled my fancy tonight. I had initially written off this cranberry pudding recipe since we didn't have any frozen cranberries left... or so I thought! After some contemplation I decided that maybe it was worth double-checking the cranberry situation. Turns out we still had most of a bag in the freezer! Score!

This recipe apparently hails from Maine and is pudding in the British sense of being a sweet dessert-type dish rather than pudding in the North American sense of being a custard-y milk-based concoction. Looking at the recipe, it looks an awful lot like sticky toffee pudding but with cranberries taking the place of the dates. I still think I prefer traditional sticky toffee pudding, but this is an interesting variation on the theme.


Cranberry Pudding

From Taste of Home

Ingredients

Cake

  • 1/4 c. unsalted butter, softened
  • 1/4-1/2 c. sugar1
  • 1 c. all-purpose flour
  • 1 tsp. baking powder
  • 1/8 tsp. coarse sea salt, ground
  • 1/2 c. whole (3.25%) milk
  • 1 1/2 c. frozen cranberries, halved

Sauce

  • 1/2-1 c. brown sugar1
  • 1 Tbsp. all-purpose flour
  • 1/16 tsp. coarse sea salt, ground
  • 2/3 c. water
  • 1 Tbsp. unsalted butter
  • 1 tsp. vanilla extract

Directions

Cake

  1. Grease and flour a 20cm (8") square cake tin and preheat oven to 180°C (350°F).
  2. Cream sugar with butter.
  3. Combine flour, baking powder, and salt.
  4. Mix flour mixture into creamed mixture alternately with milk.
  5. Stir in cranberries.
  6. Spread mixture evenly into prepared tin.
  7. Bake at 180°C (350°F) for 40 minutes.

Sauce

  1. Combine sugar, flour, and salt.
  2. Stir in water until smooth.
  3. Bring to a boil over medium-high heat.
  4. Reduce heat to medium-low and simmer, stirring occasionally for 3 minutes.
  5. Remove from heat and stir in butter and vanilla.
  6. Pour sauce over warm cake.


The original recipe is written for the larger amount of sugar, which is what I used this time. However, I found the results overly sweet. If I'm going to have cranberry pudding, I'd like for the cranberries to be able to really shine. I'll probably try scaling back the sugar in either the cake, the sauce, or both next time. Back

Sunday 17 May 2020

Subzi Biryani (Vegetable Biryani)

This biryani looks complicated, but it's not actually too bad to put together. It's only slightly more complicated than making a curry and cooking a pot of rice to go with it. You just stir a few extras into the rice and then layer everything into a casserole dish and finish cooking everything in the oven. I served it with Kaaju Curry, a spinach raita (Keerai Pachadi), and a stack of Papads.


Subzi Biryani

Slightly adapted from 660 Curries by Raghavan Iyer

Ingredients

Rice

  • 1 c. long-grain brown rice
  • 1/2 tsp. coarse sea salt
  • 2 Tbsp. heavy (35%) cream
  • 1/4 tsp. saffron threads
  • 1 tsp. ground Kashmiri chilies

Vegetable Curry

  • 2 Tbsp. ghee
  • 1 tsp. cumin seeds
  • 1 tsp. black cumin seeds
  • 6 green cardamom pods
  • 6 whole cloves
  • 2 (Indian) bay leaves
  • 2 (3") cinnamon sticks
  • 1 red onion, halved and sliced
  • 6-8 cloves of garlic, julienned
  • 1 c. cauliflower florets
  • 1 c. fresh or frozen green beans, cut into 2.5cm (1") pieces
  • 2-3 small carrots, cut into 1cm cubes
  • 2 tsp. Punjabi garam masala
  • 1 tsp. coarse sea salt
  • 1 c. water
  • 1/2 c. fresh or frozen green peas

Directions

Rice

  1. Thoroughly rinse the rice and then pour boiling water over it to cover. Let it soak in the hot water while you prepare the curry.
  2. Once the curry has been removed from the heat, drain the rice.
  3. Fill a pot halfway with water and bring to a boil over medium-high heat.
  4. Add drained rice and salt.
  5. Reduce heat to medium-low and simmer, uncovered, stirring very occasionally for 10 minutes. Rice will not quite be fully cooked.
  6. Meanwhile, warm the cream slightly and stir in the saffron. Set aside to steep for at least 5 minutes.
  7. Once the rice has simmered for 10 minutes, drain it and divide into two equal portions.
  8. Pour the saffron-laced cream into one portion and sprinkle the ground chilies over the other. Keeping both portions of rice separate, stir each to fully incorporate the colourful additions.

Vegetable Curry

  1. Heat ghee over medium-high heat.
  2. Add cumin, black cumin, cardamom pods, cloves, bay leaves, and cinnamon sticks and sizzle for about a minute.
  3. Add onion and garlic and stir-fry until they turn light brown (~8 minutes).
  4. Add cauliflower, green beans, and carrots and cook, stirring frequently for another minute or two.
  5. Add garam masala and salt and stir in water.
  6. Bring to a boil, then reduce heat to medium-low, cover, and simmer, stirring occasionally, until veggies are just slightly cooked (~5 minutes).
  7. Stir in the peas, cover, and remove from heat. Set aside.

Assembly

  1. Preheat the oven to 150°C (300°F) and grease a casserole dish.
  2. Pour the chile-spiked rice into the bottom of the prepared dish and press it into a smooth layer.
  3. Dump the vegetable curry in on top and smooth it into an even layer.
  4. Top with the yellow saffron rice, smoothing this layer as well.
  5. Cover the dish and bake at 150°C (300°F) for 45-60 minutes.


Variations

Vegan

Ingredients

Rice

  • 1 c. long-grain brown rice
  • 1/2 tsp. coarse sea salt
  • 2 Tbsp. coconut milk
  • 1/4 tsp. saffron threads
  • 1 tsp. ground Kashmiri chilies

Vegetable Curry

  • 2 Tbsp. canola (or other neutral) oil
  • 1 tsp. cumin seeds
  • 1 tsp. black cumin seeds
  • 6 green cardamom pods
  • 6 whole cloves
  • 2 (Indian) bay leaves
  • 2 (3") cinnamon sticks
  • 1 red onion, halved and sliced
  • 6-8 cloves of garlic, julienned
  • 1 c. cauliflower florets
  • 1 c. fresh or frozen green beans, cut into 2.5cm (1") pieces
  • 2-3 small carrots, cut into 1cm cubes
  • 2 tsp. Punjabi garam masala
  • 1 tsp. coarse sea salt
  • 1 c. water
  • 1/2 c. fresh or frozen green peas

Kaaju Curry (Cashew Curry)

We built a beautiful vegetable biryani for dinner tonight and were feeling quite pleased with ourselves. About 10 minutes into the baking time I suddenly realized that we'd prepared a dinner full of starch and veggies but completely devoid of protein! I frantically flipped through the legume section of the cookbook without much hope of finding anything that I'd be able to prepare in time for dinner. I was figuring we'd probably end up having to thaw out a few frozen meatballs to serve along side our fancy saffron-laced casserole.

Just toward the end of the legume chapter though, I spotted this delightfully simple cashew curry. Sadly, the first step ended with a 2-hour soaking period. It sounded so perfect otherwise though, so I decided to give it a go, replacing the long soak with a short simmer. This approach seems to have worked wonderfully! The cashews came out nice and tender with a lovely mild flavour. The Kidlet couldn't get enough of 'em! (If I'm honest, neither could I.)

Certainly not a curry for every day; if not for health reasons, then for budget ones. But what a lovely treat to enjoy when you have the cashews to spare. I'm used to cashews being used as a pleasant inclusion in meat- or tofu-based curries and stir-fries. Having them as the main ingredient made for a decadent (and delicious) change of pace.


Kaaju Curry

Slightly adapted from 660 Curries by Raghavan Iyer

Ingredients

  • 2 c. raw cashews
  • 1 (400mL) can coconut milk
  • 1/2 tsp. coarse sea salt
  • 1/2 tsp. ground turmeric
  • 1/2 tsp. ground Kashmiri chilies1
  • 12-15 fresh or frozen curry leaves
  • 6 green cardamom pods
  • 6 whole cloves
  • 1-2 (3") cinnamon sticks

Directions

  1. Place cashews in a pot and add water to cover.
  2. Bring to a boil over medium-high heat.
  3. Reduce heat to medium-low and simmer for 5 minutes.
  4. Drain and return to pot.
  5. Add remaining ingredients and bring to a boil.
  6. Cover, reduce heat, and simmer until sauce thickens (~20 minutes).


1 Iyer calls for ground cayenne here, but I swapped in some Kashmiri chilies instead since they're quite a bit milder and I figured the Kidlet would prefer it. Feel free to use cayenne if you're looking for something with a bit more kick. Back

Sorshe Tamatar (Mustard Tomatoes)

I really enjoyed this one! Being composed mainly of tomatoes, it's not very substantial on its own, but it is very tasty. I love the pungent mustard flavour. I kind of want to try making the same sauce and cooking other things in it. I think it could be nice on greens and/or potatoes. Maybe even some sort of mustard-y mixed vegetable stew! Tomatoes, potatoes, spinach, mustard greens... maybe even a few green chickpeas? I think it could make for a really interesting dish. In the meantime, if you just want a light side dish with big flavour, this simple tomato curry has you covered!

Sorshe Tamatar served atop Gatte ki Tehri

Sorshe Tamatar

Slightly adapted from 660 Curries by Raghavan Iyer

Ingredients

  • 2 Tbsp. mustard seeds, ground
  • 1/4 c. hot water
  • 2 Tbsp. mustard oil
  • 3-4 dried red Thai, cayenne, or arbol chilies
  • 450mL diced tomatoes
  • 1 Tbsp. jaggery
  • 1/2 tsp. coarse sea salt
  • 1/2 tsp. ground turmeric
  • 1/4 c. chopped fresh cilantro

Directions

  1. Combine mustard and water and mix to make a pungent, yellow paste.
  2. Heat oil over medium heat.
  3. Add chilies to hot oil and roast until blackened (~30 seconds).
  4. Add tomatoes, mustard paste, jaggery, salt, and turmeric and bring to a boil.
  5. Reduce heat to medium-low and simmer, uncovered, stirring occasionally, until sauce has thickened slightly (~10 minutes).
  6. Stir in cilantro and serve.

Saturday 16 May 2020

Gatte ki Tehri (Rajasthani Pulao with Chickpea Dumplings)

This was part of a dinner of desperation. We ran out of onions and I couldn't make the dinner I'd been planning. We were out of a lot of stuff since I hadn't been grocery shopping in over a week. So I had to find something I could quickly put together with the ingredients I had on hand. I found a simple onion-less tomato curry and picked this biryani to go with it as it seemed like it would provide a little protein a well as act as a substrate. And, even better, I had made a batch of gatte (chickpea flour dumplings) a few months ago and frozen half of them, so I could skip that part of the recipe and just go straight to making the pulao and add my thawed dumplings at the end!

For me, this isn't one of those knock-your-socks-off amazing curries, but it is dead simple to put together if you have the dumplings on hand already and it's tasty enough, especially if you have some other curries and/or a raita to complement it. Overall, I was really pleased with this as one of those something-from-nothing sort of meals.

Gatte ki Tehri topped with Sorshe Tamatar

Gatte ki Tehri

Slightly adapted from 660 Curries by Raghavan Iyer

Ingredients

Dumplings

  • 2 c. chickpea flour
  • 2 tsp. coriander seeds, ground
  • 1 tsp cumin seeds, ground
  • 1 tsp. ground cayenne
  • 1/2 tsp. coarse sea salt, ground
  • 1/2 tsp Rajasthani garam masala
  • ~1/4 c. warm water
  • ~1 Tbsp. canola (or other neutral) oil

Pulao

  • 1 c. long-grain brown rice
  • 3 c. water
  • 2 Tbsp. ghee
  • 1 Tbsp. cumin seeds; 2 tsp. whole, 1 tsp. ground
  • 1/2 tsp ground asafetida
  • 1 tsp. ground cayenne1
  • 1/2 tsp. coarse sea salt
  • 1/2 tsp. ground turmeric
  • 1/2 tsp. Rajathani garam masala
  • 1/2 c. boiling water
  • 1/4 c. chopped fresh cilantro

Directions

Dumplings

  1. Combine chickpea flour, coriander, cumin, cayenne, salt, and garam masala.
  2. Drizzle with water and bring together into a ball (preferably with your hand).
  3. If it won't come together yet, add an extra Tbsp. or two or warm water. Dough may be quite sticky.
  4. Remove as much dough as possible from your fingers and wash your hands.
  5. Add oil and knead until smooth.
  6. Shape dough into a 30cm (12") long log ~4cm (1.5") in diameter.
  7. Cut the log crosswise into four pieces.
  8. Bring a pot of water to a boil over medium-high heat.
  9. Add the dough pieces to the boiling water and reduce heat to medium.
  10. Simmer, uncovered, turning occasionally for 45 minutes.
  11. Remove dough pieces from water with a slotted spoon and submerge in cold water for a few seconds.
  12. Scrape off the pale outer skin with a butter knife or the edge of a spoon. The dough should be darker and firmer underneath. Discard the pale bits of dough you've trimmed off.
  13. Slice each dough piece in half lengthwise.
  14. Cut each piece crosswise into 5-10mm thick2 nuggets.
  15. Set half the nuggets/dumplings aside for this dish. Place the other half in a freezer bag and freeze for future use.

Pulao

  1. Rinse the rice and set aside.
  2. Heat ghee over medium-high heat.
  3. Add cumin seeds and sizzle for 10-15 seconds.
  4. Add rice, asafetida, cumin, cayenne, salt, turmeric, and garam masala.
  5. Stir in water and bring to a boil.
  6. Cook, without stirring, until water has evaporated and craters are starting to appear in the surface of the rice (~20 minutes).
  7. Stir in dumplings and boiling water, being sure to mix the rice well.
  8. Cover and reduce heat to low.
  9. Cook, covered, without stirring, for 10 minutes.
  10. Remove from heat and allow to sit, covered and undisturbed, for a further 10 minutes.
  11. Remove lid, fluff rice, sprinkle with cilantro, and serve.


Variations

Vegan

Ingredients

Dumplings

  • 2 c. chickpea flour
  • 2 tsp. coriander seeds, ground
  • 1 tsp cumin seeds, ground
  • 1 tsp. ground cayenne
  • 1/2 tsp. coarse sea salt, ground
  • 1/2 tsp Rajasthani garam masala
  • ~1/4 c. warm water
  • ~1 Tbsp. canola (or other neutral) oil

Pulao

  • 1 c. long-grain brown rice
  • 3 c. water
  • 2 Tbsp. coconut oil
  • 1 Tbsp. cumin seeds; 2 tsp. whole, 1 tsp. ground
  • 1/2 tsp ground asafetida
  • 1 tsp. ground cayenne
  • 1/2 tsp. coarse sea salt
  • 1/2 tsp. ground turmeric
  • 1/2 tsp. Rajathani garam masala
  • 1/2 c. boiling water
  • 1/4 c. chopped fresh cilantro


1 For a less spicy option, substitute an equal amount of ground Kashmiri chilies. Back
2 Iyer says to slice them quite thick. I've found I prefer smaller, thinner dumplings. Back

Friday 15 May 2020

Kale & Black Bean Quesadillas

We have a bunch of quesadilla recipes on the blog already, but this one from Hello Fresh was tasty, filling, and a hit with the Kidlet, so it's worth saving.

Note that the salsa and the filling both call for half an onion and half a lime; just grab one of each and divide them between the subrecipes.

Kale & Black Bean Quesadillas

Hello Fresh

Ingredients

Salsa

  • 2 tomatoes, diced
  • 1 tbsp chopped cilantro
  • zest and juice of ½ lime
  • ½ large red onion, chopped
  • 2 tbsp oil
  • salt and pepper

Quesadillas

  • 5 tsp + 1 tsp mexican seasoning, divided
  • ¾ C sour cream
  • ½ large red onion, chopped
  • ¼ lb kale, chopped
  • 2 cloves garlic, minced
  • 800mL tinned black beans
  • zest and juice of ½ lime
  • 12 6" flour tortillas
  • 2 C grated cheddar cheese
  • oil
  • salt and pepper

Directions

  1. Whisk together sour cream and 1 tsp mexican seasoning in a small bowl; set aside.
  2. Combine all salsa ingredients in another bowl, season with salt and pepper, and set aside.
  3. Drain, rinse, and mash beans.
  4. Heat 2 tbsp oil in a large pan over medium-high heat.
  5. Add the onions and cook, stirring occasionally, until softened, 2-3 minutes.
  6. Add the kale and ¼ C water. Continue cooking, stirring often, until tender, 5-6 minutes.
  7. Add garlic, bean mash, and remaining mexican seasoning. Cook, stirring, until garlic is fragrant and beans are warmed through, 1-2 minutes. If the filling is too stiff at this point you may want to mix in more water; we needed to add quite a lot to get it to a point where it could be easily spread into the quesadillas.
  8. Add remaining lime juice and zest. Season with salt and pepper. Remove to a bowl and clean the pan.
  9. Spread half of a tortilla with filling. Top with cheese and fold over tortilla to make a half circle. Repeat with remaining 11 tortillas.
  10. Return the pan to medium heat and add a bit more oil. Add the quesadillas, 3 (or however many your pan will fit) at a time, and cook until golden brown, 2-3 minutes per side.
  11. Serve with sour cream and salsa.

Hakka Noodles

TF and I ordered Hakka noodles from one of the local Indian restaurants recently. They were alright. I found the flavour alright, but they were mostly noodles with very little in the way of sauce or inclusions. A thin sheen of fairly oily tomato-based sauce and a few small pieces of cabbage and not much else. I mean, I still ate them and enjoyed them, but I do wish that they'd been a little more balanced and interesting than just a big ol' pile of starch. When I spotted Iyer's recipe for Hakka noodles in 660 Curries I was intrigued. It looked a lot more interesting than the restaurant version we'd gotten.

The sauce was definitely more flavourful and a lot less oily. And there was a pleasant amount of veg an protein to it as well, although I wouldn't've turned my nose up at even more inclusions! TF really liked this one. I enjoyed it, but I wasn't head-over-heels for it the way she was. Still, worth keeping in mind and worth making again.

I feel like this is an especially good recipe to have in my back pocket because it seems like it couple be pretty flexible. I did it by the book this time (mostly), using cauliflower, carrots, and bean sprouts as the veg. The one change I made was to swap out the paneer for some lovely extra firm, tomato-marinated tofu. That said, I think you could change the veggies up depending on what you had on hand and still get great results. I could see broccoli, green beans, and/or cabbage all working extremely well here. Bell peppers, mushrooms, or snow peas might also be good choices. Really, there are so many possibilities!


Hakka Noodles

Slightly adapted from 660 Curries

Ingredeints

  • 240g fresh fettuccini
  • 1/4 c. ketchup
  • 3 Tbsp. light soy sauce
  • 1 Tbsp. dark soy sauce
  • 1 Tbsp. malt vinegar
  • 2 tsp. ground Kashmiri chilies1
  • 2 Tbsp. corn or peanut oil
  • 150g paneer or extra-firm tofu
  • 1 c. cauliflower pieces
  • 1 large carrot, sliced into thin coins
  • 4-5 cloves garlic, chopped
  • 1/2 c. chopped fresh cilantro, divided
  • 1 large tomato, diced
  • 4 scallions/green onions, cut into 1-2cm lengths
  • 2 (6cm x 2.5cm x 3mm) slices of ginger, julienned
  • 125g bean sprouts

Directions

  1. Boil the pasta until al dente. This took ~3 minutes for the fresh noodles I had. Drain and immediately plunge noodles into cold water to stop cooking. Set aside.
  2. Meanwhile, whisk ketchup, soy sauces, vinegar, and chilies together to make sauce. Set aside.
  3. Heat wok over medium high heat.
  4. Drizzle oil down the sides of the wok and allow it to pool at the bottom.
  5. Add paneer (or tofu), cauliflower, carrot, garlic, and 1/4 c. of the cilantro and stir-fry for ~5 minutes.
  6. Drain noodles and add them to the wok. Stir fry for another 2-3 minutes.
  7. Add sauce and stir to coat noodles and veggies.
  8. Add tomato, green onions, and ginger and stir-fry for another 2-4 minutes.
  9. Stir in bean sprouts.
  10. Remove from heat, sprinkle with remaining 1/4 c. of cilantro, and serve.


1 If Kashmiri chilies are not available, you can substitute 1 part ground cayenne to 3 parts sweet paprika. Back

Spicy Currant Bread

I usually don't eat much of the breads I bake. I love baking them and the rest of the family loves eating them, but I usually only have a slice or two from each pair of loaves. This bread was different. I couldn't get enough of it! And when the end of the last loaf started to go a bit stale, it made phenomenal bread pudding.


Spicy Currant Bread

From the Laurel's Kitchen Bread Book

Ingredients

  • 1 c. dried currants
  • 2 c. apple juice
  • 1/3 c. (17g) wheat bran1
  • 1 tsp. allspice berries, ground
  • 1/2 c. warm water
  • 2 tsp. active dry yeast
  • 1/4 c. oil
  • 2 Tbsp. molasses
  • 830g hard (bread/strong/high grade) whole wheat flour
  • 2 1/2 tsp. (14g) coarse sea salt
  • extra juice and/or water

Directions

  1. Rinse the currants.
  2. Add the currants to the apple juice and simmer for five minutes.
  3. Drain the currants reserving the juice.
  4. Add water to the juice to bring the volume back up to 2 c.
  5. Stir the bran and allspice into the juice. Cover and set aside to cool for an hour or two or as long as overnight.
  6. Dissolve the yeast in the warm water.
  7. Stir the oil and molasses into the juice mixture.
  8. Combine the flour and salt in a large bowl and mix thoroughly.
  9. Make a well in the centre of the flour and pour in the yeast mixture as well as the apple juice mixture.
  10. Gradually incorporate the flour into the liquids, working from the centre outward.
  11. Knead for 15-20 minutes, then work in the currants.
  12. Shape dough into a ball and place in a covered bowl to rise.
  13. When dough no longer returns a 1cm deep wet fingerprint it is ready to be knocked back. Knead it a few strokes and return it to its covered bowl to rise again.
  14. Once the second rise is complete, knock it back again and divide into two equal portions.
  15. Round each portion, stretch the gluten tight across the top surface, cover, and set aside for at least 10 minutes.
  16. Shape each portion into a loaf by flattening it, folding it into thirds, and rolling it up. Place in greased loaf pans.
  17. Cover and allow to rise until fingerprint is only gently returned. (This usually takes ~45 minutes for me, but will vary with the temperature of your room.)
  18. Bake at 180°C (350°F) for ~45 minutes.


1 I didn't have any wheat bran, so I just used a bit of oat bran instead. Back

Wednesday 13 May 2020

Turkish Fried Eggs

This breakfast egg is quick and easy to make and very tasty. symbol ate them every day for the better part of a week, which is very usual -- usually foods "wear out" after 2-3 days at most! They go well on garlic toast or large english muffins, and I think they'd work really well on a bagel, too.

If cooking for more than one person (or very hungry), you can add more eggs and scale up the other ingredients proportionally.


Turkish Fried Eggs

Ingredients

  • 1 tbsp oil
  • ¼ tsp cumin seeds
  • ¼ tsp chili flakes
  • ½ red onion, chopped
  • 2 cloves garlic, minced
  • ½ frozen chopped spinach
  • salt & pepper
  • 2 eggs
  • cheddar cheese (optional)
  • 1 slice garlic toast

Directions

  1. If using brick spinach rather than loose spinach, thaw it out at least partially so you can break it apart first. Loose frozen spinach can go straight into the pan.
  2. Combine oil, cumin, chili, onion, garlic, and spinach in a small pan over medium heat. Cook, stirring occasionally, until onion softens and turns translucent and spices are fragrant.
  3. Break eggs over onion mix and add salt and pepper to taste. Cover pan to help whites set and cook until desired yolk firmness is reached.
  4. Remove from heat. If using cheese, briefly uncover, top egg with cheese, and cover again so residual heat melts the cheese.
  5. Serve on garlic toast.

Thursday 7 May 2020

Potato Bread

I'm really pleased with how these loaves came out! They look beautiful and they rose wonderfully. The herbed potato bread I did a couple weeks ago was extremely tasty and also by far the best keeping bread I've made yet. I have high hopes for this one!


Potato Bread

From the Laurel's Kitchen Bread Book

Ingredients

  • 1 (225g) potato
  • 1/4 c. warm water
  • 2 tsp. active dry yeast
  • 1 c. fresh buttermilk or yogurt
  • 1 c. hot potato cooking water
  • 2 Tbsp. honey
  • 2 Tbsp. oil
  • 900g hard (bread/strong/high grade) whole wheat flour
  • 14g (~2 1/2 tsp.) coarse sea salt

Directions

  1. Cut the eyes out of the potato, rinse it, slice it, and boil until tender.
  2. Drain the potato reserving the cooking water.
  3. Dissolve the yeast in the warm water and set aside for ~10 minutes.
  4. Mash the potato and combine it with the buttermilk, 1 c. of reserved cooking water, honey, and oil.
  5. Combine the flour and salt and mix thoroughly.
  6. Make a well in the centre of the flour and pour in the yeast mixture and the potato mixture.
  7. Mix the flour into the liquids working from the centre outward.
  8. Once most of the flour's been incorporated, turn it out onto the counter and begin kneading.
  9. Knead for 20-30 minutes working in more water as needed. (Feel free to use more cooking water for this.)
  10. Shape into a ball and place in a covered bowl to rise.
  11. Once dough no longer returns a 1cm deep wet fingerprint, then it's ready to knock back. (This should take 1-2 hours depending on the temperature of the room.)
  12. Knock back the dough and set it to rise in the covered bowl again.
  13. After another hour or so, the dough should be ready to knock back again.
  14. Knock back the dough again and divide it into two even portions.
  15. Shape each dough portion into a ball and pull the gluten tight across the top of each ball. Cover and set aside for 10 minutes.
  16. Shape each ball into a loaf. Hearth loaves or pan loaves work well for this bread.
  17. Cover and set to rise for 30-45 minutes.
  18. Uncover, dust with pastry flour, and slash the tops of the loaves.
  19. Bake at 180°C (350°F) for 45-60 minutes.
  20. Cool in pans for 10 minutes, then remove from pans and set on a wire rack to cool.