Monday, 30 September 2024

Barbarian Bars

This recipe comes courtesy of the C&C Cakery blog, which, sadly, no longer exists. Luckily I copied the recipe into my notes file several years ago, before it disappeared. And I'm glad a did. These bars are way tastier than they have any right to be! The recipe might sound a little weird, but it's dead easy to put together and really delicious.


Barbarian Bars

Slightly adapted from C&C Cakery

Ingredients

  • 1 3/4 c. graham cracker crumbs
  • 1/2 c. unsalted butter, melted
  • 1 c. chopped walnuts or pecans
  • 1 c. chopped dark chocolate
  • 1/2 c. chopped milk or white chocolate (or a mix of both)
  • 1/2 c. butterscotch chips1
  • 1 c. unsweetened dried coconut2
  • 300mL sweetened condensed milk3

Directions

  1. Preheat oven to 180°C (350°F) and line a 23x33cm (9x13") pan with parchment paper.
  2. Combine the graham cracker crumbs and butter and mix well.
  3. Dump the graham cracker mixture into the prepared pan and press firmly into an even layer to completely cover the bottom of the pan.
  4. Sprinkle the nuts in an even layer on top, followed by the dark chocolate, then milk chocolate, butterscotch chips (or toffee bits), and finally the coconut.
  5. Pour the sweetened condensed milk over everything, spreading it as evenly as possible. Try to coat the entire surface with milk.
  6. Bake at 180°C (350°F) until browned on top (25-30 minutes).
  7. Remove from oven and allow to cool completely before cutting.
  8. Cut into squares and serve.


1 I didn't have any butterscotch chips, so I substituted Skor toffee bits and am very happy with the results. Back
2 The original recipe called for sweetened coconut, but, given how many other sugary ingredients were already present, I opted for unsweetened. I definitely think that was the right call! The bars are delicious, but, even with the unsweetened coconut, they are still very sweet! I think they would have been cloying and much too sweet if there'd been sugar added to the coconut as well. Back
3 The original recipe called for a "14-oz" can of sweetened condensed milk (which works out to just shy of 400mL in metric). However, the standard size can for sweetened condensed milk here is 300mL. And I only had one. It was a little tricky to get it to cover the whole surface. Having the extra 90-ish mL definitely would have made that task easier. That said, 300 was enough (just barely). And I think the lesser amount made for a better sweetness balance. I think more milk would have put these in danger of being too sweet. So it worked out for the best in the end. Back

Sunday, 29 September 2024

Fettucini ai Gamberi, Pomodoro e Capperi

The Kidlet is cleared to eat shrimp now, so we are taking advantage of that. This was a convenient recipe that we had all the ingredients for ready to go, and it went over well.

As usual, I find Hazan's sauces to be delicious, but too scant for the amount of pasta. Consequently, this is scaled up significantly from the original.


Fettucini ai Gamberi, Pomodoro e Capperi (Fettucini with Shrimp, Tomatoes, and Capers

From The Classic Pasta Cookbook by Guiliano Hazan (p. 73)

Ingredients

  • 500-600g shrimp, deveined
  • ⅓ C olive oil
  • 3 large yellow onions, halved and thinly sliced (about 750mL)
  • 2 cloves garlic, minced
  • 1 large tin (~750mL) diced tomatoes
  • 1 tsp chopped fresh oregano (or ½ tsp dried)
  • 3 tbsp capers
  • ½ C chopped fresh parsley
  • 450g dried, store-bought fettucini or similar pasta

Directions

  1. Bring a generous quantity of water to boil in a large pot.
  2. Add a small amount of salt and the shrimp. Gently braise until cooked, 2-3 minutes if fresh, 7-10 if frozen.
  3. Remove shrimp (with a spider; retain the water!) to a colander until cool enough to handle.
  4. Heat the olive oil in a large, deep skillet over medium heat until shimmering.
  5. Add the onions and cook until soft and starting to brown.
  6. Add the garlic and cook until fragrant, ~1 minute.
  7. Add the tomato sauce, increase the heat to medium high, and cook until most of the liquid has evaporated.
  8. Meanwhile, peel shrimp, and return water to a boil.
  9. Add oregano, capers, and shrimp to sauce. Cook until heated through and set aside on low heat.
  10. Add pasta to shrimp-water and cook until al dente. Add two ladlefuls of pasta water to the sauce, then drain pasta.
  11. Return sauce to medium heat and cook, stirring, until thickened.
  12. Add pasta and parsely. Toss until well mixed.
  13. Serve with freshly grated parmesan.

Saturday, 28 September 2024

Baked Cod with Leeks, Morels, and Bacon

My parents got a bumper crop of morels this spring and were kind enough to dry a bunch and give them to us. I don't get morels very often (and TF had never tried them), so I wanted to make good use of them. I had initially debated making the morel and green pea curry from Iyer's book. But, in the end, I decided that I wanted to prioritize this baked cod recipe. I really liked the sound of combining the morels with leeks and bacon! That sounded like a very appealing combination. And it was! Definitely pleased with how this one cake out.


Baked Cod with Leeks, Morels, and Bacon

Slightly adapted from Dish of the Day by Kate McMillan

Ingredients

  • 20g dried morels
  • 1/2 c. boiling water
  • 4-6 slices bacon
  • 2 c. thinly sliced leeks (white and pale green parts only)
  • 1 tsp. champagne vinegar1
  • 4 cod fillets (~185g each)
  • salt and pepper, to taste
  • 1 Tbsp. unsalted butter
  • 1 Tbsp. minced fresh chives

Directions

  1. Preheat oven to 190°C (375°F).
  2. Pour the boiling water over the morels and allow to soak for at least 20 minutes.
  3. Squeeze dry and roughly chop the rehydrated mushrooms. Set aside.
  4. Fry the bacon until crisp, then transfer to paper towel-lined plate to drain.
  5. Pour off all but 2 Tbsp. of the fat from the pan.
  6. Add the leeks and cook, stirring often, until they begin to brown (~10 minutes).
  7. Crumble the bacon and add half of it to the leeks.
  8. Add the morels and vinegar and toss to combine.
  9. Spread the leek mixture evenly over the bottom of the pan.
  10. Season the cod with salt and pepper and place it on top of the leek mixture.
  11. Dot the butter on top of the cod.
  12. Bake at 190°C (375°F) until the cod is cooked through (12-15 minutes).
  13. Garnish with the chives and remaining bacon and serve.


1 I didn't have any champagne vinegar and I wasn't about to go out and get a whole bottle just for 1 tsp. for this recipe. IIRC, I just used sherry vinegar in its place. Back

Friday, 27 September 2024

Chicken Tikka Masala (Dish of the Day)

I've made at least two previous versions of chicken tikka masala. And while this version couldn't hold a candle to Iyer's rendition of it, it was still quite good. TF and the Kidlet especially seemed to enjoy it. And I appreciate that it came together relatively easily as well.


Chicken Tikka Masala

Adapted from Dish of the Day by Kate McMillan

Ingredients

  • 1/4 c. plain Greek yogurt
  • juice of 1 1/2 limes
  • 4 tsp. ginger paste, divided
  • 2 tsp. cumin seeds, ground and divided
  • 1 tsp. bin bhuna hua garam masala
  • 2 tsp. sweet paprika
  • 500g skinless boneless chicken breast, cut into bite-sized pieces
  • 3/4 tsp. coarse sea salt, divided
  • 1 Tbsp. canola (or other neutral) oil
  • 1-2 Tbsp. ghee
  • 1 onion, chopped
  • 1-2 cloves garlic, minced
  • 5 green cardamom pods
  • 1 tsp. coriander, ground
  • 1/2 tsp. ground turmeric
  • 1/2 tsp. ground Kashmiri chilies
  • 400mL diced tomatoes
  • 1 fresh green Thai, serrano, or finger chile, minced
  • 1/2 c. heavy (35%) cream1
  • 1/2 c. water
  • 1/4 tsp. Punjabi garam masala2
  • juice of 1/2 a lemon

Directions

  1. Combine the yogurt, lime juice, 1 Tbsp. of the ginger paste, 1 tsp. of the cumin, untoasted garam masala, and paprika and mix well.
  2. Add the chicken and toss to combine.
  3. Cover and chill for 1-8 hours.
  4. When ready to cook, preheat the broiler (on high if it has multiple settings) and line a baking sheet with a silicone baking mat.
  5. Shake off any excess marinade and place the chicken on the prepared baking sheet.
  6. Season with 1/2 tsp. of the salt and drizzle with the oil.
  7. Broil until it develops some good colour and a bit of char (~5 minutes).
  8. Turn and continue broiling until other side is also darkened (~5 minutes more).
  9. Meanwhile, heat the ghee over medium-high heat.
  10. Add the onion, garlic, and remaining 1 tsp. of ginger paste and cook until softened (3-5 minutes).
  11. Add the cardamom, coriander, turmeric, ground chilies, and remaining 1 tsp. of cumin and cook for another minute.
  12. Add the tomatoes and any residual marinade from the chicken and cook until sauce thickens (5-10 minutes).
  13. Add the fresh chile, cream, and water, reduce heat to medium-low, and simmer until sauce thickens again (another 10 minutes or so).
  14. Add the cooked chicken to the sauce along with the Punjabi garam masala and remaining 1/4 tsp. of salt and cook until heated through.
  15. Remove from heat, stir in lemon juice, and serve.


1 I actually swapped out the heavy (double) cream for half-and-half (10% MF). Mostly because I had it and it needs to be used. That said, if you want maximum richness, go for the full fat cream. If you want minimum calories, you can get away with half-and-half, but table (single/18%) cream would probably be better if you have it. Back
2 The original recipe calls for 1 1/4 tsp. "garam masala" (which generally means bin bhuna hua garam masala) which then gets divided between the marinade and the sauce. That said, since the last 1/4 tsp. of garam masala doesn't get added until right near the end of cooking, I think that a toasted blend like Punjabi garam masala would work better there while the untoasted blend goes into the marinade. And that's how I'd meant to prepare mine. Unfortunately, I got a bit muddled and put the full 1 1/4 tsp. of garam masala into the marinade and forgot to put any in the sauce. Whoops! But that's why I write up these notes. Now I'll have better instructions for next time. Back

Thursday, 26 September 2024

Chocolate Blackout Cake

This is an interesting cake. It is basically a very rich, moist chocolate cake that is "iced" with chocolate pudding rather than a buttercream or ganache or some more traditional cake coating. It is baked as two 20cm (8") round layers, each of which are then split. Three of the resulting thin layers are used to assemble the cake and the fourth is crumbled and used to coat the outside.

I didn't get my batter divided quite evenly and one of my layers baked up a little thinner than the other. I was a bit nervous about trying to split the thinner one, so I just left it whole and split the thicker one only. I then stacked two of the resulting layers and crumbled the third. This, of course, resulted in a reduced overall surface area, so the filling and "icing" are somewhat more generous than they're really meant to be. (Same overall proportions, of course, just thicker layers since there are fewer of them.)

This worked fine, but did mean that the cake was a little more... wobbly than it would have been had I made it with the "correct" number of layers.

Honestly, if I had two 18cm (7") round pans, then I'd be tempted to bake my cake in those next time. The 8" layers baked up fine. But I would've felt more confident about splitting them had they been slightly thicker. I think 6" layers would probably be too thick/tall. But 7" might be just about right. Sadly, I only have one 7" pan at the moment. Which still might be worth trying next time. It just makes it slightly more difficult to get the batter divided evenly and, obviously, ends up requiring double the cooking time since you have to bake the layers one after the other rather than in tandem. So, possibly something to consider, but definitely not ideal.

Other than my lack of confidence in splitting the layers though, this recipe worked out great! The cake was delicious and moist with deep chocolate flavour. (Which the coffee and brown sugar help to accentuate.) And the pudding was also pleasingly rich and thick. A winner all 'round!


Chocolate Blackout Cake

Slightly adapted from The Perfect Cake by America's Test Kitchen

Ingredients

Pudding

  • 1 c. heavy (35%) cream
  • 2 c. milk
  • 1 1/4 c. sugar
  • 1/4 c. cornstarch (cornflour)
  • 1/4 tsp. coarse sea salt
  • 170g unsweetened chocolate
  • 2 tsp. vanilla extract

Cake

  • 110g all-purpose flour
  • 2 tsp. baking powder
  • 1/2 tsp. baking soda
  • 1/4 tsp. coarse sea salt, ground
  • 1/2 c. unsalted butter
  • 3/4 c. Dutched (alkalized) cocoa powder
  • 1 c. brewed coffee
  • 1 c. buttermilk
  • 1 c. brown sugar
  • 1 c. sugar
  • 2 large eggs
  • 1 tsp. vanilla extract

Directions

  1. Combine cream, milk, sugar, cornstarch, and sea salt over medium heat.
  2. Break chocolate into pieces and add to milk mixture.
  3. Cook, whisking frequently, until chocolate has completely melted and mixture is smooth and homogenous.
  4. Continue cooking until bubbles begin to form and pudding thickens.
  5. Remove from heat, stir in the vanilla, and set aside to cool.
  6. Chill for at least 3-4 hours.
  7. Meanwhile, preheat the oven to 160°C (325°F) and grease and flour1 two 20cm (8") round baking tins.
  8. Sift together the flour, baking powder, and baking soda.
  9. Mix in the salt.
  10. Melt the butter over medium heat.
  11. Mix in the cocoa and cook for 1 minute.
  12. Remove from heat and stir in the coffee and buttermilk.
  13. Add the brown sugar and granulated sugar.
  14. Mix in the eggs, one at a time.
  15. Mix in the vanilla.
  16. Divide the batter as evenly as possible between the prepared tins.
  17. Bake at 160°C (325°F) for 30-35 minutes.
  18. Transfer cake layers (still in their tins) to a cooling rack and allow to cool for 15 minutes.
  19. Invert tins onto cooling racks and carefully remove the cakes from their tins. Allow to cool completely (1-2 hours).
  20. Once cake layers are completely cool, divide each one horizontally.2
  21. Place one layer on a serving platter.
  22. Spoon ~1 c. of pudding on top and spread all the way to the edges of the layer.
  23. Top with a second layer and repeat the process: spreading 1 c. of putting on top.
  24. Place a third layer on top and spoon the rest of the pudding over it, completely covering the entire cake -- top and sides.
  25. Crumble the fourth layer and sprinkle the chocolate crumbs on top of your assembled cake, covering the top and sides. You will have to press slightly to get the crumbs to adhere to the pudding. Especially on the sides of the cake.
  26. Serve immediate or refridgerate for up to 2 days.


1 You may wish to line the bottoms with parchment paper and grease the paper before flouring. This adds an extra step, but will help ensure that the cake relases from the pans cleanly. Back
2 The folks at America's test kitchen recommend doing this with a serrated knife. The outline a procedure of scoring the perimeter of the cake layers and then cutting through along the scored lines to get a level split. Personally, I have always preferred my mother's method of using a piece of thread. You simply take a long piece of thread and wrap it around the cake (doing your best to make sure it's roughly level/even all the way around), then grab both ends and pull tightly. The thread should slice neatly through the cake! I've found it a ver quick and reliable method and prefer it to faffing about with knives or cake levelling contraptions. Back

Wednesday, 25 September 2024

Arugula Salad with Clementines and Walnuts

It was TF's birthday today. She chose spaghetti a la carbonara as her birthday meal. And, as usual, she made it herself. But I wanted to do up some sides to go with it. Since, while carbonara is delicious, it's also not exactly health food. And I felt the need to try to put some greens on the plate.

I picked up a head of broccoli and roasted it with a drizzle of olive oil and some salt and pepper. But I figured that another vegetable side wouldn't go amiss, so I put together this salad as well.

The suggestion for topping it with toasted walnuts and orange segments came from a thread on Reddit. The same user also suggested adding either goat cheese or shaved Parmesan as well as a few olives. I chose to add the Parmesan, but omitted the olives.

For the dressing, I went with a slightly modified version of a lemon vinaigrette recipe found on Love & Lemons. I added a bit of red wine vinegar and half a shallot to mine, reduced the salt slightly, and omitted the thyme.

I'm really happy with how the salad worked out overall. And, as an added bonus, I drizzled a small amount of the dressing over the broccoli when it came out of the oven. I feel like the bright citrus flavours worked really well with the roasted broccoli. And the acidity helped balance the fat from the carbonara somewhat. All-in-all, a good combination!


Arugula Salad with Clementines and Walnuts

Adapted from Reddit and Love & Lemons

Ingredients

Vinaigrette

  • 1/4 c. lemon juice
  • 1 Tbsp. red wine vinegar
  • 1/2 shallot, thinly sliced
  • 1 clove garlic, minced
  • 1 tsp. Roman mustard
  • 1/2 tsp. honey
  • 1/8 tsp. coarse sea salt, ground
  • 1/8 tsp. black peppercorns, ground
  • 1/4 c. olive oil

Salad

  • ~100g arugula
  • 2 clementines (or 1 orange), sectioned
  • 3-4 Tbsp. walnuts, toasted and chopped
  • shaved Parmesan

Directions

  1. Combine the lemon juice, vinegar, shallot, gerlic, mustard, honey, salt, and pepper and mix well.
  2. Slowly drizzle in the olive oil while whisking vigorously. Set aside.
  3. Place the arugula in a salad bowl and top with clementines and walnuts.
  4. Spoon some of the vinaigrette over. (You will not need it all.)
  5. Top with Parmesan shavings and serve.

Tuesday, 24 September 2024

Hyderabadi Toor Dal (Hyderabad Pigeon Pea Dal)

We had a few vegetable curries already, but none of them were very proteinaceous. I had been contemplating making something beef-based, but this dal was more expedient. (And it used up the last of the diced tomato in the fridge!)

As written, the recipe calls for ghee as the fat with canola oil as the fall-back if ghee is not available. And, while I think canola oil would be... fine. I don't think it's necessarily the best choice. Personally, if you can't use ghee (for reasons of health, dietary restrictions, or lack of availability), then I would recommend substituting either coconut oil or mustard oil. I think either one would make a great replacement here.

I cut back the water slightly when making this dal. The original recipe called for cooking the peas in 3 c. of water and then adding an additional 1/2 c. with the sauce. I omitted the sauce water and just cooked the peas in the prescribed amount of liquid. This was fine, but I think I would have preferred my dal even thicker. Next time I might try cooking the legumes in just 2 1/2 c. of water and see how that turns out. (This change is reflected below.)


Hyderabadi Toor Dal

Slightly adapted from 660 curries by Raghavan Iyer

Ingredients

  • 1 c. skinned split pigeon peas (toover dal)
  • 2 1/2 c. water
  • 2 Tbsp. ghee
  • 1 tsp. mustard seeds
  • 1 onion, chopped
  • 2 Tbsp. ginger paste
  • 1 tbsp. garlic paste
  • 15 fresh or frozen curry leaves
  • ~1 c. diced tomato (fresh or canned)
  • 1/2 Tbsp. coarse sea salt
  • 1 tsp. ground Kashmiri chilies1
  • 1/2 tsp. ground turmeric

Directions

  1. Thoroughly rinse the pigeon peas.
  2. Drain the peas, then add to a pressure cooker/InstantPot with the water.
  3. Pressure cook on "high" for 10 minutes, then allow for a 15-minute natural release.
  4. Meanwhile, heat the ghee over medium-high heat.
  5. Add the mustard seeds, cover, and cook until they stop popping (30-60 seconds).
  6. Add the onion, ginger paste, garlic paste, and curry leaves and stir-fry for ~5 minutes.
  7. Add the tomato, salt, ground chilies, and turmeric and cook, stirring occasionally, for another 3-5 minutes. Remove from heat and set aside.
  8. Once peas are done, pour the contents of the pan into the pressure cooker with the legumes.
  9. Scrape out the pan very well. If necessary, ladel a bit of the dal into the pan and swish it out. You may opt to use a little bit of water either instead or as well here, but be careful not to thin the dal out too much.
  10. Simmer the dal over medium heat for another 5 minutes.
  11. Serve with roti or another flatbread of your choice.


Variants

Vegan Version

Ingredients

  • 1 c. skinned split pigeon peas (toover dal)
  • 2 1/2 c. water
  • 2 Tbsp. coconut or mustard oil
  • 1 tsp. mustard seeds
  • 1 onion, chopped
  • 2 Tbsp. ginger paste
  • 1 tbsp. garlic paste
  • 15 fresh or frozen curry leaves
  • ~1 c. diced tomato (fresh or canned)
  • 1/2 Tbsp. coarse sea salt
  • 1 tsp. ground Kashmiri chilies1
  • 1/2 tsp. ground turmeric


1 Or 3/4 tsp. sweet paprika + 1/4 tsp. ground cayenne. Back

Monday, 23 September 2024

Katarikai Bhajee (Fried Eggplant Curry)

This curry was delicious! Eggplant can be somewhat hit or miss with me, but this was definitely a hit. The eggplant ends up cooked just right and isn't overly greasy and the chilies give it a nice, spicy kick.

I'm always amazed at the complexity of flavours that can be coaxed out of just a few spices. This curry relies on coriander seeds, chilies, mustard seeds, toasted lentils, and a bit of turmeric. Curry leaves and cilantro round things out. But there really isn't that much to it. And yet it tastes amazingly full-bodied and intricate. Definitely a strong recommend from me. Especially since it's also relatively quick and easy to make. You really can't go wrong!


Katarikai Bhajee

Slightly adapted from 660 Curries by Raghavan Iyer

Ingredients

  • 2 Tbsp. canola (or other neutral) oil
  • 1 Tbsp. coriander seeds
  • 5 dried red Thai, cayenne, or arbol chilies
  • 3 Tbsp. skinned split black lentils (mapte beans/white lentils/urad dal), divided
  • 1 tsp. mustard seeds
  • 450g eggplant1, cut into 5mm cubes
  • 15 fresh or frozen curry leaves
  • 1/2 Tbsp. coarse sea salt
  • 1/2 tsp. ground turmeric
  • 1 c. water
  • ~3/4 c. diced tomato2
  • 1/4 c. chopped fresh cilantro

Directions

  1. Heat the oil over medium-high heat.
  2. Add the coriander seeds, chilies, and 2 Tbsp. of the lentils and cook until lentils have browned and chilies begin turning black (~3 minutes).
  3. Immediately remove from heat and strain toasted mix out of pan with a slotted spoon, leaving behind as much of the oil as possible.
  4. Transfer the toasted spices to a plate to cool. Once cooled, transfer to a spice grinder and finely grind. Set aside.
  5. Return pan to medium-high heat.
  6. Add the mustard seeds, cover, and cook until they stopp popping (30-60 seconds).
  7. Add the remaining 1 Tbsp. of lentils and stir-fry until golden (~30 seconds).
  8. Add the eggplant and curry leaves and stir-fry for ~5 minutes.
  9. Add the salt and turmeric and stir to combine.
  10. Add the water and bring to a boil.
  11. Simmer vigorously, stirring occasionally, until eggplant is soft and sauce has been mostly absorbed (~10 minutes).
  12. Add the tomato, ground spices, and cilantro.
  13. Serve with plain yogurt or a raita of your choice.3


1 I used Asian eggplants for my rendition of this curry. I removed the stems, but left the skin on. Italian eggplant will also work fine, but I would advise peeling it as the skin on this variety tends to be somewhat tougher than on the smaller, Asian/Japanese varieties. Back
2 The original recipe calls for 1 "medium-sized" tomato, cored and chopped. I didn't have any fresh tomatoes on hand, so I elected to use canned diced tomatoes. I put four big spoonfuls in, which I figure probably worked out to ~3/4 c. I think a little more or a little less also would have been fine. Follow your heart and adjust to taste. Back
3 We were all out of yogurt, so our curry had to be served unaccompanied this time. I do highly recommend having it with some sort of yogurt-based side/topping if you can though. I think the cooling tartness would complement the curry well, plus it's a convenient way to add a bit of extra protein to the meal and make it somewhat more nutritionally complete. Back

Sunday, 22 September 2024

Eggy Dutch Baby with Nectarines and Almonds

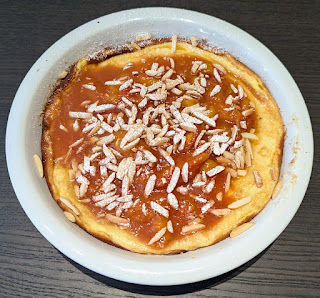
Since I wasn't overly impressed with the Breakfast Bible version of a Dutch baby, I decided to revert to the Weight Watchers recipe that, according to my notes, I liked much better. I still think that I like it better than the BB version. But I'm no longer convinced that it's really correct to call it a Dutch baby. Last time I said that it came out "a bit" eggier than previous versions that I'd tried. This time it was basically a baked custard. A delicious baked custard. But still definitely more like a custard than a Yorkshire pudding or a pancake. Either way, I'm happy with the result. Just maybe don't use this recipe if you really want that Yorkshire pudding/Dutch baby texture.


Eggy Dutch Baby with Nectarines and Almonds

Adapted from The Breakfast Bible by Kate McMillan and Weight Watchers

Ingredients

Batter

  • 1 Tbsp. unsalted butter
  • 1 c. milk
  • 1/4 c. all-purpose flour
  • 3 large eggs
  • 2 Tbsp. sugar
  • 1/2 Tbsp. vanilla extract
  • 1/2 tsp. almond extract

Topping

  • 2 Tbsp. unsalted butter
  • 2 Tbsp. brown sugar
  • 3-5 nectarines, sliced
  • 2 tsp. lemon juice
  • 1/4 c. slivered or sliced almonds, toasted
  • 1-2 tsp. icing sugar (optional)

Directions

  1. Place 1 Tbsp. butter in a 23cm (9") deep dish pie plate.
  2. Place the pie plate in the oven and preheat to 200°C (400°F).
  3. Meanwhile, combine the milk, flour, eggs, sugar, vanilla, and almond extracts and beat with a whisk until smooth.
  4. Pour the batter into the hot pie plate and bake at 200°C (400°F) until set, but still slightly jiggly (15-20 minutes).
  5. Meanwhile, melt 2 Tbsp. butter over medium heat.
  6. Add the sugar and nectarines and cook, stirring occasionally, until sugar has dissolved and mixture thickens slightly.
  7. Remove from heat and stir in lemon juice.
  8. Once Dutch baby/custard is done, remove from oven and allow to cool slightly (~5 minutes).
  9. Pour the nectarine over the custard and sprinkle with almonds and icing sugar (if using).
  10. Cut into wedges and serve.

Saturday, 21 September 2024

Buttermilk Bread (Bernard Clayton)

I love the Laurel's Kitchen buttermilk bread recipe. Not quite as much as I love featherpuff bread, but it's pretty close!

Clayton includes a different take on buttermilk bread in his book. He makes it as a white bread, brushed with an egg glaze and sprinkled with seeds. I liked it well enough, but I think I prefer the Laurel's Kitchen approach. That said, it's nice to have both in your back pocket: a bread for every palate and occasion!


Buttermilk Bread

Slightly adapted from Bernard Clayton's New Complete Book of Breads

Ingredients

  • 500-600g hard white flour (or all-purpose flour), divided
  • 3 Tbsp. sugar
  • 2 tsp. coarse sea salt
  • 1/4 tsp. baking soda
  • 2 1/4 tsp. active dry yeast (or 1/2 Tbsp. instant yeast)
  • 1 c. water
  • 1 c. buttermilk
  • 1/3 c. unsalted butter
  • 1 egg
  • sesame and/or poppy seeds

Directions

  1. Combine ~250g of the flour with the sugar, salt, baking soda, and yeast.
  2. Warm the water, buttermilk, and butter over low heat until softened and gently warmed through.
  3. Pour the wet ingredients into the dry and beat for 2 minutes.
  4. Add another 100-150g of flour and beat for an additional 2 minutes.
  5. Switch to dough hook or kneading by hand from here on out and continue adding flour until a soft dough is formed.
  6. Knead until smooth and elastic (5-8 minutes by machine or ~20 minutes by hand).
  7. Round the dough and place it in a covered bowl to rise at room temperature for ~90 minutes. (May need somewhat more or less time depending on temperature of room.)
  8. Once fully risen, knock back and divide into two equal pieces.
  9. Round each piece of dough, cover, and rest for 5-10 minutes.
  10. Meanwhile, grease two 21x11cm (8.5x4.5") loaf pans.
  11. Shape each ball into a loaf by your preferred method and place seam-side-down in the prepared pans.
  12. Cover and allow to rise at room temperature for ~45 minutes.
  13. Preheat oven to 190°C (375°F).
  14. Beat the egg and brush the tops of the loaves with it. Be careful not to let any egg drip down the sides of the pan or your loaves will not come out of the pan cleanly!
  15. Sprinkle tops with sesame and/or poppy seeds as desired.
  16. Bake at 190°C (375°F) for 30-40 minutes.
  17. Allow to cool in pans for 5-10 minutes, then turn out onto wire racks to finish cooling.
  18. Cool completely before slicing.

Friday, 20 September 2024

Lasoon Sengdane Batate chi Bhajee (Garlic-Peanut Potato Curry)

We had some potatoes that needed to be used up and I needed another dish to go with the eggplant curry for dinner last night, so this potato curry was a natural choice. (I had originally been hoping to also make a dal go to with it to add a little more protein to the meal, but I ran out of energy and just stuck with the two veggie curries in the end.)

TF usually isn't that big a fan of potato curries. But surprisingly, in this case she actually preferred this to the eggplant one! Honestly, they were both excellent. Although grinding up the peanuts and garlic and whatnot for the initial step of the recipe did take a bit of elbow grease. Next time I might try using the "food chop" setting on the blender rather than doing it in the molcajete. Hopefully that will streamline the process a bit.


Lasoon Sengdane Batate chi Bhajee

Slightly adapted from 660 Curries by Raghavan Iyer

Ingredients

  • 2 Tbsp. sesame seeds
  • 2 Tbsp. raw peanuts (without skins)
  • 4-5 cloves garlic
  • 3 dried red Thai, cayenne, or arbol chilies
  • 2 Tbsp. peanut oil1
  • 450g potatoes, cut into 2cm cubes
  • 1/2 tsp. ground turmeric
  • 1 small (~400mL) can diced tomatoes
  • 1 c. water
  • 2 tsp. coarse sea salt
  • 2 Tbsp. chopped fresh cilantro
  • 12 fresh or frozen curry leaves

Directions

  1. Combine the sesame seeds, peanuts, garlic, and chilies in a blender, food processor, or molcajete and pulse to form a finely chopped, slightly gritty blend. (If using a molcajete, you may want to add a small portion of the salt to help aid in breaking down and grinding the garlic and chilies.)
  2. Heat the oil over medium-low heat.
  3. Add the minced blend to the oil and cook, stirring, until the mixture turns brown and begins to get somewhat crumbly (5-8 minutes).
  4. Add the turmeric and cook for another 5-10 seconds.
  5. Add the potatoes, tomatoes, water, and salt and stir to combine.
  6. Raise heat to medium-high and bring to a boil.
  7. Reduce heat to medium and cook, stirring occasionally, until potatoes are tender (30-40 minutes).
  8. Stir in the cilantro and curry leaves and serve.


1 I didn't have any peanut oil, so I decided to go for sesame oil instead. If you don't have either of those, then I think that canola oil or ghee would also be fine. (Although obviously don't use ghee if you need to keep things vegan.) Back

Thursday, 19 September 2024

Pi­ña Colada Pancakes

This is another mix-and-match pancake creation courtesy of The Breakfast Bible. I just used the standard whole wheat pancake recipe and added a bit of coconut and pinapple to the batter, then topped them with even more pinapple and coconut. McMillan suggests a combination of pineapple, coconut, macadamia nuts, and maple syrup for the topping. I didn't have any macadamia nuts, so I tried it with a few slivered almonds instead. That was good, but, in retrospect, I think that a few toasted pumpkin seeds would have been even better. I also ended up adding a dollop of plain Greek yogurt to mine. I felt that this made them a little more substantial and brought everything together. That said, if you really wanted to double down on the coconut flavour, then I think some whipped coconut cream would go a treat on these!


Piña Colada Pancakes

Slightly adapted from The Breakfast Bible by Kate McMillan

Ingredients

Batter

  • 1 c. whole wheat flour
  • 1/2 c. all-purpose flour
  • 1/2 c. rolled oats (pref. quick oats)
  • 2 tbsp. brown sugar
  • 1/4 tsp. coarse sea salt, ground
  • 1/2 Tbsp. baking powder
  • 3/4 tsp. baking soda
  • 2 large eggs
  • 2 c. buttermilk
  • 3 Tbsp. unsalted butter, melted
  • 1/4 c. unsweetened dried coconut
  • 1/2 c. finely diced fresh pineapple

Toppings

  • plain Greek yogurt and/or whipped coconut cream
  • chopped fresh pinapple
  • toasted coconut chips
  • macadamia nuts and/or toasted pumpkin seeds
  • maple syrup

Directions

  1. Combine the flours, oats, and salt and sift in the baking powder and baking soda.
  2. In a separate bowl (or large measuring cup), beat the eggs with the buttermilk.
  3. Mix the butter into the wet ingredients
  4. Pour the wet into the dry and stir until just combined.
  5. Mix in the coconut and pineapple.
  6. Preheat a pan, griddle, or tawa over medium heat.
  7. Lightly grease the pan if necessary.
  8. Use ~1/4 c. of batter per pancake. Cook 1-4 at a time, depending on the size of your pan.
  9. Cook each pancake until it is browned underneath and bubbles form on surface.
  10. Flip and cook until the other side is browned and pancake is cooked all the way through.
  11. Serve topped with yogurt (or coconut cream), pinapple, coconut chips, nuts/seeds, and maple syrup.

Wednesday, 18 September 2024

Dutch Baby with Apples and Browned Butter

This was another Dutch baby that just came out so-so. It was okay. The apples and cinnamon in it were nice. It just wasn't great. It came out a little more bread-y and a little less puffy than I typically prefer for this sort of thing. That said, maybe this is one of the dangers of doing your measurements by volume rather than by weight. The proportions are very important for a recipe like this. So ending up with slightly more or less flour than required because you didn't level the scoop quite right could throw things off.

Unfortunately, this cookbook doesn't include weights, just volumes. So I just rolled with that. I have included estimates of the equivalent weight for the flour in brackets. Hopefully next time I can do it that way and see if it yields a better result.


Dutch Baby with Apples and Browned Butter

Slightly adapted from The Breakfast Bible by Kate McMillan

Ingredients

  • 2/3 c. milk
  • 2/3 c. (80g) all-purpose flour
  • 1/2 tsp. ground cinnamon
  • 1/8 tsp. coarse sea salt
  • 3 large eggs
  • 3 Tbsp. unsalted butter, divided
  • 2 apples, peeled and sliced
  • maple syrup, to serve

Directions

  1. Preheat oven to 220°C (425°F).
  2. Combine milk, flour, cinnamon, salt, and eggs in blender and blend until smooth.
  3. Melt 1 Tbsp. of the butter and, with the blender running, drizzle the melted butter into the batter. Set aside.
  4. Melt 1 Tbsp. of the remaining butter over medium heat and cook until the butter beings to brown.
  5. Add the apples and cook, turning/stirring occasionally, until the apples are golden all over (5-10 minutes).
  6. Add the remaining 1 Tbsp. of butter and cook until melted.
  7. Spread the apples into an even layer and pour the batter over them.
  8. Transfer to oven and bake at 220°C (425°F) for 15-20 minutes.
  9. Remove from oven, cut into wedges, sprinkle with icing sugar or maple syrup, and serve.

Tuesday, 17 September 2024

Frisian Sugar Loaf

This bread was delicious. Unhealthy, but delicious. In addition to using white flour and being enriched with milk and butter, the dough also includes a cup of sugar cubes! The cubes get lightly crushed before getting worked into the dough and form little pockets of melted sugar upon baking. A lovely -- if somewhat decadent -- result.

I actually ended up using some fancy saffron-infused sugar cubes for my rendition of this bread. They imparted a wonderful aroma and colour to the loaves and the saffron flavour came through quite nicely. Given that the sugar cubes were already flavoured, I decided to omit the cinnamon in this version. That said, I do think the cinnamon would have been delicious with either plain or cardamom-infused sugar cubes (which I may, in fact, try next time). In the meantime, this was a great success and I have no complaints about how it turned out.


Frisian Sugar Loaf

Slightly adapted from Bernard Clayton's New Complete Book of Breads

Ingredients

  • 1 c. sugar cubes
  • 1 Tbsp. ground cinnamon (optional)
  • ~750g all-purpose flour, divided
  • 1/2 c. skim milk powder
  • 2 1/4 tsp. active dry yeast (or 1 3/4 tsp. instant yeast)
  • 2 tsp. coarse sea salt
  • 2 c. hot water (50-55°C)
  • 3 Tbsp. unsalted butter

Directions

  1. With an ice pick or tack hammer crack -- but do not crush! -- the sugar cubes.
  2. Toss the sugar pieces with the cinnamon (if using) and set aside.
  3. Combine ~250g of the flour with the milk powder, yeast, and salt.
  4. Add the hot water and shortening and beat at medium speed for 2 minutes.
  5. Add the remaining flour ~50g at a time until the dough comes together in a rough mass.
  6. Turn the dough out onto a lightly floured surface and knead for 15-20 minutes, adding a handful of sugar pieces every few minutes until all of the sugar has been incorporated.
  7. Round the dough and place it in a covered bowl to rise for 1-2 hours1.
  8. Turn the dough out onto a lightly floured work surface and divide it into two equal portions.
  9. The cut edge will be sticky. Carefully pinch the edges together to close the seam and cover the sticky sugar.
  10. Now round each portion of dough, cover, and set aside to rest for 5-10 minutes.
  11. Meanwhile, grease two loaf pans (preferably 21x11cm), line them with parchment paper, and grease the paper.
  12. Once the dough has rested, shape each portion into a loaf by your preferred method and place the loaves into the prepared pans.
  13. Cover and set aside to rise for 30-60 minutes.
  14. Preheat oven to 200°C (400°F).
  15. Uncover loaves and slash as desired.
  16. Bake at 200°C (400°F) for 15 minutes.
  17. Reduce temperature to 180°C (350°F) and bake for an additional 30-40 minutes.
  18. Remove from oven and allow to cool for 5 minutes.
  19. Turn pans on their sides on the cooling rack and gently pull on the parchment paper to ease the loaves out of their pans.
  20. Place loaves on cooling rack and allow to cool completely before slicing.


1 Rising time will depend on the temperature of your room. Allow to rise until dough maintains the indent from a wet finger pressed ~2cm into the surface. If it fills in, it needs more time to rise. If it sighs and or sinks back, it is over-risen and should be knocked back immediately. Ideally you will catch it before it reaches the point of being over-risen. But as long as it's only slightly over-risen, the bread should still be salvageable. Just keep a close eye on it for any remaining rises. Back

Monday, 16 September 2024

Fried Chicken and Waffles with Bacon Gravy

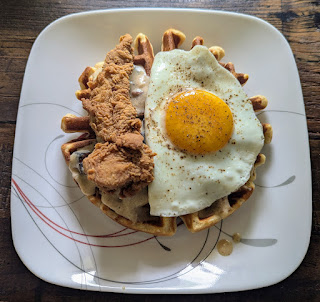
I cheated big-time for this recipe. If I were doing it properly, I would've made not just the waffles and gravy, but also the fried chicken from scratch. But I really didn't want to have to set up for deep frying or put that much effort into it. So instead, I went down the street and got some fried chicken tenders and served those with the waffles and gravy. And they were delicious! No regrets.


Fried Chicken and Waffles with Bacon Gravy

Slightly adapted from Waffles: Sweet, Savory, Simple by Dawn Yanagihara

Ingredients

  • 170g bacon
  • 2 Tbsp. flour
  • 2 1/2 c. milk
  • 1 dried bay leaf
  • 1/8-1/4 tsp. Tabasco (or similar) hot sauce
  • salt and pepper, to taste
  • 4 classic, buttermilk, cornmeal, or malted waffles
  • 4-8 pieces chicken tenders (or fried chicken)

Directions

  1. If making fried chicken from scratch, prepare it first, then continue with the recipe.
  2. Crisp the bacon over medium heat.
  3. Remove the bacon from the pan, leaving behind the fat/grease.
  4. Chop or crumble the bacon and set aside.
  5. Pour off all but 2 Tbsp. of fat from the pan. If you have less than 2 Tbsp. of fat, supplement with lard or other fats as necessary.
  6. Whisk flour into fat and cook for 2 minutes.
  7. Gradually whisk the milk into the roux.
  8. Add the bay leaf and Tobasco sauce and season to taste with salt and pepper.
  9. Increase heat to medium-high and bring to a boil.
  10. Reduce heat to medium or medium-low and simmer vigorously, stirring occasionally, until thickened (~5 minutes).
  11. Return the bacon to the pan. If you made your own fried chicken from scratch, add any drippings or crispy bits that you strained out of the frying oil after using it.
  12. Cover and keep warm, stirring occasionally, until ready to use.
  13. Meanwhile, cook the waffles.
  14. Top each waffle with a generous portion of gravy and 1-2 pieces of chicken.
  15. Add extra hot sauce or other condiments as desired.

Sunday, 15 September 2024

Applesauce Crumb Cake

I've made other applesauce cakes before, but I'd never tried the one out of The Breakfast Bible specifically. And since I am apparently trying to 100% as many cookbooks as possible, I decided to give it a go. It was pretty good. But, honestly, I think I probably prefer the version out of the Kidlet's ATK cookbook over this one. Still... glad I tried it. If nothing else it's another recipe to check off and another point for comparison.


Applesauce Crumb Cake

Slightly adapted from The Breakfast Bible by Kate McMillan

Ingredients

Cake

  • 370g all-purpose flour
  • 1 tsp. baking soda
  • 1 tsp. ground cinnamon
  • 1/4 tsp. coarse sea salt, ground
  • 200g sugar
  • 200g brown sugar
  • 3/4 c. canola oil
  • 3/4 c. unsweetened applesauce
  • 3 large eggs
  • 3 apples, peeled and cubed

Crumb Topping

  • 120g all-purpose flour
  • 100g brown sugar
  • 1/2 c. unsalted butter

Directions

  1. Preheat oven to 180°C (350°F) and grease and flour a 23x33cm (9x13") baking pan.
  2. Sift together the flour, baking soda, cinnamon, and salt.
  3. In a separate bowl (or large measuring cup), combine the sugar, brown sugar, oil, applesauce, and eggs.
  4. Add the wet ingredients to the dry and stir until combined.
  5. Add the apples and stir until just mixed.
  6. Pour the batter into the prepared pan and spread into an even layer.
  7. Combine the flour and sugar for the topping and cut in the butter.
  8. Press into a ball and then separate into coarse crumbs.
  9. Sprinkle the crumbs over the cake.
  10. Bake at 180°C (350°F) for ~1 hour.
  11. Transfer to wire rack to cool.
  12. Once cooled, cut into squares and serve.

Saturday, 14 September 2024

Frittata with Herbs and Tomatoes

I find frittatas tend to make a fairly decent low-effort-but-nutritious breakfast/brunch option. You get protein from the eggs and it's relatively easy to work in at least some veg. They're very flexible. And one frittata will feed all three of us for two meals, which is handy.

This frittata recipe comes courtesy of The Breakfast Bible (which I'm still working my way through). It's meant to be made with parsley, basil, mint, chives, cherry tomatoes, and gruyère. We were all out of fresh basil, so I ended up substituting dried. And our chives had gone off, so I tossed in a small green onion instead. For the cherry tomatoes, I ended up using up some leftover diced tomatoes we had sitting in the fridge. And I ended up going for grated cheddar rather than gruyère because that's what we had on hand. (Although TF and I both think that mozzarella would've also worked really well.) For the topping, I ended up using some baby spinach rather than the arugula, but they're both good options. I know that's a lot of changes, but it still worked out well and gave us a tasty breakfast (and used up some leftovers from the fridge), so I have no complaints!


Frittata with Herbs and Tomatoes

Slightly adapted from The Breakfast Bible by Kate McMillan

Ingredients

  • 10 large eggs
  • 2 Tbsp. milk
  • 2 Tbsp. chopped flat-leaf parsley
  • 1 Tbsp. chopped fresh basil (or 1/2 Tbsp. dried)
  • 1 tsp. chopped fresh mint
  • 1 tsp. chopped fresh chives (or 1 small green onion, chopped)
  • 1/4 tsp. coarse sea salt, ground
  • 1/8 tsp. black peppercorns, ground
  • 1 Tbsp. unsalted butter
  • 1/4 c. grated gruyère (or mozzarella or cheddar)
  • 1/2 c. halved cherry tomatoes (or diced tomatoes)
  • 3 c. arugula (rocket)
  • 1 Tbsp. olive oil (optional)
  • 2 Tbsp. lemon juice (optional)

Directions

  1. Preheat oven to 200°C (400°F).
  2. Beat the eggs with the milk.
  3. Mix in the parsley, basil, mint, chives, salt, and pepper.
  4. Melt the butter over medium heat.
  5. Pour in the egg mixture and sprinkle with cheese and tomatoes.
  6. Cook, without stirring, for 2 minutes.
  7. Transfer to oven and bake for 10-12 minutes.
  8. If frittata is still undercooked in the centre or insufficiently browned on top, place under broiler for 1-2 minutes to set.
  9. Meanwhile, toss arugula with olive oil and lemon juice (if using) and season with a little extra salt and pepper.
  10. Once frittata is cooked, top with arugula, cut into wedges, and serve.

Friday, 13 September 2024

Makkai Parangikai Kari (Corn Curry)

This curry is meant to be made with corn and white pumpkin, but Iyer suggests the using the inner rind of a watermelon as an alternative to the pumpkin, so I decided to give that a go. We had lots of watermelon that needed to be used anyway, so I figured that saved me going out and trying to find another ingredient.


Makkai Parangikai Kari

Slightly adapted from 660 Curries by Raghavan Iyer

Ingredients

  • 1 Tbsp. chopped fresh ginger
  • 1/4 tsp. black peppercorns
  • 1/4 tsp. cardamom seeds (from green pods)
  • 2 fresh green1 Thai, finger, or serrano chilies, stems removed
  • 1 tsp. coarse sea salt
  • 1 Tbsp. canola (or other neutral) oil
  • 1 tsp. mustard seeds
  • 1 c. coconut milk
  • 2 c. fresh or frozen corn kernels
  • 450g white pumpkin (or inner watermelon rind), peeled and seeded and cut into 2cm cubes
  • 2 Tbsp. chopped fresh cilantro
  • 12 fresh or frozen curry leaves
  • 1 c. water

Directions

  1. Combine ginger, peppercorns, cardamom seeds, chilies, and salt in a molcajete and grind/pound to form a pulpy paste.
  2. Heat oil over medium-high heat.
  3. Add the mustard seeds, cover, and cook until they have stopped popping (30-60 seconds).
  4. Add the coconut milk.
  5. Stir in the paste from the molcajete, then remove from heat and allow mixture to sit for a minute or so.
  6. Add the corn, pumpkin (or watermelon rind), cilantro, curry leaves, and water.
  7. Return to heat and bring to a boil.
  8. Reduce heat to medium-low, cover, and simmer, stirring occasionally, until vegetables are fork tender (~15 minutes).
  9. Serve topped with your favourite chutney. (I like sonth/tamarind-date chutney.)


1 I had a few leftover fresh red finger chilies on hand, so I just used those instead here. It changed the colour of the curry (making it more pinkish than green), but was very similar otherwise. Back

Thursday, 12 September 2024

Omita Khaar (Bitter Green Papaya Curry)

I cheated a bit on this curry. It's meant to be made with green/unripe papaya. Unfortunately, I didn't have any of that. What I did have, though, was a bunch of kohlrabi that's been going begging in the fridge because I got it by accident in one of my produce boxes. And it turns out that kohlrabi actually makes a decent substitute for unripe papaya! Score!

This is one of those very simple curries that I always feel a bit nervous making. There really doesn't seem to be enough to it for it to be acutally... good. Just papaya, a couple of chilies, and some salt, mustard seeds, and baking powder? No garlic, no onion... not even any turmeric! That can't possibly turn into something tasty, right?! Especially when it's made with something as dubious as unripe papaya. And the fact that the recipe aims to double down on the bitter elements also did not instill a great degree of confidence in me. TF and I aren't generally that big on bitter flavours in general. But, you know what, this was actually pretty good! I mean, don't get me wrong, it wasn't a revelation or anything. It's not anyone's new favourite. But, considering the number and nature of the ingredients? It definitely exceeded my expectations for it!

So, if you find yourself in possession of kohlrabi and/or unripe papaya and aren't sure what else to do with it. I can genuinely recommend this recipe. It's not going to take centre stage on its own, but it makes a lovely vegetable side dish to go along with the rest of the meal.

Photo goes here.

Omita Khaar

Slightly adapted from 660 Curries by Raghavan Iyer

Ingredients

  • 680g unripe papaya (or kohlrabi)
  • 2 Tbsp. mustard oil
  • 1 tsp. mustard seeds1
  • 2 fresh green2 Thai, finger, or serrano chilies, halved lengthwise
  • 2 tsp. baking powder
  • 1 tsp. coarse sea salt
  • 1 c. water

Directions

  1. Cut off the heel and stem ends of the papaya, peel it, and slice it in half lengthwise. Scoop out the seeds and "guts", then cut the flesh into 1.5cm cubes. (If using kohlrabi, peel it and cut it into cubes.)
  2. Heat the mustard oil over medium-high heat.
  3. Add the mustard seeds, cover, and cook until they stop popping (30-60 seconds).
  4. Add the papaya (or kohlrabi) and chilies and stir-fry until papaya just begins to brown (4-5 minutes).
  5. Add the baking powder and salt and stir-fry for another 4-5 minutes.
  6. Add the water, stir to combine, and simmer, stirring occasionally, until papaya is fork tender but still holds its shape (15-20 minutes).


1 The original recipe only calls for 1/2 tsp. of mustard seeds, but I'm so used to 1 tsp. being the default amount that I just went on autopilot and put a full tsp. in. That said, I really liked the result, so I think I'd do it that way again in the future. Alternatively, it might be interesting to try making it with panch phoron either as well as or instead of the mustard seeds. I've seen recipes for omita khaar online that call for it and I think the additional spices would go quite well! Back
2 I have a bunch of green finger chilies in the freezer. That said, I still had two fresh red finger chilies in the fridge that needed to be used up before they went off, so I just tossed those in instead. Maybe not quite as visually harmonious as the green ones would have been, but still excellent flavour-wise. Back

Wednesday, 11 September 2024

Chocolate Chip-Almond Oatmeal Cookies

I don't tend to make cookies very often. Even if I enjoy the results, I just don't enjoy the process. I find it tedious. But I've been eyeing this recipe for months. And I was craving a dessert last night. And I even still felt like I had a bit of energy left after dinner. So I figured, why not?

Unfortunately, I think there must be a typo in the original recipe. Because when prepared as written, the cookies spread like crazy and utterly lack any sort of structural integrity. TF commented that the last time she had cookies fail like that, it was because she'd accidentally put in twice as much butter as the recipe called for.

I definitely put in the specified amount of all the ingredients. But I now suspect that there was an error in the recipe and it was actually meant to call for 1/2 c. of butter, rather than the 1 c. actually listed.

If making these again, I'd definitely halve the butter. I might also try omitting the granualted sugar and just make it with brown sugar. Obviously this would make the cookies significantly less sweet, but I think they'd still be sweet enough. (And I'd feel a little less guilty eating them.)

I'm also debating whether it might be nice to swap out half of the chocolate for some sort of dried fruit. I know raisins are traditional for oatmeal cookies. But with the chocolate and almonds, I'm wondering if either cranberries or cherries would be a good choice.

I've given some options and suggestions below. (As well as adjusting the butter and sugar quantities.) All of these changes are, as yet, untested, so use at your own peril. That said, I can definitively confirm that the recipe as originally written does not work very well. So hopefully these changes will offer at least some improvement.


Chocolate Chip-Almond Oatmeal Cookies

Adapted from Dessert of the Day by Kim Laidlaw

Ingredients

  • 1/2 c. unsalted butter, softened
  • 3/4 c. brown sugar
  • 2 large eggs
  • 1 tsp. vanilla extract
  • 1 1/2 c. all-purpose flour
  • 1 tsp. baking soda
  • 1/4 tsp. coarse sea salt
  • 2 c. rolled oats
  • 190-380g dark chocolate, chopped
  • 1 c. slivered almonds
  • 1 c. dried cranberries or cherries (optional)

Directions

  1. Preheat oven to 180°C (350°F) and line two baking sheets with parchment paper or silicone baking mats.
  2. Cream together the butter and the sugar.
  3. Beat in the eggs and vanilla.
  4. Sift in the flour and baking soda, add the salt, and mix well.
  5. Stir in the rolled oats.
  6. Add the chocolate, almonds, and dried fruit (if using) and stir to combine.
  7. Drop spoonfuls of dough onto the prepared baking sheets.
  8. Bake at 180°C (350°F) for 10-12 minutes.
  9. Let cool for 5-10 minutes before transferring to plate or rack to finish cooling.
  10. Repeat baking process with remaining dough.

Tuesday, 10 September 2024

Lentil, Potato, and Spinach Curry

I really liked this curry. I think TF and the Kidlet preferred the chicken tikka masala that I made to go with it, but I actually preferred the lentils!

The original recpe called for French (Puy) lentils, but I didn't have quite enough left, so I ended up using a mix of French and brown lentils. I tend to prefer French lentils in general, but the mix was fine here. And brown lentils tend to be more common in Indian cooking anyway, so I didn't feel that it was a huge deal to fudge things with the lentils a bit.

Cooking the lentils with some herbs and veggies added great flavour, but picking out all the bits afterward was annoying. I think next time I'd put everything but the lentils in a little cheesecloth bag so that it could be easily pulled out and composted afterward. Either that, or just leave all the veggies in. They'll end up a bit mushy, of course, but it might be worth trying. I figure, if you chop everything up small, they'll just end up homogenizing into the sauce. Something to think about for next time...


Lentil, Potato, and Spinach Curry

Slightly adapted from Vegetable of the Day by Kate McMillan

Ingredients

  • 1 c. French (Puy) lentils
  • 4 c. water
  • 1 large carrot, cut into three pieces
  • 1 rib celery, cut into three pieces
  • 1 onion, half chopped, half left whole
  • 5 sprigs parsley
  • 1-2 Tbsp. canola oil or ghee
  • 2-3 cloves garlic, minced
  • 1 Tbsp. bin bhuna hua garam masala
  • 2 tsp. cumin seeds, ground
  • 1 tsp. coriander seeds, ground
  • 1 tsp. coarse sea salt
  • 1/4 tsp. black peppercorns, ground
  • 2 large red potatoes, cut into 1cm cubes
  • 2 c. chopped frozen spinach
  • 1/4 c. plain yogurt or raita, to serve (optional)

Directions

  1. Rinse and drain the lentils.
  2. Place lentils in a pot with the water, carrot, celery, onion half, and parsley and bring to a boil over medium-high heat.
  3. Reduce heat to medium-low, cover, and simmer until lentils are tender (~30 minutes).
  4. Remove and discard the herbs and veggies.
  5. Reserve the lentils and their cooking water separately. If there is less than 2 c. of liquid left, add water to bring the total volume to 2 c.
  6. In the now empty pot, heat the oil (or ghee) over medium heat.
  7. Add the chopped onion and garlic and cook until softened (~5 minutes).
  8. Add the garam masala, cumin, coriander, salt, and pepper and cook for another minute or two.
  9. Add the potatoes, lentils, and reserved cooking water and bring to a boil.
  10. Cook until potatoes are fork tender (~15 minutes).
  11. Stir in spinach and cook until heated through (2-3 minutes).
  12. Serve topped with yogurt/raita, if desired.

Monday, 9 September 2024

Scrambled Eggs with Dill, Cream Cheese, and Croutons

This was an interesting combo. It essentially incorporates the toast as a topping for the eggs rather than a substrate. It works pretty well. Although I think I preferred the kielbasa and arugula scrambled eggs overall. Still, it was a fun experiment.


Scrambled Eggs with Dill, Cream Cheese, and Croutons

Slightly adapted from The Breakfast Bible by Kate McMillan

Ingredients

  • 2 Tbsp. butter or bacon grease, divided
  • 3/4 c. cubed stale bread
  • 8 large eggs
  • 2 Tbsp. milk
  • 1/4 tsp. coarse sea salt, ground
  • 1/8 tsp. black peppercorns, ground
  • 125g cream cheese
  • 2 Tbsp. chopped fresh dill

Directions

  1. Melt 1 Tbsp. of the fat over medium heat.
  2. Add the bread and cook, stirring every minute or two, until nicely crisp. Transfer to plate and set aside.
  3. Beat eggs with milk, salt, and pepper.
  4. Add remaining 1 Tbsp. of fat to pan and reduce heat to medium-low.
  5. Pour in eggs and cook until bottom beings to set (~3 minutes).
  6. Add cream cheese and dill and stir it in.
  7. Continue cooking until eggs are fully set.
  8. Top with croutons and serve.

Sunday, 8 September 2024

Trottole ai Gamberi e Funghi

This recipe is specced for long pasta like tonnarelli or fusilli lunghi, but we had a bag of never-before-seen trottole and decided to use that instead. As usual, we ramped up the quantity of sauce significantly compared to what the recipe calls for. The result was delicious, although the sauce took longer to make than planned due to taking longer to cook down the liquid.

The recipe also calls for heavy cream (35% MF) and raw, shelled shrimp. We have a surplus of half-and-half (10% MF) right now, so I used that and increased the quantity. For the shrimp, we had frozen cooked shelled shrimp, which I tossed into the sauce a bit earlier than called for to let them thaw; I might experiment with alternate approaches in the future, since they released a lot of moisture when doing so.


Trottole ai Gamberi e Funghi (Trottole with Shrimp and Mushrooms)

The Classic Pasta Cookbook by Guiliano Hazan (pp.104-105)

Ingredients

  • 450-500g dried pasta
  • 45g dried porcini mushrooms
  • ½ C olive oil
  • 1½-2 C yellow onions, halved and thinly sliced
  • 5 garlic cloves, minced
  • 650g fresh cremini mushrooms, thinly sliced
  • 450mL diced tomatoes (or whole plum tomatoes, smashed)
  • ¾ C heavy cream, or 1½ C half-and-half
  • 500-600g cooked peeled frozen shrimp
  • freshly grated parmesan for serving

Directions

  1. Place dried porcini in a bowl and pour over 1½ C warm water. Let stand 20 minutes.
  2. Drain, reserving mushroom water. Rinse mushrooms and coarsely chop.
  3. Pour mushroom water through a coffee filter and buffer.
  4. Heat oil and onion in a large, deep-sided skillet over medium heat. Cook until the onion softens and turns golden.
  5. Add the garlic and cook until fragrant, 30-60 seconds.
  6. Increase heat to medium-high and add the porcini and their filtered water. Cook, stirring often, until the water has evaporated.
  7. Add the cremini slices, season with salt and pepper, and cook until they are tender and the water they release has evaporated.
  8. Add the tomatoes and cook until about half the liquid has cooked off.
  9. Meanwhile, start the pasta cooking.
  10. Reduce heat to medium, add the cream, and cook until reduced by half.
  11. Add the shrimp and simmer until thawed and heated through.
  12. Toss with the cooked pasta and serve.

Saturday, 7 September 2024

Waffles Bostock

I've been craving waffles for the last couple days. Conveniently, I am still working my way through the waffle cookbook. Somewhat less conveninetly, the only recipes I have yet to make from it are the dessert waffles (and a few of the toppings). I know that I could just revisit one of the earlier recipes, but where would be the fun in that?!

These waffles Bostock certainly make for a decadent option, but they are reasonably quick and easy to make. They basically answer the question: What if we replaced the pastry of a Bakewell tart with waffles?

Yanagihara suggests using either basic, buttermilk, or malted waffles as the base for this offering. My sourdough starter really needed some TLC though, so I opted for a sourdough waffle instead. Honestly, I think this approach worked out even better. The frangipane is very rich and both it and the jam are quite sweet, so having a relatively lean, whole wheat waffle with a bit of a sour tang to it helped to balance the flavours out a bit. I mean, I'm sure the other options would've been fine, but I actually really liked how the sourdough waffles worked out.


Waffles Bostock

Slightly adapted from Waffles: Sweet, Savory, Simple by Dawn Yanagihara

Ingredients

  • 100g ground almonds (almond flour)
  • 100g sugar
  • 1/8 tsp. coarse sea salt, ground
  • 1 large egg
  • 1/2 tsp. vanilla extract
  • 1/4 tsp. almond extract
  • 6 Tbsp. unsalted butter, softened
  • 4 sourdough waffles (or other waffle of your choice)
  • 6-8 Tbsp. jam1 (preferably raspberry, strawberry, cherry, or apricot)
  • sliced almonds, glacé cherries, and/or maraschino cherries, to serve

Directions

  1. Preheat oven to 200°C (400°F).
  2. Combine ground almonds, sugar, and salt and mix well, breaking up any lumps.
  3. Mix in the egg, vanilla, and almond extract.
  4. Add the butter and mix well.
  5. Place the waffles on a baking sheet.
  6. Spread 1 1/2 to 2 Tbsp. of jam onto each waffle.
  7. Spoon ~1/4 of the frangipane (almond mixture) onto each waffle and spread into an even layer.
  8. Top each waffle with ~2 Tbsp. of sliced almonds and/or a glacé cherry (if using).
  9. Bake at 200°C (400°F) until frangipane is set (10-15 minutes).
  10. Add a maraschino cherry to each waffle (if using/desired).
  11. Optionally sprinkle with a little icing sugar before serving.
1 We ended up using strawberry jam for two of the waffles and spread the other two with some of my dad's homemade red currant jelly! Back

Friday, 6 September 2024

Urulikazhungu Molagha Bhajee (Potato-Pepper Vegetable Curry)

I don't make potato curries very often. We're usually having either rice, flatbreads, or both if we're having curry for dinner, which pretty much fills the "starch" slot in my dinner plans. So, when I'm selecting which curries to make, I'm generally looking for something with lots of non-starchy veggies and/or protein in it and most potato curries do not fit those requirements. In this case though, I already had a bunch of other curries already made: lots of veggies and protein on hand already. I didn't really need any new curries at all. We already had plenty for dinner. But I had the time and the ingredients on hand, so I figured it wouldn't hurt to whip up one more. Just to have a little extra variety!

Urulikazhungu Molagha Bhajee

Slightly adapted from 660 Curries by Raghavan Iyer

Ingredients

  • 6 1/2 tsp. canola (or other neutral) oil, divided
  • 450g russet (or other floury) potatoes, cut into French-fry strips
  • 1 bell pepper, cut into 1cm wide strips
  • 15 fresh or frozen curry leaves
  • 1 c. water
  • 1 tsp. coarse sea salt
  • 1 Tbsp. skinned split black lentils (mapte beans/urad dal/white lentils)
  • 1 Tbsp. yellow split peas (chana dal)
  • 1 Tbsp. coriander seeds
  • 1 cinnamon stick (~7cm long), broken into smaller pieces
  • juice of 1 lime
  • 2 Tbsp. chopped fresh or frozen curry leaves

Directions

  1. Heat 2 Tbsp. of the oil over medium-high heat.
  2. Add the potatoes, bell pepper, and curry leaves and stir-fry until potatoes begin to brown (~5 minutes).
  3. Add water and salt and bring to a boil.
  4. Reduce heat to medium-low, cover, and simmer, stirring occasionally, until potatoes are fork tender (10-12 minutes).
  5. Meanwhile, heat the remaining 1/2 tsp. oil over medium-high heat.
  6. Add the lentils, split peas, and cinnamon and cook, stirring constantly for 2-3 minutes.
  7. Transfer the spice mixture to a plate and allow to cool.
  8. Once spices have cooled completely, transfer to a spice ginder and grind until the texture resembles ground black pepper.
  9. Once the vegetables are tender, add the spices and lime juice.
  10. Sprinkle with chopped curry leaves and serve.

Thursday, 5 September 2024

Bhuna Hua Simla Mirch aur Masoor ki Dal (Red Lentil Dal with Slow-Roasted Bell Peppers)

We at the last of our chickpea stew last night, but we still had a couple of other curries and some rice left, so I just threw together a simple dal tonight to fill the legume slot. It's surprisingly tasty considering the brevity of the ingredient list and the lack of alliums!

The original recipe calls for green bell pepper and green chilies, but I had yellow and red respectively, so I just used those instead. The chilies give it a nice kick while the bell pepper adds a bit of sweetness, making it a flavourful dish despite turmeric being the only actual spice used. My only complaint is that it comes out quite thin. I halved the amount of water called for in the sauce, but even so, I found it very soupy. Next time I think I'd reduce the water used to cook the lentils as well. (The instructions below reflect both of these changes.)


Bhuna Hua Simla Mirch aur Masoor ki Dal

Slightly adapted from 660 Curries by Raghavan Iyer

Ingredients

  • 1-2 Tbsp. canola (or other neutral) oil
  • 1 bell pepper, chopped
  • 1-2 fresh Thai, cayenne, or finger chilies, sliced thin
  • 1 c. skinned split brown lentils (red lentils/Egyptian lentils/masoor dal)
  • 3 c. water, divided
  • 3/4 c. diced tomato
  • 1/2 Tbsp. coarse sea salt
  • 1/2 tsp. ground turmeric
  • 1/4 c. chopped fresh cilantro

Directions

  1. Heat oil over medium heat.
  2. Add bell pepper and chilies and cook, stirring occasionally, for 15-20 minutes.
  3. Meanwhile, thoroughly rinse the lentils.
  4. Add 2 c. of the water to the lentils and bring to a boil over medium-high heat.
  5. Skim off any foam from the surface, cover, and reduce heat to medium-low.
  6. Simmer lentils, stirring occasionally, until tender (10-15 minutes).
  7. Once the peppers have gotten some colour and started to brown, add the tomato, salt, and turmeric and deglaze the pan.
  8. Add the remaining cup of water and cook, stirring occasionally, until tomato begins to break down (5-8 minutes).
  9. Once the lentils are tender and the sauce is done, pour it into the pot with the lentils and stir to combine.
  10. Continue to simmer the dal, uncovered, stirring occasionally, for an additional 5 minutes.
  11. Stir in the cilantro and serve.

Wednesday, 4 September 2024

Saag Pork (Spinach and Pork Curry)

I don't make pork curries very often. I don't really associate pork with Indian cuisine and it always feels slightly incongruous to me. I tend to default to legume, vegetable, and/or chicken curries. Sometimes I'll do beef, lamb, or fish depending on what I have on hand or what's on sale at the grocery store that week. But pork just doesn't really figure into things.

That said, Iyer does have a decent-sized pork section in the meat chapter of 660 Curries. And I had some pork tenderloins in the freezer. I got them with a completely different recipe in mind, but I keep not quite getting to it, so I figured I might as well just turn them into curries and try to do the other recipe some other time when I have a bit more bandwidth for meal planning.

I appreciated that this was an incredibly simple recipe that required very little prep and cooked quickly. Plus it used up the leftover tomato in the fridge. And gave us some greens to help balance the meal. So, a win all 'round!


Saag Pork

Slightly adapted from 660 Curries by Raghavan Iyer

Ingredients

  • 500g pork tenderloin, cut into 2cm cubes
  • 1/4 c. whipping (35%) cream
  • 2 Tbsp. garlic paste
  • 2 tsp. bin bhuna hua garam masala
  • 1 tsp. coarse sea salt
  • 1-2 Tbsp. canola (or other neutral) oil
  • 1 tsp. cumin seeds
  • 1/2 c. tomato sauce1
  • 300g chopped frozen spinach

Directions

  1. Combine the pork, cream, garlic paste, garam masala, and salt and mix well.
  2. Cover and chill for at least half an hour or as long as 2 hours.
  3. Heat oil over medium-high heat.
  4. Add cumin seeds and sizzle for 15-30 seconds.
  5. Add the pork along with its marinade and cook, stirring occasionally, for ~5 minutes.
  6. Add the tomato sauce and reduce heat to medium.
  7. Cover and simmer, stirring occasionally, for ~15 minutes.
  8. Add the spinach, cover, and cook until heated through (~5 minutes).
  9. Stir and cook, covered, for another 10 minutes or so.


1 I didn't have any ready-made tomato sauce, but I did have some leftover canned diced tomato. I just used that and added a little bit of salt, pepper, basil, garlic, and bottle masala to approximate a sauce. Back

Tuesday, 3 September 2024

Indo-Italian Spaghetti Arrabbiata

This recipe is Iyer's take on an Indian restaurant's take on spaghetti arrabbiata. It incorporates ginger, garam masala, and cilantro (among other things) into the spicy, tomato-based sauce which is then tossed with cooked spaghetti and topped with Parmesan.

It's quite tasty, but definitely more of a side dish than a main course on its own. It's very starch-heavy, so you really want some vegetables and protein to go with it to make it a complete meal.

I did end up serving it with a couple other curries. But, as I'm still playing catch-up with the blog write-ups, I'm afraid that I no longer remember which ones. I do remember being happy with the resulting meal though. Everything worked quite well together!


Indo-Italian Spaghetti Arrabbiata

Slightly adapted from 660 Curries by Raghavan Iyer

Ingredients

  • 1-2 Tbsp. canola (or other neutral) oil
  • 1 tsp. cumin seeds
  • 2-3 dried red Thai, cayenne, or arbol chilies
  • 1 onion, chopped
  • 1/4 c. tomato paste
  • 1 Tbsp. ginger paste
  • 1 Tbsp. garlic paste
  • 2 tsp. ground Deggi chilies (or 1 tsp. each cayenne and sweet paprika)
  • 2 tsp. sugar
  • 1 tsp. coarse sea salt
  • 1/2 tsp. Kashmiri garam masala
  • 2 c. water
  • 4 c. chopped tomatoes
  • 1/2 c. chopped fresh cilantro
  • 450g dried spaghetti
  • grated Parmesan, to serve

Directions

  1. Heat oil over medium-high heat.
  2. Add cumin seeds and chilies and cook until chilies blacken (15-20 seconds).
  3. Add the onion and stir-fry until light brown around the edges (5-8 minutes).
  4. Add the tomato paste, ginger paste, garlic paste, ground chilies, sugar, salt, and garam masala.
  5. Reduce heat to medium and simmer, stirring occasionally until the paste develops and oily sheen on the surface (~4 minutes).
  6. Add the water and deglaze the pan.
  7. Bring to a boil and simmer, uncovered, stirring occasionally, until sauce begins to thicken (~10 minutes).
  8. Add tomatoes and cilantro and cook, uncovered, stirring occasionally, until tomatoes are warmed through (3-5 minutes).
  9. Cover and keep warm over low heat while pasta cooks.
  10. Meanwhile, bring a large pot of water to a boil.
  11. Add spaghetti and cook until al dente.
  12. Drain the spaghetti and toss it with the sauce.
  13. Top with Parmesan and serve.