Showing posts with label bacon. Show all posts

Thursday, 30 July 2026

Grilled Cheese with Bacon, Tomato, and Egg

Short post today because I am typing one-handed while holding a baby.

These were good. Decadent, but nice as a once-in-a-while treat.


Grilled Cheese with Bacon, Tomato, and Egg

From The Breakfast Bible by Kate McMillan

Ingredients (per sandwich)

  • 2 slices of streaky bacon
  • 1 large egg
  • freshly ground pepper
  • 2 slices of bread
  • 4-8 thin slices of cheese
  • 2-3 slices of tomato
  • butter or margerine

Directions

  1. Cook bacon until crispy, then cut in half crosswise.
  2. Season egg to taste with pepper and fry until whites are set and yolk is thickened.
  3. Layer half of the cheese onto a slice of bread.
  4. Top with bacon, tomato, egg, the remaining cheese, and the other slice of bread.
  5. Butter the outside of the sandwich.
  6. Grill in a panini press or a frying pan with a heavy weight compessing the sandwich. If using a frying pan, flip to toast the other side.
  7. Once both sides are golden brown, remove from pan and cut in half.

Monday, 3 November 2025

Salt and Pepper Waffles with Clam Dip

This was the last savoury waffle in the book that I hadn't made yet. I had been holding off on making it initially since we were still avoiding shellfish for the Kidlet. But Reiver had put in a request for waffles and I was vibing with a savoury option, so I decided to finally give these ones a try. And they were really good!


Salt and Pepper Waffles with Clam Dip

Slightly adapted from Waffles: Sweet, Savory, Simple by Dawn Yanagihara

Ingredients

Dip

  • 115g bacon
  • 1 (185g) can baby clams, drained
  • 6 Tbsp. mayonnaise
  • 6 Tbsp. sour cream
  • 2 green onions, chopped
  • 1 tsp. lemon juice
  • 1 tsp. Worcestershire sauce
  • 1/4 tsp. coarse sea salt, ground
  • 1/4 tsp. black peppercorns, ground
  • 1/8 tsp. celery seeds, ground

Waffles

  • 140g all-purpose flour
  • 2 tsp. sugar
  • 1/2 tsp. coarse sea salt, ground
  • 1/2 tsp. black peppercorns, ground
  • 1 1/4 tsp. baking powder
  • 1 large egg
  • 1 c. milk
  • 3 Tbsp. butter, melted
  • 1-2 green onions, green parts only, sliced

Directions

Dip

  1. Cook the bacon until crisp and chop.1
  2. Combine the clams, mayo, sour cream, green onions, lemon juice, Worcestershire sauce, salt, pepper, and celery seed.
  3. Mix well, taste, and adjust seasonings as desired.
  4. Cover and chill for at least an hour.

Waffles

  1. Combine the flour, sugar, salt, and pepper.
  2. Sift in the baking powder and mix well.
  3. Beat the egg with the milk.
  4. Stir in the melted butter.
  5. Pour the wet ingredients into the dry and stir until just combined.
  6. If you have a "standard"/American waffle iron, you can put 2-3 tsp. of batter into each quadrant and make mini waffles to serve as an appetizer. Otherwise, you can use a normal quantity of batter to make full-sized waffles.
  7. Cook according to manufacturer directions.

Assembly

  1. Top the waffles with the clam dip.
  2. Garnish with sliced green onion (and chopped bacon if you forgot to stir it into the dip like me).


1 I forgot to add the bacon to my dip, so I just sprinkled it on top at the end. Back

Saturday, 27 September 2025

Bacon and Cheese Drop Biscuits

I didn't really have a plan for breakfast this morning. And then I slept in. So I woke up and groggily started casting about in my cookbooks looking for inspiration. In the end, it came down to French toast, muffins, or these biscuits. And the biscuits appealed to us more, so biscuits it was!

These are very easy to throw together (assuming that you have the bacon already cooked and ready to hand). And they have a lot of leavener in them, so they come out very light. They're not my favourite biscuits, but they're quite good nonetheless.

I think, if I were doing them again, I might reduce the oven temperature slightly. I baked these ones at 230°C (450°F) like the recipe called for. And they were good. But the bottoms got a bit darker than I would have liked. So I'm thinking that I might try dropping the temperature down to 220°C (425°F) next time.


Bacon and Cheese Drop Biscuits

Slightly adapted from The Big Book of Breakfasts by Maryana Vollstedt

Ingredients

  • 250g all-purpose flour
  • 1 Tbsp. sugar
  • 1/2 tsp. coarse sea salt, ground
  • 1 Tbsp. baking powder
  • 1 tsp. baking soda
  • 5 Tbsp. butter
  • 1 c. grated cheddar
  • 2-4 slices bacon, cooked and chopped
  • 1 c. buttermilk

Directions

  1. Preheat oven to 220°C (425°F).
  2. Combine flour, sugar, and salt.
  3. Sift in the baking powder and baking soda.
  4. Cut in butter.
  5. Mix in the cheese and bacon.
  6. Pour in the buttermilk and stir to combine.
  7. Drop generous tablespoonfuls of the mixture onto an ungreased baking sheet.
  8. Bake at 220°C (425°F) until done (~12 minutes).
  9. Transfer to a wire rack to cool.

Monday, 22 September 2025

Scrambled Eggs with Hominy, Bacon, and Chilies

This was really good! I never would have thought of putting hominy into scrambled eggs, but it was actually a nice addition.

I swapped out the pork bacon for chicken "bacon" and then added a little bacon grease when cooking the green onions. I also added a bit of mild cheddar right at the end. The recipe doesn't call for any cheese, but I felt like it made a nice addition and complemented the other flavours well.


Scrambled Eggs with Hominy, Bacon, and Chilies

Slightly adapted from The Big Book of Breakfast by Maryana Vollstedt

Ingredients

  • 4-6 slices of bacon (or chicken bacon), chopped
  • 3-6 green onions, chopped
  • 1 small (~400mL) can hominy, rinsed and drained
  • 1 can (~100mL) chopped green chilies
  • 6 large eggs
  • 2 Tbsp. milk
  • salt and pepper, to taste
  • 1/2 c. grated cheddar (optional)
  • ~1/2 c. salsa (optional)

Directions

  1. Cook the bacon and the green onions until bacon is done and green onions are softened (~5 minutes).
  2. Add the hominy and chilies and cook until heated through (3-5 minutes).
  3. Beat the eggs with the milk.
  4. Pour the egg mixture into the pan with the hominy and season to taste with salt and pepper.
  5. Leave undisturbed for a minute or so then cook, stirring occasionally, until the eggs look dry.
  6. Sprinkle with cheese (if using).
  7. Serve with salsa (if using).

Wednesday, 27 August 2025

Budae Jjigae (Korean Army Base Stew)

I've made budae jjigae ramen before, but I'd never actually made the stew itself before. So I decided to finally give this version of it a try while I was in New Zealand.

I think, in the end, I actually preferred the budae jjigae ramen to this stew. But I'm still glad to have tried it! And, honestly budea jjigae is such a flexible recipe that there's really a lot of room for variation and adjustment. So I wouldn't necessarily be opposed to making this again with slightly different ingredients and proportions at some point.

Photo goes here.

Budae Jjigae

Slightly adapted from Aaron & Claire

Ingredients

Seasoning Paste

  • 6 Tbsp. gochugaru (Korean chile flakes)
  • 2 Tbsp. sugar
  • 2-3 Tbsp. garlic paste
  • 2 Tbsp. dark soy sauce
  • 1 Tbsp. dasida (Korean beef stock powder)
  • 1/4 c. water

Soup

  • 400g cabbage
  • 1 Yukon Gold potato
  • 4-5 green onions
  • 400g SPAM
  • 6-8 sausages
  • 4 slices bacon
  • 400g ground beef
  • 1/4 c. baked beans
  • 2-3 slices American (or mild cheddar) cheese
  • 3 c. Korean bone broth (sagol yuksu)
  • ~3 c. water
  • 1-2 cake(s) of instant ramen noodles (optional)

Directions

  1. Combine the gochugaru, sugar, garlic, soy sauce, dasida, and water. Mix well and set aside.
  2. Cut the cabbage into bite-sized pieces.
  3. Slice the potato, green onions, SPAM, sausages, and bacon.
  4. Arrange all the ingredients nicely in a pot (or divide into two smaller pots).
  5. Add the seasoning paste in the middle.
  6. Use the ground beef to make some tiny meatballs -- no seasoning necessary -- and arrange them around the seasoning paste.
  7. Add the baked beans and place the cheese on top.
  8. Pour in the bone broth and water and bring to a boil.
  9. Once the rest of the ingredients are almost cooked, add in the ramen (if using) and cook until done.
  10. Serve with hot rice and/or kimchi.

Sunday, 24 August 2025

Creamy Kimchi Pasta

This was a bit of a last-minute whirlwind meal. I got a bit carried away making goodies for my last day of class in NZ. I ended up making an apple-feijoa crumble, maple butter tarts, and maccaroni & cheese. Then, in a panic, realized that I didn't have anything for dinner. So I whipped up a quick batch of this pasta to serve to Reiver and the Kidlet before I went.

Reiver later pointed out that I really needn't have worried about it and that he could have easily fixed them some dinner while I was at class. Also, the Kidlet ended up basically eating her body weight in leftover mac & cheese when I got home anyway. So I probably should've just taken the extra few minutes to chill before class. Oh well...

Photo goes here.

Creamy Kimchi Pasta

Slightly adapted from Aaron & Claire

Ingredients

Pasta

  • 200g kimchi, chopped
  • 2 Tbsp. gochugaru (Korean chile flakes)
  • 2 Tbsp. light soy sauce
  • 2 Tbsp. oyster sauce
  • 2 tsp. sugar
  • 500g dry pasta
  • 1 Tbsp. olive oil
  • 1 onion, sliced
  • 4-6 green onions, chopped and divided
  • 6-12 mushrooms, chopped
  • 100g uncooked bacon, chopped
  • 1 c. heavy (35%) cream
  • 1 c. milk
  • 100g grated Parmesan
  • ~1/2 c. pasta water
  • salt and pepper, to taste

Directions

  1. Combine the kimchi, gochugary, soy sauce, oyster sauce, and sugar and mix well. Set aside.
  2. Cook the pasta according to package directions. Reserve ~1 c. of the water, then drain the rest.
  3. Heat the oil over medium-high heat.
  4. Add the onions and the white parts of the green onions and sauté for 2 minutes.
  5. Add the mushrooms and bacon and cook for another 2 minutes.
  6. Add the kimchi mixture and cook until liquid has evaporated (~3 minutes).
  7. Reduce heat to medium and add the cream and milk.
  8. Simmer until thickened slightly (3-5 minutes).
  9. Stir in the Parmesan and reduce heat to medium-low.
  10. Add pasta, stir, increase heat to medium-high, and mix in ~1/4 c. of the reserved pasta water.
  11. Season to taste with salt and pepper.
  12. Add more pasta water as needed to achieve desired consistency.
  13. Top with the green parts of the green onions and a bit of extra Parmesan to serve.

Sunday, 9 February 2025

Stir Fried Kimchi

Symbol: I ended up changing the proportions on this recipe slightly. Mostly because kimchi is a bit harder to come by here than it is at home, so I ended up cutting it back to essentially a half batch, but with extra onion, green onion, and bacon relative to the original.


Stir Fried Kimchi

Slighlty adapted from Aaron & Claire

Ingredients

Sauce

  • 1/2 Tbsp. gochugaru (Korean chili pepper flakes)
  • 1/2 Tbsp. soy sauce
  • 3/4 tsp. sugar
  • 1/2 Tbsp. light corn syrup
  • 1/2 tsp. dasida (Korean beef stock powder)

Kimchi

  • 1 c. well-fermented kimchi
  • 1 onion, halved and sliced
  • 1 green onion, chopped
  • 1/2 Tbsp. neutral-tasting oil
  • 100g middle or back bacon (optional)
  • 1 tsp. toasted sesame oil
  • Generous pinch of toasted sesame seeds, to garnish

Directions

  1. Make the sauce: Combine all the sauce ingredients in a small container and mix well.
  2. Using tongs and scissors, cut kimchi into small, bite-sized pieces.
  3. In a pan, heat the oil over medium heat.
  4. Add the bacon (if using) and cook until golden brown, then remove from the pan and cut into thin strips.
  5. To the same pan, add the green onion and sauté for 1 minute or until fragrant.
  6. Add the kimchi and cook for 5 minutes over medium-low heat.
  7. Add the onion, bacon, and sauce and cook for another 7 minutes, being careful not to burn it.
  8. Turn the heat off. Finish with sesame oil and sesame seeds.

Saturday, 8 February 2025

Baconfat Bananas

Symbol here! Reiver has just been helping me transcribe some of the recent recipes, so his name may show up on some posts as well. The preamble will usually still be from me though.

I cooked a bit of bacon to go into the strata this morning. Which was delicious, but left me with the conundrum of what to do with the leftover bacon grease. It wasn't really enough to be worth saving, but I also didn't have any ideas readily to hand for it. Reiver suggested it might go well with the slightly over-ripe bananas on the counter, so I poked around for some ideas.

I contemplated doing a slightly savoury banana bread. And there was an interesting banana-bacon-cornbread recipe that I stumbled across as well. But those all required a fair bit more bacon fat than I had available. So, in the end, I went with this simple recipe for bacon and bananas. I didn't actually have the bacon for it since all of that went into the strata, but the bananas were still great on some pancakes! And I can always try it with the bacon next time.

From Reiver: There wasn't any actual bacon in the recipe, just the bacon fat from the Cheese and Bacon Strata. While a simple enough classic, this went wonderfully with the granola pancakes.

Photo goes here.

Banana and Bacon

Slightly adapted from Cuisine Fiend

Ingredients

  • 3-4 slices of smoked streaky bacon
  • 1 Tbsp. butter
  • 2 tbsp. maple syrup
  • 2 small bananas, halved lengthwise and crosswise

Directions

  1. Cook the bacon, then remove from pan and set aside.
  2. Add the butter and maple syrup to the pan.
  3. Add the banana pieces, cut-side-down, and cook for 3-4 minutes until slightly caramelized.
  4. Flip and cook until softened and evenly cooked throughout.
  5. Remove the bananas onto a plate, top with bacon, and drizzle with any juices left in the pan.

Wednesday, 29 January 2025

Bacon and Cheese Strata

I think this is the most barebones strata that I've ever seen. That's not bad, mind you! It honestly really hit the spot this morning. And the simplicity means that you don't need to worry about having a lot of ingredients on hand to make it. Plus, the relatively plain flavour makes it the perfect backdrop for whatever sauces or toppings you want to use to dress it up. So, I really have no complaints about it. It was just interesting to see a strata that was pretty much just bread, custard, and cheese with just a touch of bacon to round it out. Not a bad place to start your breakfast or brunch though, really. Very handy as a goes-with-anything sort of dish!


Bacon and Cheese Strata

Slightly adapted from The Big Book of Breakfast by Maryana Vollstedt

Ingredients

  • 4 slices bread
  • 100-150g bacon, cooked and chopped
  • 6 large eggs
  • 1 1/2 c. milk
  • 1/4 tsp. coarse sea salt, ground
  • 1/8 tsp. black peppercorns, ground
  • 2-3 drops Tabasco (or similar) hot sauce
  • 2 Tbsp. chopped flat-leaf parsley1
  • 1/2 c. grated cheddar cheese

Directions

  1. Grease a 20x30cm baking dish.
  2. Arrange the bread slices in a single layer in the bottom of the dish. Trim as needed to get them to fit with as few gaps as possible.
  3. Sprinkle the bacon over the bread.
  4. Beat the eggs with the milk and mix in the salt, pepper, Tabasco sauce, and parsley.
  5. Pour the custard over the bread, cover, and set aside for at least half an hour. Alternatively, cover, and chill overnight.
  6. Preheat oven to 180°C (350°F).
  7. Sprinkle the cheese over the strata.
  8. Bake at 180°C (350°F) for 30-40 minutes.
  9. Serve with HP Sauce and/or your favourite chutney.


1 I completely forgot to add the parsely! Whoops! Still tasty, but wish I'd remembered that detail. Oh well... next time! Back

Thursday, 9 January 2025

Asparagus, Corn, and Egg Tart

This made for a phenomenal brunch! The flavours were great and it looked very nice too. The only slightly hiccough (and I do mean slight) was that, in order to get the egg whites to fully set, I had to cook it until the yolks were also hard. They were still delicious. It just wasn't the set white, runny yolk result that I'd been hoping for. But, given how this one went, I think you'd need to cook the whites and yolks separately for that. That said, it was good enough like this that I probably wouldn't be inclined to bother most of the time. And, I will admit: having the yolks fully set did make it easier to serve.

I've given ranges for a lot of the ingredients here because I do feel that you have a fair bit of flexibility. Our green onions were large, so I only ended up using three. But with smaller ones, I think that the full six called for in the recipe would have been more appropriate. The recipe also called for just over 100g of each kind of cheese. I used 100 and felt that was very generous. I think that I probably could've gotten away with half that amount and still been quite happy. That said, maximum cheese was delicious! And I followed a similar logic with the asparagus, bacon, and garlic. For the eggs, the original recipe actually called for 4-6. But I had a very large pie plate and, even with six eggs, it still looked a bit sparse, so I tossed in an extra two and that seemed just about right.


Asparagus, Corn, and Egg Tart

Slightly adapted from The Breakfast Bible by Kate McMillan

Ingredients

  • 1 recipe cornmeal shortcrust pastry
  • 100-150g asparagus, trimmed
  • 100-150g pancetta or bacon, chopped
  • 3-6 green onions, chopped
  • 3-4 cloves garlic, minced
  • 1 c. frozen corn kernels
  • 50-100g mozzarella cheese, grated
  • 50-100g cheddar cheese, grated
  • 1/3 c. half-and-half (10% MF)
  • salt and pepper, to taste
  • 6-8 large eggs
  • 1/2 c. sunflower or similar sprouts (optional)

Directions

  1. Roll out the pastry and use it to line a 23cm (9") deep-dish pie plate or 25cm (10") tart tin. Chill for 20-30 minutes.
  2. Preheat oven to 190°C (375°F).
  3. Line the pie shell with baking paper, fill with pie weights, and blind bake for 12 minutes.
  4. Meanwhile, blanch the asparagus for 1-2 minutes and then drain and shock in cold water.
  5. Cook the pancetta/bacon over medium heat for a few minutes, then add the green onion and garlic and cook until softened (5 minutes + 3-5 minutes).
  6. Add the corn and cook for another minute or so.
  7. Remove the paper and pie weights from the pastry shell and spread the bacon mixture in an even layer in the bottom of the pie shell.
  8. Place the asparagus on top and sprinkle with the cheese.
  9. Drizzle with the half-and-half and season to taste with pepper.
  10. Return to oven and bake for 10 minutes.
  11. Crack the eggs into the tart, doing your best to space them evenly. If it's important to you to have set whites and runny yolks, then separate the yolks from the whites and pour the whites on first. Set the yolks aside for now.
  12. Season to taste with salt and pepper.
  13. Bake at 190°C (375°F) for 15 minutes.
  14. If you reserved the yolks, add them now, doing your best to space them evenly atop the tart.
  15. Return to oven, turn off heat, and allow to sit in hot oven for 10 minutes to finish setting whites and thicken yolks.
  16. Remove from oven and allow to stand for 5-10 minutes before slicing.
  17. Garnish with sprouts (if using), cut into wedges, and serve.

Wednesday, 6 November 2024

Bacon, Leek, and GruyĂšre Quiche

I had and open package of chicken bacon in the fridge that needed to be used up as well as a couple of leeks from our last produce basket, so this quiche made for an ideal breakfast option. I went with sourdough pastry again so that I could use a bit more starter as well.

The quiche was delicious. But I still think I'd make a few tweaks next time. And, surprisingly, one of those tweaks would be to add less cheese. Usually, if I'm making adjustments to the amount of cheese called for in the recipe, it's an increase to the amount, not a decrease! But I actually feel like this one went a bit too heavy on the cheese. I mean, it tasted great, but it had so much gruyère that it became almost more like a cheese pie than a quiche. And all that cheese made it a little greasy as well. So I do think I'd try cutting the cheese slightly next time.

I might also increase the egg a touch. The original recipe called for a 23cm (9") loose-bottom tart tin, but I prefer to use my 23cm deep-dish pie plate for quiche. Which, to be fair, worked fine. But I did find that, with only two eggs, the pie shell was left slightly under-filled. So I think I'd try adding an extra egg next time.

And, depending on how I was feeling, I might try making the custard with whole milk rather than half-and-half. Just to lighten it up a bit. Don't get me wrong! The half-and-half was delicious. But it did make for a very rich final result. I'd be interested to see how it turned out with milk instead.


Bacon, Leek, and Gruyère Quiche

Slightly adapted from The Breakfast Bible by Kate McMillan

Ingredients

  • 1/2 recipe sourdough pastry (or pastry of your choice)
  • 4-6 slices bacon
  • 1 Tbsp. unsalted butter
  • 2 leeks, halved and thinly sliced (light parts only)
  • 3 large eggs
  • 1 c. half-and-half (10%) or milk
  • 1/2 tsp. coarse sea salt, ground
  • 1/4 tsp. black peppercorns, ground
  • 1/8 tsp. ground nutmeg
  • 100g gruyère cheese, grated

Directions

  1. Roll out pastry and use it to line a 23cm (9") deep-dish pie plate. Freeze for 30 minutes.
  2. Place a baking sheet in the oven and preheat to 190°C (375°F).
  3. Line pie shell with baking paper and fill with pie weights. Place on hot baking sheet and bake at 190°C (375°F) for 15 minutes.
  4. Remove pie weights and bake for another 5 minutes.
  5. Meanwhile, cook bacon until crisp and chop.
  6. Drain fat from pan, return pan to heat, and melt butter over medium-low heat.
  7. Add leeks and cook until softened (~10 minutes).
  8. Beat eggs with half-and-half (or milk), salt, pepper, and nutmeg.
  9. Once pie shell is baked, add the leeks and bacon in an even layer in the bottom.
  10. Top with cheese.
  11. Give the custard a final mix and pour it into the pie shell.
  12. Return quiche to oven on top of hot baking sheet and bake at 190°C (375°F) for 30 minutes.

Friday, 1 November 2024

Asian Noodle Bowl (Breakfast Bible)

Personally, I don't really feel that this recipe... works as written. It calls for 1 1/2 pounds of fresh noodles (either udon, soba, or spaghetti), which works out to ~1 pound of dried. I opted for a scant pound of ramen for my take on this. And it was okay, but I really felt that there were way too many noodles for the amount of other stuff. And I even doubled the bacon and increased the eggs by 50%! (Plus, I added some toasted sesame seeds and pickled veggies.) So yeah, while I'm fine with this breakfast as a concept I think this particular implementation could use some work.

The recipe below reflects the rebalanced version. Which, to be fair, is largely the same as what I made today, just with less noodles.


Asian Noodle Bowl

Adapted from The Breakfast Bible by Kate McMillan

Ingredients

  • 4-6 slices bacon or 100g smoked tofu, sliced
  • 250g dried noodles (ramen, soba, spaghetti, etc.)
  • 2 Tbsp. light soy sauce
  • 2 tsp. mirin
  • 1 tsp. rice vinegar
  • 1/2 tsp. sugar
  • 4-6 large eggs, beaten
  • 2 green onions, chopped, greens and whites separated
  • 1 Tbsp. toasted sesame seeds
  • pickled veggies, to taste
  • black pepper, to taste

Directions

  1. If using bacon, fry until crisp. If using tofu, add a little bacon grease or oil to the pan and fry until browned on both sides. Chop and set aside.
  2. Cook the noodles to desired doneness. Drain and set aside.
  3. Combine soy sauce, mirin, vinegar, and sugar.
  4. Drain all but 1 Tbsp. of fat from the pan used to cook the bacon.
  5. Add the noodles, the sauce, and the white parts of the green onions and toss to combine.
  6. Push the noodles to the sides of the pan and pour in the eggs.
  7. Cook, without stirring, for 3-4 minutes.
  8. Stir the eggs to allow some of the uncooked egg to run underneath.
  9. Continue stirring ever few minutes until eggs are mostly cooked, then stir into the noodles and continue cooking until eggs are fully set.
  10. Top with green parts of green onions, sesame seeds, and pickled veggies, season to taste with pepper, and serve.

Friday, 18 October 2024

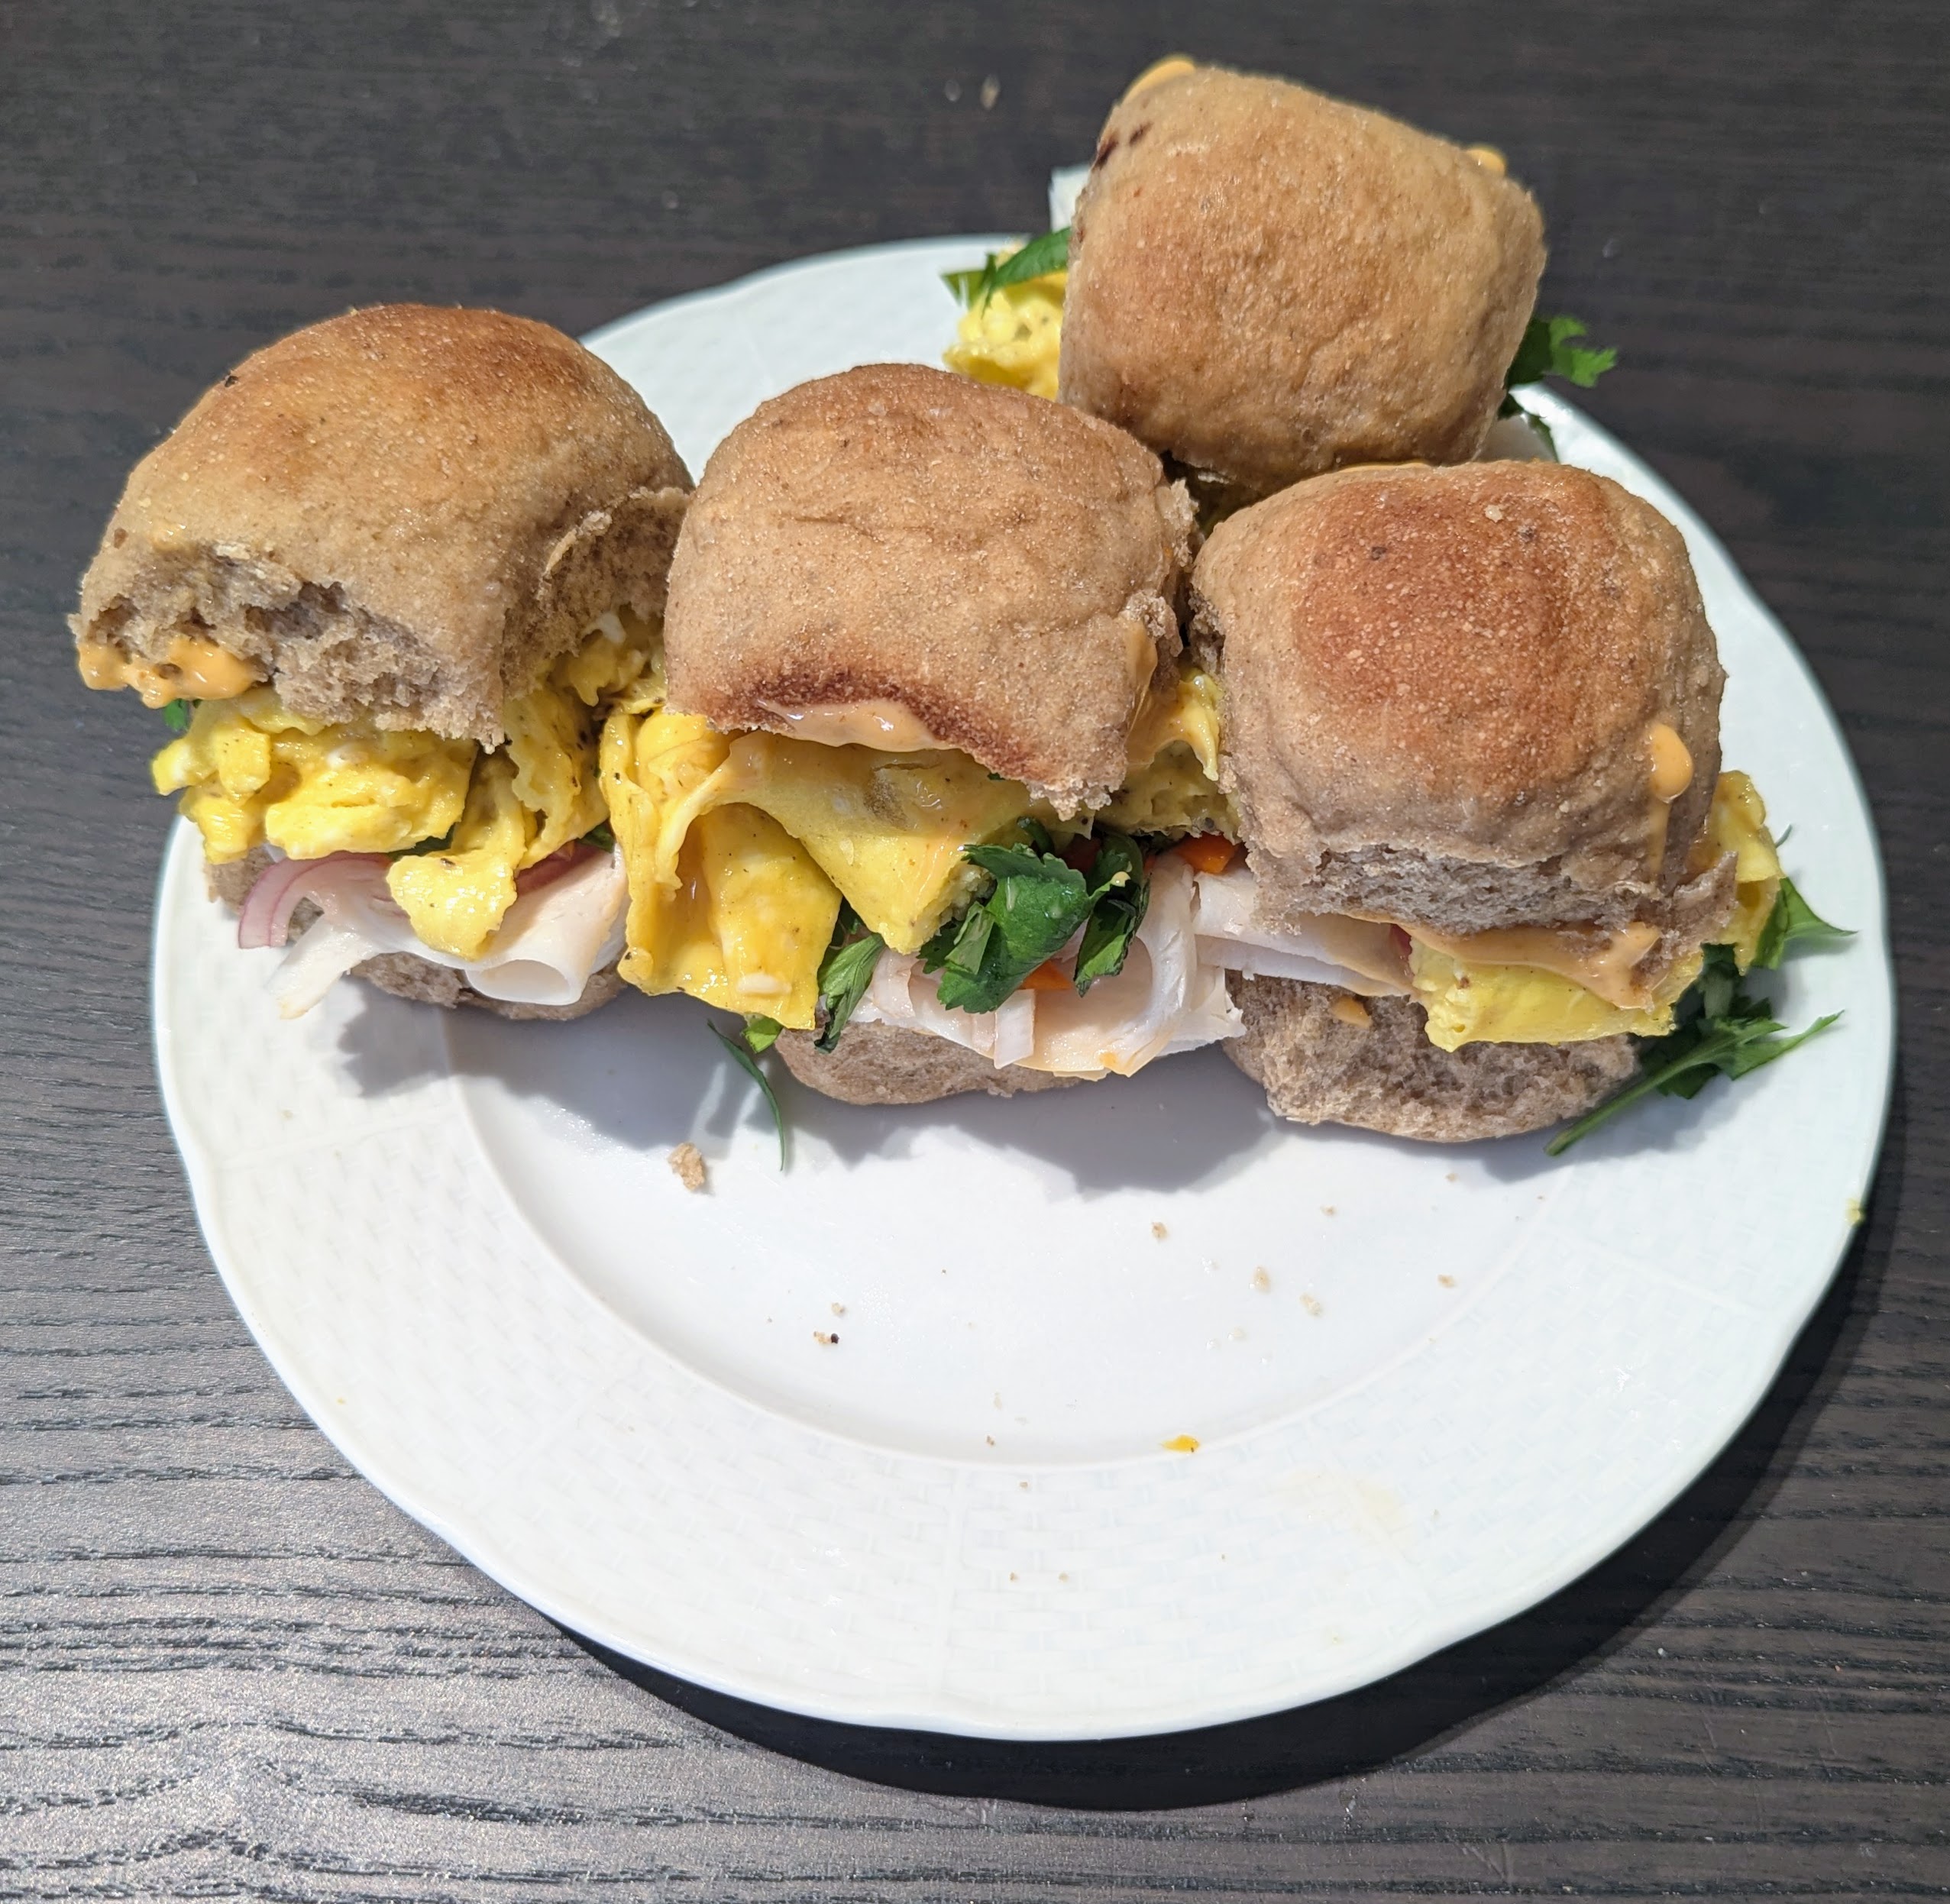
Breakfast Banh Mi

I took a few too many liberties with this recipe. Or, at least one too many, rather.

Banh mi are meant to be made on baguettes. And that is, indeed, what this recipe calls for. Unfortunately, I didn't have any baguettes. And I didn't want to wait until tomorrow to make this, so I decided that I'd just roll with some non-honey-filled honeycakes as the bread component of these sandwiches. Go for little banh mi sliders rather than the traditional sub. Sadly, the honeycake flavour profile doesn't really mix well with the banh mi flavour profile. They are two great tastes that do not taste great together.

That said, all the individual components were good! So I do think this would have been fine had I made it on the right bread. The cilantro, mint, pickled veggies, and sri racha mayo were all delicious. And I think the bacon and eggs would have been great with them. Although I say "would have" because I did end up making another substitute here. First off, because I was making sliders rather than subs, I went with scrambled eggs rather than fried. I think scrambled worked well here, but I'd be interested to try it with fried sometime, just to see how I like it. And the other change was to swap the bacon out from some turkey breast deli meat. I was going to use smoked tofu, but I hadn't realized that TF had used up the last of it while I was away camping and neither of us had ever restocked. So turkey breast was the best substitute I could manage in the end. It was fine, but I think that smoked tofu, tempeh, or bacon would have been better.

Still, despite a few... less-than-ideal substitutions, this worked out alright as a last-minute breakfast. I would definitely keep this in my back pocket to try again someday. Especially if I had some nice baguettes on hand!


Breakfast Banh Mi

Slightly adapted from The Breakfast Bible by Kate McMillan

Ingredients

Pickled Veggies

  • 1 carrot, grated
  • 1 shallot1, halved and thinly sliced
  • 1/4 c. rice vinegar
  • 1/2 Tbsp. sugar
  • 1/2 tsp. coarse sea salt

Sri Racha Mayo2

  • 1/4 c. mayonnaise
  • 1 Tbsp. sri racha
  • 2 tsp. lime juice3

Sandwich

  • 8 slices bacon or smoked tofu
  • 4 large eggs
  • salt and pepper, to taste
  • 1 baguette
  • 1/4 c. chopped fresh cilantro
  • 2 Tbsp. chopped fresh mint

Directions

  1. Combine the carrot, shallot, vinegar, sugar, and salt in a jar.
  2. Close jar tightly and shake to mix. Set aside for at least 20 minutes.
  3. Meanwhile, combine the mayo, sri racha, and lime juice and mix well. Set aside.
  4. Cook your bacon or tofu until crisp. If using tofu, add a little fat to the pan to help it crisp up.
  5. Set the bacon/tofu on a plate and either drain fat from or add fat to the pan as appropriate.
  6. Either fry or scramble your eggs in the pan, seasoning with salt and pepper to taste.
  7. Cut the baguette into four equal pieces and slice each piece in half lengthwise.
  8. Spread both halves of each baguette section with sri racha mayo.
  9. Top the bottom half of each baguette section with bacon/tofu, eggs, pickled veggies, cilantro, and mint and place the top piece of the baguette on top.


1 The original recipe called for half a red onion, but I didn't have red onions and I did have shallots. And, honestly, I felt like a shallot would go better here anyway, so I would 100% keep this substitution in the future. That said, I think red onion would also be fine. Especially if it'd save you a trip to the grocery store. So, use whichever one is most convenient. Back
2 I've halved the quantities called for here because the original recipe made way too much mayo! Back
3 The original recipe called for lemon juice, but, after giving it some thought, I decided to go with lime juice instead. I felt like the lime would complement the other flavours better. I think either one would be fine though. Also, the recipe didn't call for any zest and I didn't use any, but I might try tossing in a pinch next time. I think it would be nice. Back

Tuesday, 8 October 2024

Orecchiette alla Verza

I don't think this was a favourite for either me or symbol, but we did like it, and everyone, including the Kidlet, had seconds. And while it takes a long time to prepare, it is very easy, and the ingredients, while not self-stable, keep well.

I also appreciate that it uses an entire cabbage, rather than ¼-½ a cabbage as so many recipes do. (The original recipe calls for only 6 cups of cabbage, but that's not how we roll.) I think it would go nicely with some onions as well, too.


Orecchiette alla Verza (Orecchiette with Anchovies and Cabbage

From The Classic Pasta Cookbook by Guiliano Hazan (p. 129)

Ingredients

  • 1 package bacon
  • 8 whole anchovies
  • 6 garlic cloves, minced
  • 1 cabbage, quartered, cored, and thinly sliced
  • 450g orechiette
  • 1 tbsp butter
  • freshly grated parmesan

Directions

  1. In a large, deep-sided skillet or pot, cook the bacon. Remove to a plate, retaining the bacon fat in the pan.
  2. Return skillet to medium-low heat. Add anchovies and cook until they start to break down.
  3. Add garlic and cook until fragrant and the anchovies have dissolved, ~2-3 minutes.
  4. Add cabbage and stir until coated with bacon fat. You may need to do this in multiple steps, letting it cook down a bit between.
  5. Season cabbage with black pepper and cook, covered, stirring occasionally, until cooked down and very tender, ~30 minutes.
  6. Cook pasta al dente.
  7. Crumble or cut bacon into small pieces; stir into cabbage.
  8. Add butter to the cabbage and toss until melted.
  9. Drain pasta and toss with cabbage.
  10. Serve with parmesan.

Thursday, 3 October 2024

Nutty Sourdough Pancakes with Bacon

I've been working my way through all the suggested mix-in and topping combinations for pancakes in The Breakfast Bible. In retrospect I think that maybe the peanut butter and bacon would have been a better match for the banana pancakes, but I think it still worked reasonably well with the nuts and seeds used here.


Nutty Sourdough Pancakes with Bacon

Slightly adapted from The Breakfast Bible by Kate McMillan

Ingredients

Pancakes

Toppings

  • peanut butter
  • maple syrup
  • bacon

Directions

  1. Make your pancake batter as directed.
  2. Add the pecans, sesame seeds, and poppy seeds and stir to combine.
  3. Cook the pancakes as usual, using ~1/4 c. of batter for each.
  4. Top pancakes with peanut butter, maple syrup, and bacon.
  5. Optionally serve with fried eggs.

Saturday, 28 September 2024

Baked Cod with Leeks, Morels, and Bacon

My parents got a bumper crop of morels this spring and were kind enough to dry a bunch and give them to us. I don't get morels very often (and TF had never tried them), so I wanted to make good use of them. I had initially debated making the morel and green pea curry from Iyer's book. But, in the end, I decided that I wanted to prioritize this baked cod recipe. I really liked the sound of combining the morels with leeks and bacon! That sounded like a very appealing combination. And it was! Definitely pleased with how this one cake out.


Baked Cod with Leeks, Morels, and Bacon

Slightly adapted from Dish of the Day by Kate McMillan

Ingredients

  • 20g dried morels
  • 1/2 c. boiling water
  • 4-6 slices bacon
  • 2 c. thinly sliced leeks (white and pale green parts only)
  • 1 tsp. champagne vinegar1
  • 4 cod fillets (~185g each)
  • salt and pepper, to taste
  • 1 Tbsp. unsalted butter
  • 1 Tbsp. minced fresh chives

Directions

  1. Preheat oven to 190°C (375°F).
  2. Pour the boiling water over the morels and allow to soak for at least 20 minutes.
  3. Squeeze dry and roughly chop the rehydrated mushrooms. Set aside.
  4. Fry the bacon until crisp, then transfer to paper towel-lined plate to drain.
  5. Pour off all but 2 Tbsp. of the fat from the pan.
  6. Add the leeks and cook, stirring often, until they begin to brown (~10 minutes).
  7. Crumble the bacon and add half of it to the leeks.
  8. Add the morels and vinegar and toss to combine.
  9. Spread the leek mixture evenly over the bottom of the pan.
  10. Season the cod with salt and pepper and place it on top of the leek mixture.
  11. Dot the butter on top of the cod.
  12. Bake at 190°C (375°F) until the cod is cooked through (12-15 minutes).
  13. Garnish with the chives and remaining bacon and serve.


1 I didn't have any champagne vinegar and I wasn't about to go out and get a whole bottle just for 1 tsp. for this recipe. IIRC, I just used sherry vinegar in its place. Back

Monday, 16 September 2024

Fried Chicken and Waffles with Bacon Gravy

I cheated big-time for this recipe. If I were doing it properly, I would've made not just the waffles and gravy, but also the fried chicken from scratch. But I really didn't want to have to set up for deep frying or put that much effort into it. So instead, I went down the street and got some fried chicken tenders and served those with the waffles and gravy. And they were delicious! No regrets.


Fried Chicken and Waffles with Bacon Gravy

Slightly adapted from Waffles: Sweet, Savory, Simple by Dawn Yanagihara

Ingredients

  • 170g bacon
  • 2 Tbsp. flour
  • 2 1/2 c. milk
  • 1 dried bay leaf
  • 1/8-1/4 tsp. Tabasco (or similar) hot sauce
  • salt and pepper, to taste
  • 4 classic, buttermilk, cornmeal, or malted waffles
  • 4-8 pieces chicken tenders (or fried chicken)

Directions

  1. If making fried chicken from scratch, prepare it first, then continue with the recipe.
  2. Crisp the bacon over medium heat.
  3. Remove the bacon from the pan, leaving behind the fat/grease.
  4. Chop or crumble the bacon and set aside.
  5. Pour off all but 2 Tbsp. of fat from the pan. If you have less than 2 Tbsp. of fat, supplement with lard or other fats as necessary.
  6. Whisk flour into fat and cook for 2 minutes.
  7. Gradually whisk the milk into the roux.
  8. Add the bay leaf and Tobasco sauce and season to taste with salt and pepper.
  9. Increase heat to medium-high and bring to a boil.
  10. Reduce heat to medium or medium-low and simmer vigorously, stirring occasionally, until thickened (~5 minutes).
  11. Return the bacon to the pan. If you made your own fried chicken from scratch, add any drippings or crispy bits that you strained out of the frying oil after using it.
  12. Cover and keep warm, stirring occasionally, until ready to use.
  13. Meanwhile, cook the waffles.
  14. Top each waffle with a generous portion of gravy and 1-2 pieces of chicken.
  15. Add extra hot sauce or other condiments as desired.

Monday, 12 August 2024

Bacon and Potato Frittata

This frittata is meant to use slender fingerling potatoes. The potatoes are halved and browned in bacon fat before the rest of the ingredients are added to finish off the frittata. I didn't have any fingerling potatoes, but I did have some waxy red potatoes. I cut them into long pieces to approximate the shape and size of halved fingerling potatoes. Not a perfect solution, to be sure, but it worked well enough. And it did make for a nice, satisfying breakfast.


Bacon and Potato Frittata

Slightly adapted from The Breakfast Bible by Kate McMillan

Ingredients

  • 4 slices bacon
  • 250g fingerling potatoes, halved
  • 1/2 tsp. coarse sea salt, ground
  • 1/4 tsp. black peppercorns, ground
  • 3 green onions, sliced
  • 2-3 cloves garlic, minced
  • 1 Tbsp. fresh rosemary, chopped
  • 3-4 Tbsp. grated Parmesan
  • 10 large eggs
  • 2 Tbsp. milk

Directions

  1. Preheat oven to 200°C (400°F).
  2. Cook the bacon until crisp. Set aside.
  3. If there is more than 2 Tbsp. of fat in the pan, drain the excess. If there's less, add olive oil to bring it up to 2 Tbsp.
  4. Add the potatoes, season with 1/4 tsp. salt and 1/8 tsp. pepper, and cook until golden and tender (8-10 minutes).
  5. Chop bacon and add it to the pan with the green onions, garlic, and rosemary and cook for another 2-3 minutes.
  6. Beat eggs with Parmesan, milk, remaining 1/4 tsp. salt, and 1/8 tsp. pepper.
  7. Spread the potato mixture into an even layer and pour the eggs over. Cook for 2 minutes.
  8. Transfer to oven and bake until eggs are set (10-12 minutes).

Saturday, 3 August 2024

California Omelette

I've been staring at this omelette recipe for a while. I looked tasty. But it also involved a lot of ingredients that I don't normally keep on hand: pico de gallo, avocado, bacon, alfalfa sprouts, Monterey jack cheese... So, as much as it looked like an appealing breakfast option, it kept getting pushed because I haven't been organized enough to get all the bits. But, I had some leftover pepper jack from another recipe and I figured I could just quickly swing through the grocery store and get the rest of the components a day or two before making it.

In the end, the pepper jack ended up getting eaten before I got around to making the omelette, so I had to use all cheddar, rather than I mix of cheddar and jack. The ready-made pico de gallo at the grocery store was way over-priced and didn't look very good, so I ended up making my own from scratch. I couldn't find any sprouts, so I ended up tossing in a small handful of spring mix instead. And I forgot to get the bacon, so I fried up some thinly sliced smoked tofu and used that instead.

So, in the end, quite a few changes from the original recipe. But it was still very good. Probably not something I'll revisit often due to the ingredient list. But I would definitely consider it as either a special occasion thing or if I somehow ended up with pico, bacon, and avocado sitting around needing to be used.


California Omelette

Adapted from The Breakfast Bible by Kate McMillan

Ingredients

  • 4 large eggs
  • 2 Tbsp. milk
  • salt and pepper, to taste
  • 2 tsp. unsalted butter, divided
  • 1/4 c. grated cheddar, divided
  • 1/4 c. grated Monterey jack (or pepper jack), divided
  • 4 slices bacon (or 8 short slices smoked tofu), cooked until crisp and chopped and divided
  • 1/2 avocado, chopped and divided
  • 1/4 c. pico de gallo, divided
  • 2 small handfulls spring mix or baby spinach, divided

Directions

  1. Beat the eggs with the milk and salt and pepper to taste.
  2. Melt 1 tsp. of the butter over medium heat.
  3. Pour in half the egg mixture and cook until bottom is just set.
  4. Lift up edges and let raw egg flow underneath. Keep cooking until eggs are nearly fully set and just slightly wet on top.
  5. Sprinkle half of the cheese over the omelette.
  6. Add half of the bacon to one side of the omelette along with half of the avocado, pico de gallo, and greens.
  7. Fold the omelette over and cook for another 30-60 seconds.
  8. Transfer omelette to a plate and repeat cooking process with remaining ingredients to make a second omelette.

Thursday, 9 May 2024

Eggs Florentine

The Breakfast Bible contains a recipe for "eggs Blackstone", a variant of eggs Benedict. While the traditional eggs Benedict recipe offers the familiar combination of Hollandaise-smothered poached eggs atop back bacon (or ham) on toasted English muffin halves, eggs Blackstone replaces the English muffin with bread, the back bacon with side/streaky bacon, and adds tomatoes to the mix. It sounds delicious!

I didn't have the ingredients for either of these variations yesterday, however. But I did have both English muffins and eggs. (So many eggs!) And I knew that there was some baby spinach in the fridge that needed to be used up. So I opted for another common variation on eggs Benedict: eggs Florentine.

In this rendition, the meat is replaced with fresh baby spinach. I've also seen versions that sandwich a generous portion of lightly steamed spinach between the eggs and English muffin. And some preparations even have you mix chopped cooked spinach into the Hollandaise sauce! Any of these will work, but my plan was to follow the recipe in front of me and just pile a bit of fresh baby spinach onto the English muffins before adding the eggs.

I say "plan" because that's not actually what ended up happening. It turns out that TF had also had similar thoughts about the spinach needing to be used up and added it to the lentil stew she'd made the previous day. So, I had everything else all ready to go only to realize that I did not, in fact, have any fresh spinach available! Luckily we had some chopped beet greens in the freezer, so I just thawed those out and used them instead. It actually worked quite well! A bit non-traditional perhaps, but good nonetheless.


Eggs Florentine

Slightly adapted from the Breakfast Bible by Kate McMillan

Ingredients

  • 1 1/2 c. Hollandaise sauce
  • 4 English muffins, split and toasted
  • ~2 c. (55g) fresh baby spinach (or greens of choice prepared as desired)
  • 8 large eggs, poached
  • salt and pepper, to taste

Directions

  1. Prepare your Hollandaise sauce and keep it warm over very, very low heat, stirring occasionally as you prepare the other components.
  2. Toast the English muffin halves. You may butter them if you wish, but I find the Hollandaise makes the final dish buttery enough without the need to add more to the muffins.
  3. Place ~1/8 of the greens on top of each muffin half.
  4. Poach your eggs1 and place one on top of each muffin half.
  5. Top each egg with 2-3 Tbsp. of Hollandaise and season to taste with salt and pepper. Serve immediately.


Variants

Eggs Benedict

Ingredients

  • 1 1/2 c. Hollandaise sauce
  • 4 English muffins, split and toasted
  • 8 slices back bacon, cooked
  • 8 large eggs, poached
  • salt and pepper, to taste

Eggs Blackstone

Ingredients

  • 4 tomatoes, sliced thick
  • 1-2 tsp. olive oil
  • 1 tsp. minced fresh thyme (or 1/2 tsp. dried)
  • 1/4 tsp. coarse sea salt, ground
  • 1/4 tsp. black peppercorns, ground
  • 1 1/2 c. Hollandaise sauce
  • 8 slices wholegrain bread, toasted
  • 8 slices thick-cut smoked bacon, cooked
  • 8 large eggs, poached
  • salt and pepper, to taste

Directions

  1. Preheat oven to 200°C (400°F) and lightly grease a rimmed baking sheet.
  2. Arrange the tomatoes on the baking sheet, drizzle with olive oil, and sprinkle with salt, pepper, and thyme.
  3. Roast the tomatoes at 200°C (400°F) for 25-30 minutes.
  4. Meanwhile, prepare the Hollandaise sauce and keep it warm while you prepare everything else.
  5. Toast the bread and butter it if you'd like. (Although, as with the eggs Florentine, I don't feel that butter is really necessary.)
  6. Cook the bacon and poach the eggs.
  7. Top each slice of toast with some of the tomato, a slice of bacon, and an egg.
  8. Spoon 2-3 Tbsp. of Hollandaise over each egg.
  9. Season to taste with salt and pepper and serve immediately.


1 I recommend 3-4 minutes for soft poached or 5-6 for medium/jammy yolks. Use the freshest eggs possible as the whites of old eggs will tend to feather and spread in the water much more than fresh. Adding a bit of vinegar or other acid to the water can also help reduce feathering. I had a bit of excess lemon juice left over from making the Hollandaise, so I just used that. Back