Showing posts with label TF favourite. Show all posts

Thursday, 17 September 2026

Nanny's Lemon Cream

This is the lemon curd that I grew up eating. It's my great-grandmother's recipe. And we all called it lemon curd, but when we got her recipe, she had it written down as "lemon cream". It's very good. Simple. And I like that it uses whole eggs rather than just the yolks. I've now also tried it with grapefruit and can vouch for the results. I expect it would work wonderfully with limes as well!

Lemon Cream

Ingredients

  • 1 1/2 c. sugar
  • 4 large eggs
  • 1/2 c. lemon juice
  • 2 Tbsp. water
  • 3 Tbsp. butter

Directions

  1. Combine sugar, eggs, lemon juice, and water and mix very well.
  2. Cook over low to medium-low heat, stirring constantly, until thickened.
  3. Remove from heat and stir in butter.


Variations

Grapefruit Cream

Ingredients

  • 1 1/2 c. sugar
  • 4 large eggs
  • 1/2 c. (or a bit more) grapefruit juice
  • 3 Tbsp. butter

Tuesday, 30 September 2025

Cocolate-Raspberry Torte

This is basically a flourless chocolate cake. It's incredibly rich and dense with no leavener whatsoever and only the tiniest bit of flour. It then gets filled with a mixture of jam and mashed raspberries and "iced" with ganache. And garnished with whole raspberries and toasted almonds. It is delicious!


Chocolate-Raspberry Torte

Slightly adapted from The Perfect Cake by America's Test Kitchen

Ingredients

Cake

  • 240g dark chocolate
  • 12 Tbsp. butter
  • 2 tsp. vanilla extract
  • 1/2 tsp. instant coffee
  • 1 c. almond flour
  • 1/4 c. all-purpose flour
  • 1/4 tsp. coarse sea salt, ground
  • 5 large eggs
  • 3/4 c. sugar

Filling

  • 1/2 c. raspberries
  • 1/4 c. raspberry jam

Decoration

  • 150g dark chocolate
  • 1/2 c. + 1 Tbsp. heavy (35%) cream
  • 1/2 c. sliced almonds, toasted
  • ~24 whole raspberries

Directions

  1. Preheat oven to 160°C (325°F).
  2. Grease two 20cm (8") round cake pans, line bottoms with parchment paper, grease the paper, and then flour the pans.
  3. Melt the chocolate and the butter over very low heat.
  4. Remove from heat and add the vanilla and coffee.
  5. In a separate bowl, combine the almond flour, all-purpose flour, and salt and mix well.
  6. Beat the eggs until lighter in colour and increased in volume (~3 minutes).
  7. Gradually beat in sugar.
  8. Add the egg mixture to the chocolate mixture and whisk until not quite fully combined.
  9. Sprinkle in half of the almond mixture and stir to combine.
  10. Add the remaining almond mixture and finish mixing.
  11. Divide the batter between the prepared pans.
  12. Bake at 160°C (325°F) until done and toothpick inserted in centre comes out almost clean (16-20 minutes).
  13. Allow cakes layers to cool in tins for 30 minutes.
  14. Turn out onto wire racks, then flip one layer onto a serving platter right-way-up.
  15. Mash the raspberries and mix with the jam.
  16. Spread the raspberry mixture over the top of the right-way-up cake layer.
  17. Place the second layer on top upside-down.
  18. Combine the chocolate and the cream and heat over low heat until chocolate is melted and mixture is smooth and homogenous.
  19. Pour ganache over cake and spread evenly across the top and down the sides.
  20. Crush the sliced almonds and press into the sides of the cake.
  21. Decorate the top of the cake with the whole raspberries, placing them evenly-spaced around the perimeter.
  22. Chill for at least 1 hour before serving.

Friday, 22 August 2025

Chocolate Soufflé

This can be made as either one large soufflé or several small ones. I opted for the small ones today. Mostly because they don't take nearly as long to bake.

I really liked this soufflés. They were deeply chocolate-y and very light (as you would expect). I will say that I found them ever so slightly on the sweet side. I think I'd be tempted to either reduce the sugar or use unsweetened chocolate next time. I've written them up to use a bit less sugar than originally called for, but feel free to use unsweetened chocolate either instead or as well.


Chocolate Soufflé(s)

Slightly adapted from Dessert of the Day by Kim Laidlaw

Ingredients

  • 6 large eggs, separated
  • 1/2 tsp. cream of tartar
  • 1/8 tsp. coarse sea salt, ground
  • 1/2 c. sugar, divided1
  • 1 tsp. vanilla extract or 1 Tbsp. Cointreau
  • 250g dark chocolate, melted
  • whipped cream, to serve

Directions

  1. Preheat oven to 200°C (400°F) for several small soufflés or 190°C (375°F) for one large one.
  2. Grease your soufflé dish or ramekins and dust with sugar.
  3. Combine the egg whites with the cream of tartar and salt and beat until soft peaks form.
  4. Gradually beat in 1/4 c. of the sugar. Set aside.
  5. Beat the egg yolks until pale.
  6. Add the remaining 1/4 c. of sugar and beat vigorously until very pale and thick and mixture makes "ribbons" when beater is lifted out.
  7. Beat in the vanilla or Cointreau.
  8. Fold in the melted chocolate.
  9. Add ~1/3 of the meringue and stir to combine and loosen the mixture.
  10. Add the remaining meringue and gently fold it into the mixture until no longer streaky.
  11. Spoon the mixture into the prepared baking dish(es).
  12. Run a finger around the top edge to make a small "moat".
  13. Bake at 200°C (400°F) for 10-12 minutes for small soufflés or 190°C (375°F) for ~30 minutes for a large soufflé. Soufflé should be well-risen and slightly crisp on the outside, but still very soft and slightly wobbly in the middle.
  14. Cut a circle of the "crust" off the top and spoon a generous portion of whipped cream over it.
  15. Serve immediately!


1 The original recipe called for 3/4 c. of sugar total: 1/4 c. in the meringue and 1/2 c. in the base. I found this a bit too sweet for my tastes, so I've scaled back the sugar somewhat here. You could also try swapping out the dark chocolate for unsweetened, either instead of or as well as reducing the sugar. Try it and see which you like better! Back

Tuesday, 12 August 2025

Chile Egg Puff

This was delicious! Especially with all the toppings. And it's not too difficult to put together either. Although it does take a lot of cheese and eggs. So definitely make sure you are well-supplied before starting.


Chile Egg Puff

Slightly adapted from The Big Book of Breakfast by Maryana Vollstedt

Ingredients

  • 10 large eggs
  • 1/4 c. flour
  • 1 tsp. baking powder
  • 1/4 tsp. coarse sea salt, ground
  • 1/8 tsp. white peppercorns, ground
  • 3 c. grated Cheddar, divided
  • 2 c. cottage cheese (preferably fat free)
  • 1/4 c. butter, melted
  • 1 (~100mL) can of green chilies, drained
  • salsa, to serve
  • sour cream, to serve
  • sliced avocado, to serve
  • chopped green onion, to serve

Directions

  1. Preheat oven to 180°C (350°F) and grease a 23x33cm (9x13") baking dish.
  2. Beat the eggs with the flour, baking powder, salt, and white pepper.
  3. Mix in half the cheddar cheese and all of the cottage cheese.
  4. Stir in the butter and green chilies.
  5. Pour the egg mixture into the prepared baking dish and bake at 180°C (350°F), uncovered, for 30 minutes.
  6. Sprinkle with remaining cheese and bake for another 10 minutes.
  7. Let stand for 10 minutes before serving.
  8. Cut into squares and serve topped with salsa, sour cream, green onion, and avocado.

Wednesday, 28 May 2025

陕西臊子面 (Shaanxi Saozi Mian)

The name of this dish literally translates as "Shaanxi sauce noodles". The final product is a delicious lightly spicy, savoury, and sour noodle soup. Full of pork belly, fried tofu puffs, carrots, potatoes, wood ear fungus, and lily blossoms. But the first step is making the intensely flavourful meat sauce. Once the concoction is complete, you make the rest of the soup and then add the sauce, which then gets ladelled over freshly cooked noodles and topped with thin ribbons of omelette and a mix of garlic chives and green onions. The finished product is incredibly delicious and satisfying. This one is definitely a keeper!


Hanzi: 陕西臊子面
Pinyin: Shǎnxī sàozǐ miàn
English: Shaanxi sauce noodles


陕西臊子面

Slightly adapted from The Woks of Life

Ingredients

Meat Sauce

  • 2 Tbsp. oil
  • 1 cinnamon stick
  • 3 star anise
  • 3 bay leaves
  • 2 Tbsp. minced ginger or ginger paste
  • 450g pork belly, cut into 5mm dice
  • 2 Tbsp. 老干妈 (Laoganma)1
  • 1/4 c. 绍兴酒 (Shaoxing wine)
  • 1/2 c. black vinegar
  • 1/2 Tbsp. five-spice powder
  • 2 Tbsp. light soy sauce
  • 2 tsp. sugar

Soup

  • 1-2 Tbsp. oil
  • 1 Tbsp. minced ginger or ginger paste
  • 1/2-3/4 c. diced carrots
  • ~1 c. diced potatoes
  • 20g dried wood ear fungus, rehydrated
  • 5-6g dried lily blossoms, rehydrated
  • 1 Tbsp. oyster sauce
  • 6-8 c. chicken or vegetable stock
  • 8 fried soy puffs, quartered

Toppings

  • 1 tsp. cornstarch (cornflour)
  • 4 tsp. water
  • 2 large eggs
  • 1-2 tsp. oil
  • 450g dried spaghettini or other thin wheat noodles
  • 1/3-1/2 c. chopped garlic chives
  • 1-2 green onions, chopped

Directions

  1. Heat the oil over medium-low heat.
  2. Add the cinnamon stick, star anise, and bay leaves and cook, stirring occasionally, until oil is infused (2-3 minutes).
  3. Add the ginger and pork belly, increase heat to medium, and cook until meat is opaque.
  4. Add the Laoganma (or chiles and salt, if using) and cook for another 5 minutes.
  5. Add the Shaoxing wine, vinegar, five-spice powder, soy sauce, and sugar and bring to a boil.
  6. Lower heat slightly and cook until sauce is slightly reduced (6-8 minutes). Remove from heat and set aside.
  7. Heat the oil for the soup over medium heat.
  8. Add the ginger and stir-fry for 30-60 seconds.
  9. Add the carrots and potatoes and cook for 5-6 minutes, stirring occasionally.
  10. Drain and chop the wood ear fungus and the lily blossoms and add them to the pot with the vegetables.
  11. Add the oyster sauce and cook for 2-3 minutes.
  12. Add the stock, soy puffs, and the meat sauce prepared earlier and bring to a boil.
  13. Simmer for 10 minutes.
  14. Meanwhile, mix the cornstarch with the water and then beat in the eggs.
  15. Heat the remaining oil over medium heat.
  16. Pour in the egg mixture and cook until eggs have set.
  17. Carefully flip and cook for ~30 seconds on the other side.
  18. Remove omelette from pan and cut into ribbons. Set aside.
  19. Bring a pot of water to a rolling boil and cook the noodles according to package directions. Pasta should be fairly al dente and not too soft.
  20. Drain noodles and portion out into bowls.
  21. Ladel a generous quantity of the soup over the noodles.
  22. Top soup with some omelette ribbons, garlic chives, and green onions and serve immediately.


1 The original recipe called for 1/4 c. of oil (rather than just 2 Tbsp.) here + 2 Tbsp. Sichuan chile flakes and 1 tsp. of salt. I didn't have any Sichuan chile flakes and didn't want to try to go out and get yet another variety of chiles, so I reduced the oil, omitted the salt, and swapped out the chile flakes for the same amount of 老干妈. This gave me the heat, salt, and extra oil all in one. And, I must say, I'm quite happy with the results. Would definitely be happy to go that route again! Back

Tuesday, 1 April 2025

Maple Butter Tarts

Definitely not for the faint of heart when it comes to sweets! These are sugar bombs. No doubt about it. But they are also a Canadian classic. I like them with pecans in as I find the nuts attenuate the sweetness somewhat. Or, for a less traditional (but no less delicious) option, try adding a little dessicated coconut!

Maple Butter Tarts

Slightly adapted from Fed by Sab

Ingredients

  • 1 recipe sourdough pastry
  • 1/4 c. butter
  • 1/4 c. maple syrup
  • 1 c. brown sugar
  • 2 large eggs
  • inclusions: pecans, dessicated coconut, dried apple, raisins, etc. (optional)

Directions

  1. Make your pastry, wrap, and chill for 20-30 minutes.
  2. Preheat oven to 180°C (350°F).
  3. Remove the pastry from the fridge and allow to rest at room temperature while you prepare the filling.
  4. Melt the butter over medium-low heat.
  5. Remove from heat and add the maple syrup and the brown sugar.
  6. Add the eggs and mix very well.
  7. Roll out the pastry and cut circles to fit the wells of a muffin tin.
  8. Press the pastry rounds into the wells of the muffin tin.
  9. If you are adding inclusions, place them in the tart shells now.
  10. Spoon a little filling into each tart shell. Be careful not to overfill! Half-full is plenty. The pastry will likely subside slightly and the filling will bubble up as it cooks. If it overflows, it will be very difficult to get the tarts out of the tin.
  11. Bake at 180°C (350°F) for 20-25 minutes.

Sunday, 22 December 2024

Tiwanese Bakery Sourdough Focaccia

I've been alternating between making Bernard Clayton bread recipes and working my way through the selection of sourdough recipes on the King Arthur Flour website. This unusual focaccia was the next up in my queue. And I am very glad indeed! TF has very normal feelings about this bread. I like it. I like it a lot. But I don't think my enjoyment of it can hold a candle to TF's near unseemly fascination with it. I'm quite tickled that she's enjoying it so much!

I may play around with the proportions somewhat in the future. For this time, I stuck to the recipe and went fairly heavy on the oil. Next time I might try doubling the dough and bumping the corn up a little bit. Just as an experiment. It's really excellent as-is. I just like to tinker!


Tiwanese Bakery Sourdough Focaccia

Slightly adapted from King Arthur Flour

Ingredients

  • 75g ripe (fed) sourdough starter @ 100% hydration
  • 175g water
  • 250g hard (strong/high grade/bread) flour
  • 1 tsp. coarse sea salt
  • 1 tsp. garlic or scallion oil
  • 1 Tbsp. sesame or chili oil
  • 4 links Taiwanese sausage, sliced
  • 2 green onions, sliced
  • 50-60g fresh or frozen corn kernels
  • 1-2 Tbsp. sesame seeds
  • Kewpie mayonnaise

Directions

  1. Make sure your starter is well-fed and active.
  2. Combine the starter and water and mix well.
  3. Add the flour and mix thoroughly.
  4. Cover and let rest for 30-60 minutes.
  5. Add the salt and knead for a few minutes to incorporate it.
  6. Cover and rest for at least an hour.
  7. Do a bowl fold, then spread the garlic/scallion oil over the surface. Cover and allow to rest for 4-8 hours.
  8. Knock the dough back then cover and chill overnight. (If you are in a hurry, you may skip this step, but the flavour will be better with a slow, overnight fermentation.)
  9. Oil a 23x33 (9x13") baking dish with a little of the sesame/chili oil.
  10. Add the dough to the prepared pan and gently stretch it to fill as much of the pan as possible.
  11. Cover and rest at room temperature for 2-3 hours, gently stretching every 30 minutes or so.
  12. Dimple the surface of the dough and drizzle with the remaining oil.
  13. Sprinkle with sliced sausage, green onion, corn, and sesame seeds.
  14. Preheat oven to 230°C (450°F).
  15. Bake focaccia on lower rack for 15-20 minutes.
  16. If surface is not dark enough after 20 minutes, reduce temperature to 200°C (400°F) and bake for an additional 5 minutes.
  17. Turn off oven and let stand in hot oven for 5 minutes.
  18. Remove from oven, drizzle with mayo, cut into squares, and serve.

Saturday, 21 December 2024

Mascarpone-Raspberry Parfaits

I'm used to making parfaits with fresh fruit, yogurt, and granola. You can vary the fruit, add different flavours to the yogurt, try different types of granola or even swap it out for something else entirely (cocoa nibs, wheat germ, graham cracker crumbs, etc.) But those are the general components that I'm familiar with. That's the formula.

This recipe takes a significantly different route.

It still layers fresh fruit with dairy and something crunchy. It just swaps out what you're actually using as your dairy and "cruncy" components.
Instead of yogurt, you beat whipping cream with marsarpone and white chocolate for your dairy component.
For the crunchy... crushed amaretti biscuits.

This all works quite well. The cheese, chocolate, raspberries, and amaretti all make for an excellent (if very rich) final dish. I'm looking forward to having the leftovers after dinner tonight! Yum!


Mascarpone-Raspberry Parfaits

Slightly adapted from Dessert of the Day by Kim Laidlaw

Ingredients

  • 375g mascarpone cheese
  • 1 c. heavy (35%) cream
  • 100g white chocolate
  • 500g raspberries
  • 30-35 amaretti biscuits, coarsely crushed

Directions

  1. Beat the mascarpone with the cream for 10-20 seconds.
  2. Gently melt the chocolate over very low heat.
  3. Drizzle the chocolate into the cheese mixture while beating vigorously. Continue beating for an additional 30-60 seconds.
  4. Spoon a few raspberries into the bottom of each glass. (This made 8 small parfaits of ~200mL each for me.)
  5. Spoon a bit of the cheese mixture on top of the berries.
  6. Sprinkle some cookie crumbs into the cheese.
  7. Repeat layers until glasses are full and all of the ingredients have been used.
  8. Chill until ready to serve.

Thursday, 19 December 2024

Faux Sourdough Naan

I was going to make miche as my next sourdough recipe. But then I saw that this new sourdough naan recipe had been posted. And it looked nice and easy to put together. And I figured that it would complement the dal I had planned for dinner well. So I figured why not?!

I've made sourdough naan before. And it was pretty good. But I'm always game for trying new recipes. And this one was a bit different, since it's meant to use sourdough discard (mostly for a bit of flavour) and then adds a generous quantity of commercial yeast to do the actual leavening. (Hence my categorization of it as a "faux sourdough".)

I liked how this naan came out in the end. Although I did have to adjust the recipe fairly significantly. I don't know if it was written for a much higher hydration starter or if there was just a typo in the quantities or what... (A pox on sourdough recipes that don't specify the hydration of the starter!) But, whatever the underlying issue, the dough was way too dry when made according to the recipe. I ended up working in an extra 120g of starter and still needed to add a few extra teaspoons of water to get it to come together into something workable. And, honestly, I think the overall hydration was still a bit on the low side. Next time I might try working even more water into it. I was just trying not to go too crazy with it this time.


Faux Sourdough Naan

Slightly adapted from King Arthur Flour

Ingredients

  • 420g hard (strong/high grade/bread) flour
  • 120g plain yogurt
  • 240g sourdough discard @ 100% hydration
  • 120-150g water
  • 2 1/4 tsp. instant yeast
  • 1 tsp. coarse sea salt
  • 1/2 tsp. sugar
  • 3 Tbsp. ghee
  • extra ghee, sea salt, and/or spices (optional)

Directions

  1. Combine the flour, yogurt, discard, 120g of the water, yeast, salt, and sugar and mix until the dough comes together.
  2. Turn out and knead for 1-2 minutes.
  3. Work in the ghee 1 Tbsp. at a time.
  4. If the dough seems too stiff, wet your hands and continue kneading. Repeat until enough moisture has been added.
  5. Place in covered bowl to rise for 1-2 hours.
  6. Knock back and divide into 100g portions.
  7. Round each portion, cover, and proof at room temperature for ~30 minutes.
  8. Heat a tawa or cast iron pan over medium heat.
  9. Working with one portion of dough at a time, flatten into a round.
  10. Wet one side thoroughly and place the naan, wet-side-down, onto the tawa. Sprinkle with desired toppings, cover, and cook for 1-2 minutes.
  11. Flip and cook, uncovered, for another 1-2 minutes.
  12. Brush with ghee and wrap in a clean tea towel while the remaining naan are cooked in the same fashion. (Shape each one while the previous one cooks.)
  13. Serve immediately.

Wednesday, 13 November 2024

Pears Poached in White Wine

I've been on a bit of a poached fruit kick lately. First there were the quince poached in vanilla syrup. Then I was able to doctor the leftover syrup from that to make the poached quince with mascarpone, caramel, and gingersnaps. And, for this recipe, I was able to tinker with the syrup yet again to make these fabulous poached pears.

This does, of course, leave me with the same problem of how to write up the recipe. Since I don't necessarily want to have to make the previous two every time I make these pears. So, as before, I'm going to make a note of what I actually did here, but then write up the recipe (more-or-less) as given in the book.
For this rendition, I simply took the leftover syrup from the second batch of quince (which contained the leftover syrup from the first batch of quince, 1 1/2 c. of white wine, a vanilla bean, grated lemon zest, 2 cinnamon sticks, 1/2 tsp. black peppercorns, and 1 star anise) and added an extra 1/2 c. of wine and a few slices of fresh ginger.

The original recipe called for 2 c. of Riesling, 1/2 c. sugar, 1 cinnamon stick, 2 strips of lemon rind, and 3 slices of fresh ginger. So, my version definitely had a few more spices in the mix, but I quited liked it. Especially the vanilla. Given that, I've included the extra spices in the recipe, but listed them as optional. Adjust as you see fit.


Pears Poached in White Wine

Slightly adapted from Dessert of the Day by Kim Laidlaw

Ingredients

  • 2 c. Riesling
  • 1/2 c. sugar
  • 1-2 (7cm) cinnamon stick(s)
  • 3 slices fresh ginger
  • 2-3 strips lemon zest
  • 1/2 vanilla bean, split lengthwise (optional)
  • 1 star anise (optional)
  • 1/2 tsp. black peppercorns (optional)
  • 4 pears1
  • 1/4 c. chopped toasted or candied walnuts (optional)

Directions

  1. Combine the Riesling, sugar, cinnamon, ginger, lemon zest, and whatever other seasonings you've chosen and bring to a boil over medium heat.
  2. Meanwhile, peel and halve the pears. Use a spoon to scoop out the cores and remove the stems.
  3. Add the pear halves to the poaching liquid, reduce heat to medium-low, and simmer, covered, until tender (10-15 minutes).
  4. Serve as-is or topped with lightly sweetened mascarpone. (See quince recipe.)
  5. Optionally sprinkle a few toasted or candied walnuts over the pears before serving.


1 The recipe didn't specify what type of pears to use. I thought anjou would be good here, but I couldn't find any at the grocery store. The bartletts looked quite nice though, so I went for those. Back

Friday, 8 November 2024

Poached Quince with Mascarpone, Caramel, and Gingersnaps

These were absolutely delicious! TF and I both had seconds. I really loved the combination of flavours and textures. (Even if I did undercook my caramel slightly.) This is definitely my new favourite thing to do with quince!

I did cheat slightly on the syrup for these quince. Recipe as written, it's meant to be made with an entire (750mL) bottle of Riesling, 1 c. of sugar, and a few spices. But I still had a bunch of syrup left over from making the quince poached in vanilla syrup the day before, so I just added the spices and a bit of white wine to that and called it a day. This does mean that my final syrup was a bit different than the recipe called for though:
  • The original recipe called for a 1:3 ratio of sugar to liquid (by volume); my starting syrup was 1.25:1 sugar to water (which I then diluted with wine to bring it closer to 1:1.5)
  • The original recipe used Riesling as the liquid; mine had a mix of water and white wine
  • The original contained star anise, cinnamon, and black peppercorns; mine had those, but also the residual vanilla and lemon zest from the previous recipe

I was quite happy with the overall result. And I was pleased that I was able to reuse the vanilla syrup from the first recipe. The catch is that this does make it somewhat difficult to write up accurately.

I've written up the recipe below based on how I'd do this next time if I didn't have the pre-existing vanilla syrup to build on. I haven't had a chance to test it yet, but I think it would give good results.


Poached Quince with Mascarpone, Caramel, and Gingersnaps

Slightly adapted from Dessert of the Day by Kate McMillan

Ingredients

Quince

  • 750mL Riesling
  • 1 c. sugar
  • 2 (7cm) cinnamon sticks
  • 1 star anise
  • 1/2 tsp. black peppercorns
  • 1 vanilla bean, split lengthwise
  • 1/2 Tbsp. grated lemon zest
  • 3-4 quince, peeled and halved1

Caramel

  • 1 c. sugar
  • 1/4 c. water
  • 2/3 c. heavy (35%) cream
  • 3 Tbsp. unsalted butter
  • 1/2 tsp. vanilla extract
  • 1/4 tsp. coarse sea salt

Assembly

  • 225g mascarpone
  • 6-8 Tbsp. crushed gingersnaps

Directions

  1. Combine the Riesling, sugar, cinnamon sticks, star anise, black peppercorns, and vanilla bean and bring to a boil over medium heat.
  2. Add the lemon zest and quince and reduce heat to medium-low.
  3. Simmer until quince are tender (~1 hour).
  4. Meanwhile, combine sugar and water for caramel, cover, and bring to a boil over medium-high heat.
  5. Uncover and continue cooking, swirling (but not stirring) often until sugar turns a rich caramel colour2.
  6. Remove from heat and carefully whisk in the cream. Stir until smooth.
  7. Stir in the butter, vanilla, and salt. Set aside.
  8. Once quince are tender, remove from heat and allow to cool in poaching liquid.
  9. Use a spoon or melon baller to scoop out the cores.
  10. Mix 3 Tbsp. of the poaching liquid into the mascarpone.
  11. Place a quince half in each bowl and top with a generous spoonful of mascarpone.
  12. Drizzle with caramel, sprinkle with crushed gingersnaps, and serve.


1 The original recipe calls for poaching the quince first and then coring them. I found this quite tricky to do. Next time I'd be tempted to try coring them before poaching. (With the obvious caveat that I have not had a chance to test this approach yet.) Back
2 I ended up burning the last batch of caramel I made, so I was a little paranoid this time and took mine off the heat a bit too soon. The flavour was fine, but the colour was very pale and unappealing. I think it needed another 30 seconds or so to properly darken. Back

Saturday, 2 November 2024

Roasted Pears with Honey, Hazelnuts, and Greek Yogurt

One of TM's friends ended up with a bumper crop of quince this year, so they've been sharing the bounty. And we got extra bonus pears along with our quince!
I have plans for the quince that should hopefully appear on the blog shortly. I actually debated doing up a simple poached quince dessert after dinner tonight. But the pears needed to be used more urgently, so I decided to start there.

I have a lot of pear recipes awaiting testing. But this one had the virtue of being very quick and easy to put together and only needing three pears, which, conveniently, was the exact number we were given. It is also delicious!

The original recipe acutally went for an almond theme. The pears were drizzled with amaretto and topped with toasted sliced almonds after roasting. I didn't have any amaretto, but I did have a bottle of Frangelico in the pantry. And I figured that pear and hazelnut is also a good combo. So I just swapped out the liqueur and replaced the almonds with chopped toasted hazelnuts. It worked very well, if I do say so myself!


Roasted Pears with Honey, Hazelnuts, and Greek Yogurt

Slightly adapted from Dessert of the Day by Kim Laidlaw

Ingredients

  • 3 pears1
  • 1/3 c. honey
  • 4 bay leaves
  • 3 Tbsp. unsalted butter, cut into 6 pieces
  • 2 Tbsp. Frangelico (hazelnut liqueur)
  • 1 1/2 c. plain Greek yogurt
  • 1/4 c. hazelnuts, toasted and chopped

Directions

  1. Preheat oven to 190°C (375°F).
  2. Peel, halve, and core the pears.
  3. Bring the honey and bay leaves to a boil over medium heat.
  4. Reduce heat slightly and simmer for 3-4 minutes.
  5. Place the butter pieces evenly spaced in the pan and place a pear half, cut-side-down, on top of each one.
  6. Cover and bake at 190°C (375°F) for 12 minutes.
  7. Carefully flip pears over and baste with sauce.
  8. Drizzle with Frangelico and return to oven.
  9. Roast, uncovered, at 190°C (375°F) until pears are tender (~10 minutes).
  10. Remove from oven and allow to cool slightly (10-15 minutes).
  11. Place two pear halves in a bowl and drizzle with a little sauce.
  12. Top with ~1/2 c. of yogurt, ~1 Tbsp. of hazelnuts, and a bit more sauce and serve.


1 The original recipe called for 3 "ripe but firm" bosc pears. I'm not sure what variety we were given, but they definitely weren't bosc. They looked a bit like anjou, but I don't know my pears well enough to say for sure. Specifics aside, they were excellent in this application! So, personally, I wouldn't worry too much about what specific type of pears you have as long as they're good ones. Back

Sunday, 27 October 2024

Chocolate Beer Bread

I know I just made a chocolate sourdough, but this is a different chocolate sourdough. This one contains no sugar and no chocolate, but more than twice the amount of cocoa (proportionally). And the liquid is beer, rather than water. (I used a dark ale for mine.)

While the previous chocolate sourdough claimed to be a savoury bread, I actually found it relatively sweet. This one, however, is nothing like that. It is exceptionally dark and somewhat bitter. The recipe recommends pairing it with salty offerings like pickles, cheeses, and/or cured meats. And TF found it to be an excellent substrate for Vegemite. Meanwhile, the Kidlet thinks it will make an ideal bread for grilled cheese and has requested one tomorrow.

This bread also has some of the most impressively crisp, delightful crust that I've ever achieved. And it got great oven spring. (Despite me forgetting about it for an entire afternoon and generally being pretty lax with my care and timings when making it.) Very nice overall!


Chocolate Beer Bread

Slightly adapted from King Arthur Flour

Ingredients

  • 350g hard (strong/high grade/bread) flour
  • 40g Dutched (alkalized) cocoa
  • 300g beer
  • 80g ripe (fed) sourdough starter @ 100% hydration
  • 1/2 Tbsp. coarse sea salt

Directions

  1. Refresh your starter and make sure it's nice and active.
  2. Combine the flour, cocoa, beer, starter, and salt and mix very well.
  3. Let dough rest, covered, for 3-8 hours, stretching and folding every hour or so.
  4. Once dough feels light and well-risen, shape it into a loaf and place it (seam-side-up) in a floured banneton.
  5. Cover and let rest for 2-3 hours at room temperature (or 6-24 hours in the fridge).
  6. When ready to bake: preheat oven to 250°C (475°F) and boil some water.
  7. Grease a baking sheet and dust it with cornmeal.
  8. Turn the loaf out onto the preapred baking sheet.
  9. Gently rub or brush a little water onto the crust and then slash as desired.
  10. Pour some boiling water into a roasting pan and place it on the bottom rack of the oven.
  11. Place the bread on the rack above the water pan and bake at 250°C (475°F) for 15 minutes.
  12. Reduce heat to 200°C (400°F), remove water pan, and bake for another 15-20 minutes.
  13. Turn off oven and allow bread to rest in hot oven for 10 minutes.
  14. Transfer to a wire rack to cool.

Thursday, 24 October 2024

Bananas Foster

The plan had been to make some rum-glazed pineapple for dessert tonight. But the pineapple had gone off, so I found myself casting about for some other last-minute dessert. There were a few different options, but the bananas foster caught my eye and something tasty, that we had all the ingredients for, and would take very little time to prepare. (And is also delicious!)


Bananas Foster

Slightly adapte from Dessert of the Day by Kate McMillan

Ingredients

  • 3 bananas
  • 3-4 Tbsp. unsalted butter
  • 1/4 c. brown sugar
  • 3 Tbsp. dark rum
  • ~1 c. vanilla ice cream

Directions

  1. Peel the bananas and halve them lengthwise and crosswise.
  2. Melt the butter over medium-high heat.
  3. When the butter foams, place the bananas in the pan, cut-side-down.
  4. Cook for ~5 minutes, then flip and add sugar and rum.
  5. Cook for another 5 minutes.
  6. To serve, place three banana segments in each bowl, spoon a little sauce over them, and top with 3-4 Tbsp. of ice cream.

Monday, 21 October 2024

Strawberry Parfaits with Black Pepper and Balsamic Vinegar

This recipe includes some very strange flavour combinations. I mean, I've heard of both black pepper and balsamic vinegar being used in desserts before, but not both together and not in such large quantities! I was a bit nervous about the results, but I wanted to give it a try anyway and, I must say, I was quite pleased with the results! It was an unusual flavour profile, but not an unpleasant one.


Strawberry Parfaits with Black Pepper and Balsamic Vinegar

Slightly adapted from Dessert of the Day by Kim Laidlaw

Ingredients

  • 2 tsp. black peppercorns, coarsely ground
  • 500g fresh strawberries, hulled and halved
  • 1/2 c. sugar
  • 1/4 c. water
  • 2 Tbsp. balsamic vinegar
  • 1 Tbsp. Chambord1
  • 250mL vanilla ice cream2
  • whipped cream

Directions

  1. Combine the strawberries and black pepper and set aside.
  2. Combine the sugar and water in a small pot, cover, and heat over medium-high heat until the sugar melts.
  3. Uncover and cook, swirling -- BUT NOT STIRRING -- occasionally, until the sugar darkens into a light caramel (5-10 mintes).
  4. Add the strawberries and pepper and cook, stirring occasionally, until any chunks of sugar/caramel that formed when the strawberries were added melt and dissolve back into the juice (2-4 minutes).
  5. Remove from heat and stir in the vinegar and Chambord.
  6. Cover and chill for at least an hour.
  7. Once ready to serve, place some strawberries in the bottoms of three small jars and then layer some ice cream and more strawberries over them.
  8. Top with whipped cream and serve.


1 The original recipe called for kirsch, but a) I didn't have any and b) neither TF nor I like it anyway. We did, however, have a selection of other liquors. I decided that Chambord would be a nice match with the strawberries and used it in place of the kirsch. Back
2 The original recipe called for 500mL of ice cream, but I only used about half of that amount. Of course, the original recipe also claims to serve six and I only actually made three parfaits! So, maybe the original amount would have been fine if I'd split it six ways. That said, there definitely wouldn't have been nearly enough strawberries to do that. I had a scant pound (450g) of strawberries and I already found that a bit skimpy (hence bumping it up to 500g here). There's no way that 450g would have been enough to make six parfaits. I was honestly debating whether to bump the strawberies up to 600 or 700g. That said, I think 500g is sufficient -- if not exaclty generous -- for three parfaits. Back

Friday, 4 October 2024

Gochujang-Glazed Chicken

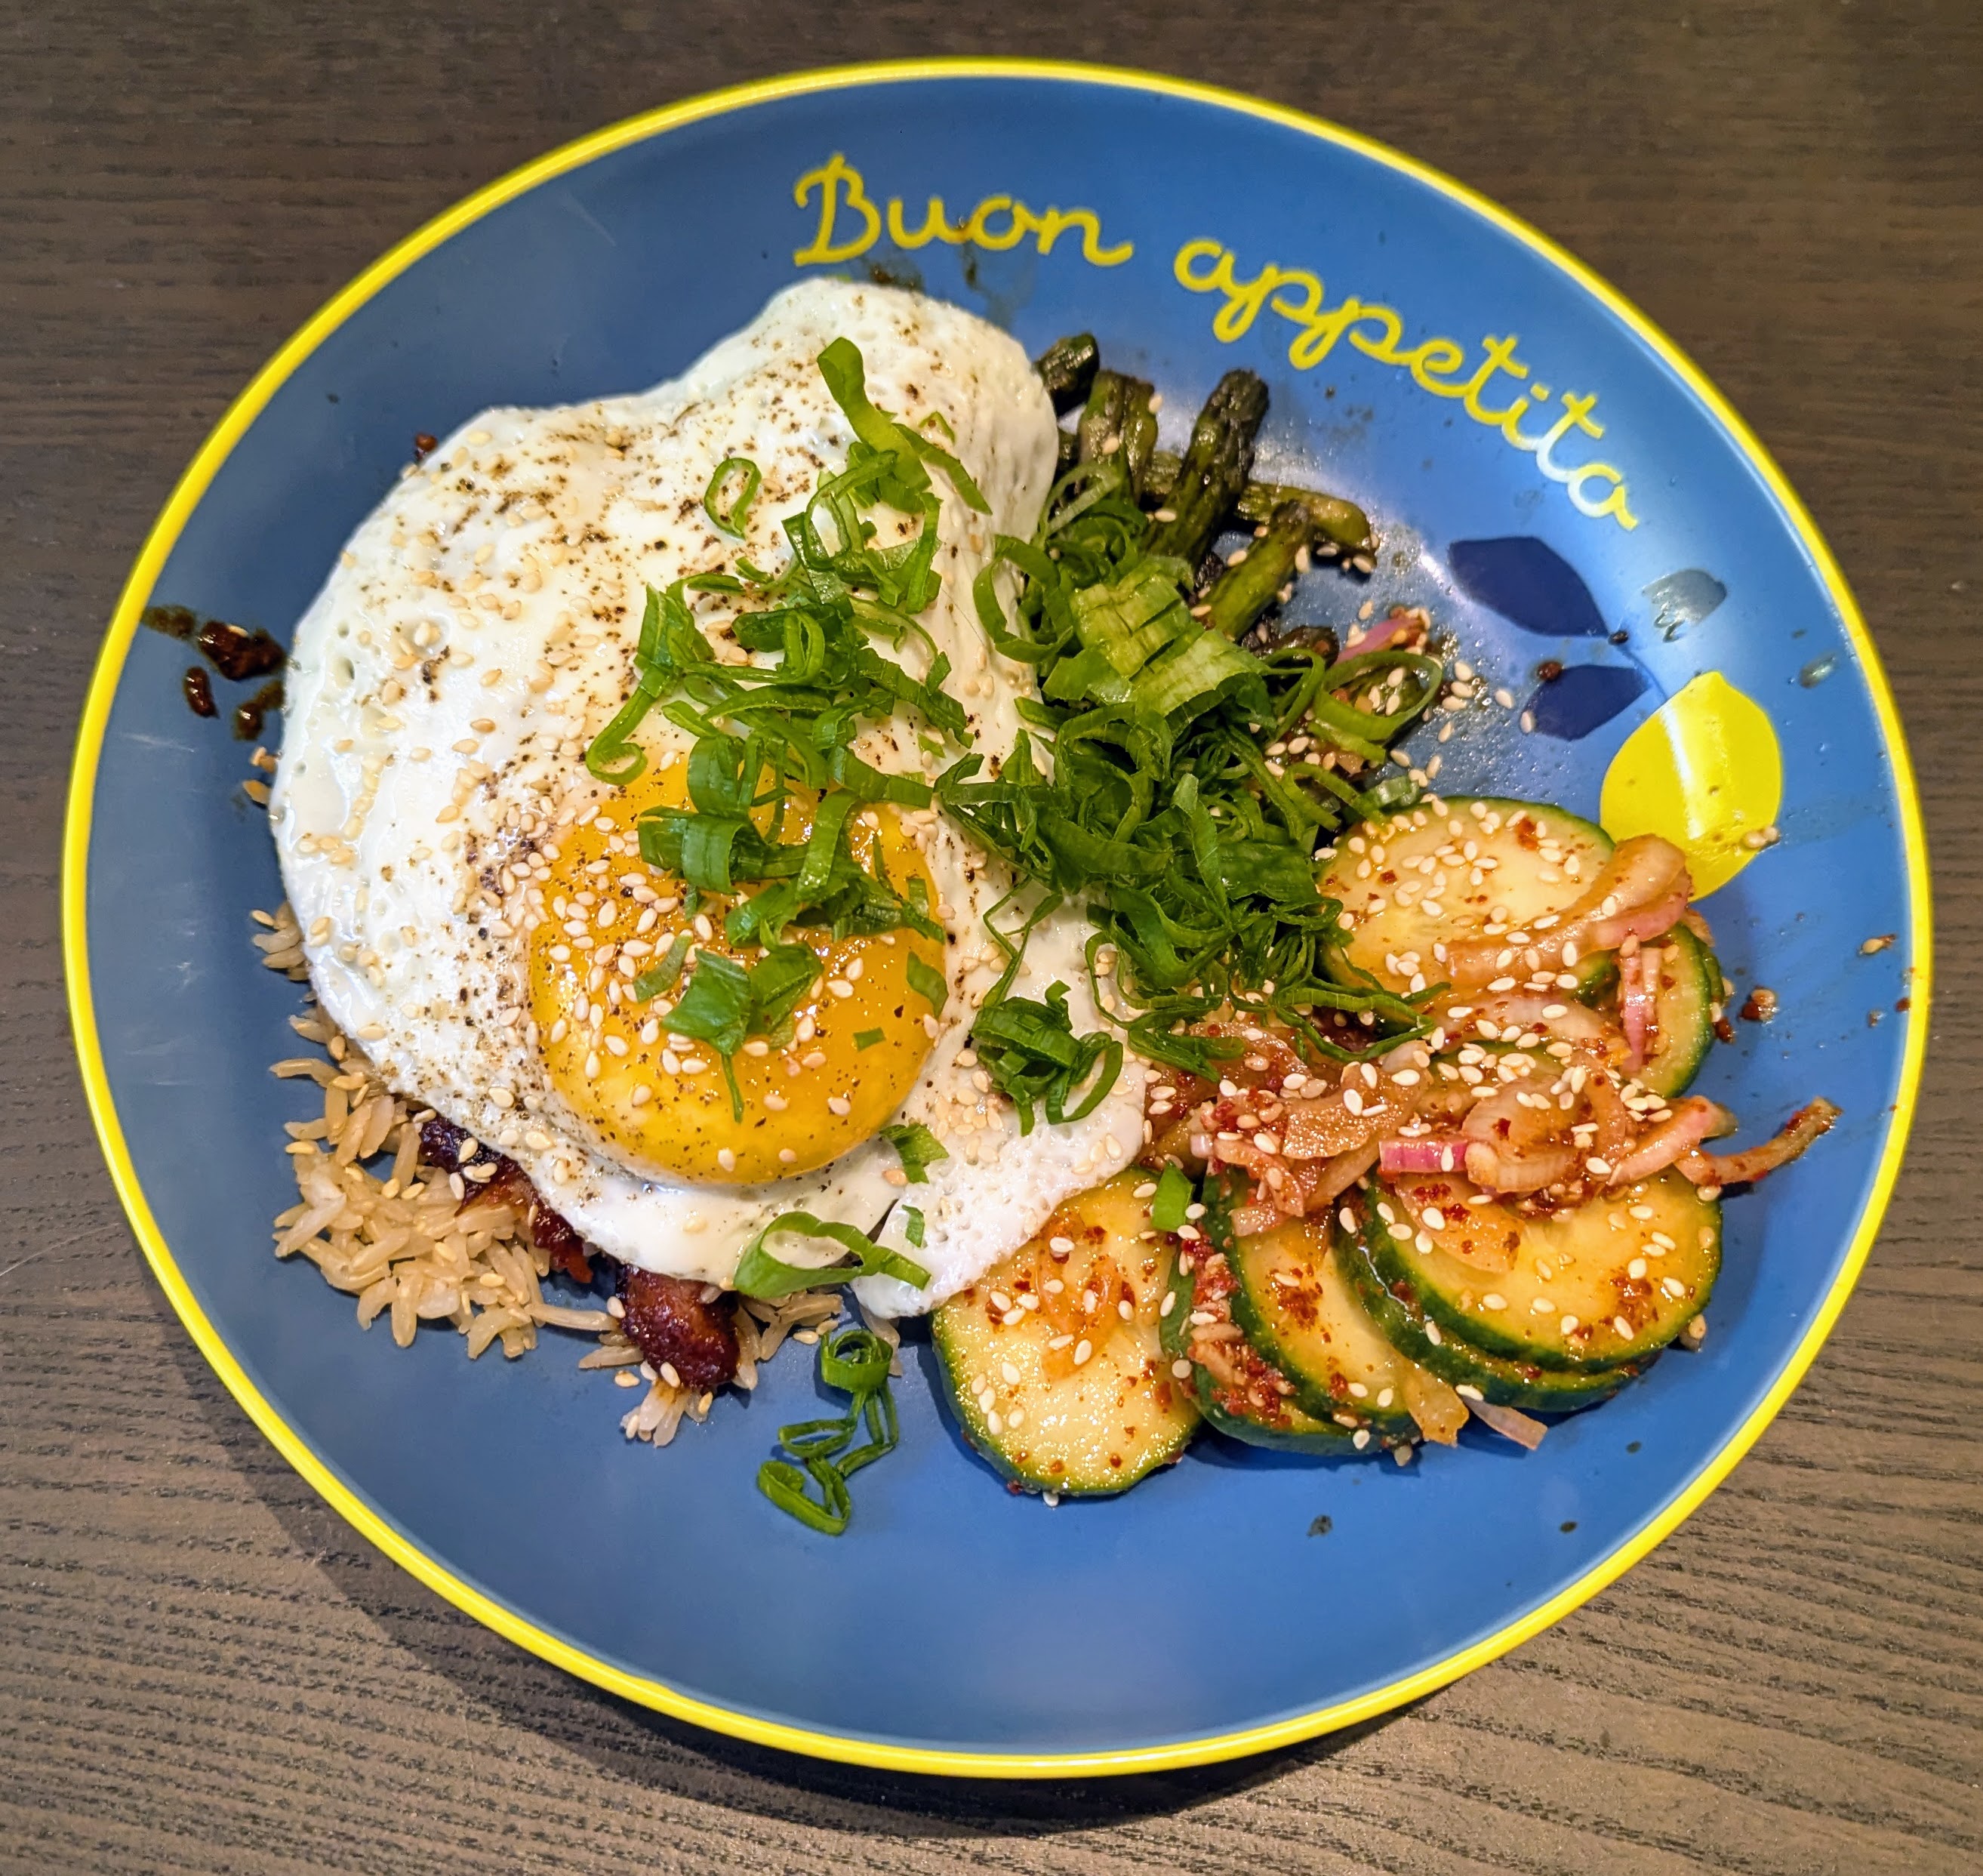
We had a surplus of chicken this week. We thawed out a big package of chicken breasts for a recipe that only actually needed ~1/3 of them. I was planning on making some sort of curry with the remainder. But, in the end, I decided to try something from Aaron & Claire's channel instead. This gochujang chicken looked tasty. And I had everything I needed to make it (except for the asparagus for the side), so I figured I'd give it a try.

The original recipe calls for skin-on chicken thighs, but I figured I could probably make it work with skinless chicken breasts. They're a lot leaner, for sure, so I was somewhat generous with the fat when cooking. And they generally take a lot longer to cook, so I cut each breast into three or four smaller pieces to allow them to cook through more quickly. And, I must say, I really have no complaints with the results! It came out great!

TF even managed to run out and grab some asparagus so we could have our greens with it. And I made a somewhat pared down version of oi muchim (basically just omitting the garlic chives), to give us a few more veggies on our plates. Sadly, I completely forgot about the soft-boiled eggs. Maybe we can have some with the leftovers tonight. But, other than my minor brain fart, this recipe worked out really well! Definitely glad I tried it.


Gochujang-Glazed Chicken

Slightly adapted from Aaron & Calire

Ingredients

Asparagus

  • 1 Tbsp. oil
  • 3-4 cloves garlic, minced
  • 400g asparagus, trimmed and cut into bite-sized pieces
  • 1 mild red chile, thinly sliced (optional)
  • 1/2 Tbsp. light soy sauce
  • 1 Tbsp. oyster sauce

Sauce

  • 2 Tbsp. gochujang
  • 2 Tbsp. gochugaru
  • 1 Tbsp. dark soy sauce
  • 1/2 Tbsp. dasida or chicken bouillon powder
  • 1 tsp sugar
  • 1 Tbsp. honey
  • 2 Tbsp. mirin
  • 1/8 tsp. black pepper, ground
  • 1/2 c. water
  • 1/2 Tbsp. cornstarch (cornflour)

Chicken

  • 600-700g skinless boneless chicken breasts, cut into tender-sized pieces
  • 1/4-1/3 c. cornstarch (cornflour) or potato starch
  • 3-4 Tbsp. schmaltz or lard
  • 5-6 cloves garlic, minced
  • 1 Tbsp. ginger paste
  • 2 green onions, white parts only, chopped

Assembly

  • 2-4 c. cooked rice
  • 4 soft- or medium-boiled eggs
  • 2 green onions, green parts only, chopped
  • 1-2 Tbsp. toasted sesame seeds

Directions

Asparagus

  1. Heat a wok over medium heat.
  2. Drizzle in the oil and swirl to coat.
  3. Add the garlic and stir-fry for 30-60 seconds.
  4. Add the asparagus and stir-fry for 2-3 minutes.
  5. Increase heat to medium-high and add the soy sauce, oyster sauce, and chile (if using) and cook for another 1-2 minutes.
  6. Remove from heat and set aside.

Sauce

  1. Combine all sauce ingredients and mix well. Set aside.

Chicken

  1. Dredge the chicken in the starch to coat completely.
  2. Melt ~1 Tbsp. of fat over medium heat.
  3. Add a few pieces of chicken to the pan and cook, turning every few minutes, until golden-brown on all sides and cooked through (4-5 minutes per side).
  4. Repeat with remaining chicken, adding more fat to pan as needed.
  5. Set chicken aside and add a little more fat to the pan. If there is a lot of fond/stuck-on bits, add a splash of water and deglaze the pan.
  6. Add the garlic, ginger paste, and green onions (white parts only) and stir-fry for 1-2 minutes.
  7. Stir the sauce and pour it into the pan.
  8. Bring to a boil and cook until thickened.
  9. Return the chicken to the pan.
  10. Stir to coat, reduce heat to low, and cook until heated through and well-combined.

Assembly

  1. Place a portion of rice on each bowl/plate.
  2. Top with some chicken, asparagus stir-fry, and a soft-boiled egg (cut in half).
  3. Sprinkle with chopped green onion (green parts only) and sesame seeds and serve.

Monday, 30 September 2024

Barbarian Bars

This recipe comes courtesy of the C&C Cakery blog, which, sadly, no longer exists. Luckily I copied the recipe into my notes file several years ago, before it disappeared. And I'm glad a did. These bars are way tastier than they have any right to be! The recipe might sound a little weird, but it's dead easy to put together and really delicious.


Barbarian Bars

Slightly adapted from C&C Cakery

Ingredients

  • 1 3/4 c. graham cracker crumbs
  • 1/2 c. unsalted butter, melted
  • 1 c. chopped walnuts or pecans
  • 1 c. chopped dark chocolate
  • 1/2 c. chopped milk or white chocolate (or a mix of both)
  • 1/2 c. butterscotch chips1
  • 1 c. unsweetened dried coconut2
  • 300mL sweetened condensed milk3

Directions

  1. Preheat oven to 180°C (350°F) and line a 23x33cm (9x13") pan with parchment paper.
  2. Combine the graham cracker crumbs and butter and mix well.
  3. Dump the graham cracker mixture into the prepared pan and press firmly into an even layer to completely cover the bottom of the pan.
  4. Sprinkle the nuts in an even layer on top, followed by the dark chocolate, then milk chocolate, butterscotch chips (or toffee bits), and finally the coconut.
  5. Pour the sweetened condensed milk over everything, spreading it as evenly as possible. Try to coat the entire surface with milk.
  6. Bake at 180°C (350°F) until browned on top (25-30 minutes).
  7. Remove from oven and allow to cool completely before cutting.
  8. Cut into squares and serve.


1 I didn't have any butterscotch chips, so I substituted Skor toffee bits and am very happy with the results. Back
2 The original recipe called for sweetened coconut, but, given how many other sugary ingredients were already present, I opted for unsweetened. I definitely think that was the right call! The bars are delicious, but, even with the unsweetened coconut, they are still very sweet! I think they would have been cloying and much too sweet if there'd been sugar added to the coconut as well. Back
3 The original recipe called for a "14-oz" can of sweetened condensed milk (which works out to just shy of 400mL in metric). However, the standard size can for sweetened condensed milk here is 300mL. And I only had one. It was a little tricky to get it to cover the whole surface. Having the extra 90-ish mL definitely would have made that task easier. That said, 300 was enough (just barely). And I think the lesser amount made for a better sweetness balance. I think more milk would have put these in danger of being too sweet. So it worked out for the best in the end. Back

Thursday, 26 September 2024

Chocolate Blackout Cake

This is an interesting cake. It is basically a very rich, moist chocolate cake that is "iced" with chocolate pudding rather than a buttercream or ganache or some more traditional cake coating. It is baked as two 20cm (8") round layers, each of which are then split. Three of the resulting thin layers are used to assemble the cake and the fourth is crumbled and used to coat the outside.

I didn't get my batter divided quite evenly and one of my layers baked up a little thinner than the other. I was a bit nervous about trying to split the thinner one, so I just left it whole and split the thicker one only. I then stacked two of the resulting layers and crumbled the third. This, of course, resulted in a reduced overall surface area, so the filling and "icing" are somewhat more generous than they're really meant to be. (Same overall proportions, of course, just thicker layers since there are fewer of them.)

This worked fine, but did mean that the cake was a little more... wobbly than it would have been had I made it with the "correct" number of layers.

Honestly, if I had two 18cm (7") round pans, then I'd be tempted to bake my cake in those next time. The 8" layers baked up fine. But I would've felt more confident about splitting them had they been slightly thicker. I think 6" layers would probably be too thick/tall. But 7" might be just about right. Sadly, I only have one 7" pan at the moment. Which still might be worth trying next time. It just makes it slightly more difficult to get the batter divided evenly and, obviously, ends up requiring double the cooking time since you have to bake the layers one after the other rather than in tandem. So, possibly something to consider, but definitely not ideal.

Other than my lack of confidence in splitting the layers though, this recipe worked out great! The cake was delicious and moist with deep chocolate flavour. (Which the coffee and brown sugar help to accentuate.) And the pudding was also pleasingly rich and thick. A winner all 'round!


Chocolate Blackout Cake

Slightly adapted from The Perfect Cake by America's Test Kitchen

Ingredients

Pudding

  • 1 c. heavy (35%) cream
  • 2 c. milk
  • 1 1/4 c. sugar
  • 1/4 c. cornstarch (cornflour)
  • 1/4 tsp. coarse sea salt
  • 170g unsweetened chocolate
  • 2 tsp. vanilla extract

Cake

  • 110g all-purpose flour
  • 2 tsp. baking powder
  • 1/2 tsp. baking soda
  • 1/4 tsp. coarse sea salt, ground
  • 1/2 c. unsalted butter
  • 3/4 c. Dutched (alkalized) cocoa powder
  • 1 c. brewed coffee
  • 1 c. buttermilk
  • 1 c. brown sugar
  • 1 c. sugar
  • 2 large eggs
  • 1 tsp. vanilla extract

Directions

  1. Combine cream, milk, sugar, cornstarch, and sea salt over medium heat.
  2. Break chocolate into pieces and add to milk mixture.
  3. Cook, whisking frequently, until chocolate has completely melted and mixture is smooth and homogenous.
  4. Continue cooking until bubbles begin to form and pudding thickens.
  5. Remove from heat, stir in the vanilla, and set aside to cool.
  6. Chill for at least 3-4 hours.
  7. Meanwhile, preheat the oven to 160°C (325°F) and grease and flour1 two 20cm (8") round baking tins.
  8. Sift together the flour, baking powder, and baking soda.
  9. Mix in the salt.
  10. Melt the butter over medium heat.
  11. Mix in the cocoa and cook for 1 minute.
  12. Remove from heat and stir in the coffee and buttermilk.
  13. Add the brown sugar and granulated sugar.
  14. Mix in the eggs, one at a time.
  15. Mix in the vanilla.
  16. Divide the batter as evenly as possible between the prepared tins.
  17. Bake at 160°C (325°F) for 30-35 minutes.
  18. Transfer cake layers (still in their tins) to a cooling rack and allow to cool for 15 minutes.
  19. Invert tins onto cooling racks and carefully remove the cakes from their tins. Allow to cool completely (1-2 hours).
  20. Once cake layers are completely cool, divide each one horizontally.2
  21. Place one layer on a serving platter.
  22. Spoon ~1 c. of pudding on top and spread all the way to the edges of the layer.
  23. Top with a second layer and repeat the process: spreading 1 c. of putting on top.
  24. Place a third layer on top and spoon the rest of the pudding over it, completely covering the entire cake -- top and sides.
  25. Crumble the fourth layer and sprinkle the chocolate crumbs on top of your assembled cake, covering the top and sides. You will have to press slightly to get the crumbs to adhere to the pudding. Especially on the sides of the cake.
  26. Serve immediate or refridgerate for up to 2 days.


1 You may wish to line the bottoms with parchment paper and grease the paper before flouring. This adds an extra step, but will help ensure that the cake relases from the pans cleanly. Back
2 The folks at America's test kitchen recommend doing this with a serrated knife. The outline a procedure of scoring the perimeter of the cake layers and then cutting through along the scored lines to get a level split. Personally, I have always preferred my mother's method of using a piece of thread. You simply take a long piece of thread and wrap it around the cake (doing your best to make sure it's roughly level/even all the way around), then grab both ends and pull tightly. The thread should slice neatly through the cake! I've found it a ver quick and reliable method and prefer it to faffing about with knives or cake levelling contraptions. Back

Tuesday, 17 September 2024

Frisian Sugar Loaf

This bread was delicious. Unhealthy, but delicious. In addition to using white flour and being enriched with milk and butter, the dough also includes a cup of sugar cubes! The cubes get lightly crushed before getting worked into the dough and form little pockets of melted sugar upon baking. A lovely -- if somewhat decadent -- result.

I actually ended up using some fancy saffron-infused sugar cubes for my rendition of this bread. They imparted a wonderful aroma and colour to the loaves and the saffron flavour came through quite nicely. Given that the sugar cubes were already flavoured, I decided to omit the cinnamon in this version. That said, I do think the cinnamon would have been delicious with either plain or cardamom-infused sugar cubes (which I may, in fact, try next time). In the meantime, this was a great success and I have no complaints about how it turned out.


Frisian Sugar Loaf

Slightly adapted from Bernard Clayton's New Complete Book of Breads

Ingredients

  • 1 c. sugar cubes
  • 1 Tbsp. ground cinnamon (optional)
  • ~750g all-purpose flour, divided
  • 1/2 c. skim milk powder
  • 2 1/4 tsp. active dry yeast (or 1 3/4 tsp. instant yeast)
  • 2 tsp. coarse sea salt
  • 2 c. hot water (50-55°C)
  • 3 Tbsp. unsalted butter

Directions

  1. With an ice pick or tack hammer crack -- but do not crush! -- the sugar cubes.
  2. Toss the sugar pieces with the cinnamon (if using) and set aside.
  3. Combine ~250g of the flour with the milk powder, yeast, and salt.
  4. Add the hot water and shortening and beat at medium speed for 2 minutes.
  5. Add the remaining flour ~50g at a time until the dough comes together in a rough mass.
  6. Turn the dough out onto a lightly floured surface and knead for 15-20 minutes, adding a handful of sugar pieces every few minutes until all of the sugar has been incorporated.
  7. Round the dough and place it in a covered bowl to rise for 1-2 hours1.
  8. Turn the dough out onto a lightly floured work surface and divide it into two equal portions.
  9. The cut edge will be sticky. Carefully pinch the edges together to close the seam and cover the sticky sugar.
  10. Now round each portion of dough, cover, and set aside to rest for 5-10 minutes.
  11. Meanwhile, grease two loaf pans (preferably 21x11cm), line them with parchment paper, and grease the paper.
  12. Once the dough has rested, shape each portion into a loaf by your preferred method and place the loaves into the prepared pans.
  13. Cover and set aside to rise for 30-60 minutes.
  14. Preheat oven to 200°C (400°F).
  15. Uncover loaves and slash as desired.
  16. Bake at 200°C (400°F) for 15 minutes.
  17. Reduce temperature to 180°C (350°F) and bake for an additional 30-40 minutes.
  18. Remove from oven and allow to cool for 5 minutes.
  19. Turn pans on their sides on the cooling rack and gently pull on the parchment paper to ease the loaves out of their pans.
  20. Place loaves on cooling rack and allow to cool completely before slicing.


1 Rising time will depend on the temperature of your room. Allow to rise until dough maintains the indent from a wet finger pressed ~2cm into the surface. If it fills in, it needs more time to rise. If it sighs and or sinks back, it is over-risen and should be knocked back immediately. Ideally you will catch it before it reaches the point of being over-risen. But as long as it's only slightly over-risen, the bread should still be salvageable. Just keep a close eye on it for any remaining rises. Back

Wednesday, 4 September 2024

Saag Pork (Spinach and Pork Curry)

I don't make pork curries very often. I don't really associate pork with Indian cuisine and it always feels slightly incongruous to me. I tend to default to legume, vegetable, and/or chicken curries. Sometimes I'll do beef, lamb, or fish depending on what I have on hand or what's on sale at the grocery store that week. But pork just doesn't really figure into things.

That said, Iyer does have a decent-sized pork section in the meat chapter of 660 Curries. And I had some pork tenderloins in the freezer. I got them with a completely different recipe in mind, but I keep not quite getting to it, so I figured I might as well just turn them into curries and try to do the other recipe some other time when I have a bit more bandwidth for meal planning.

I appreciated that this was an incredibly simple recipe that required very little prep and cooked quickly. Plus it used up the leftover tomato in the fridge. And gave us some greens to help balance the meal. So, a win all 'round!


Saag Pork

Slightly adapted from 660 Curries by Raghavan Iyer

Ingredients

  • 500g pork tenderloin, cut into 2cm cubes
  • 1/4 c. whipping (35%) cream
  • 2 Tbsp. garlic paste
  • 2 tsp. bin bhuna hua garam masala
  • 1 tsp. coarse sea salt
  • 1-2 Tbsp. canola (or other neutral) oil
  • 1 tsp. cumin seeds
  • 1/2 c. tomato sauce1
  • 300g chopped frozen spinach

Directions

  1. Combine the pork, cream, garlic paste, garam masala, and salt and mix well.
  2. Cover and chill for at least half an hour or as long as 2 hours.
  3. Heat oil over medium-high heat.
  4. Add cumin seeds and sizzle for 15-30 seconds.
  5. Add the pork along with its marinade and cook, stirring occasionally, for ~5 minutes.
  6. Add the tomato sauce and reduce heat to medium.
  7. Cover and simmer, stirring occasionally, for ~15 minutes.
  8. Add the spinach, cover, and cook until heated through (~5 minutes).
  9. Stir and cook, covered, for another 10 minutes or so.


1 I didn't have any ready-made tomato sauce, but I did have some leftover canned diced tomato. I just used that and added a little bit of salt, pepper, basil, garlic, and bottle masala to approximate a sauce. Back