Showing posts with label pie. Show all posts

Friday, 12 June 2026

Key Lime Pie

Okay, well, technically this one wasn't a true key lime pie since I didn't make it with key limes. I just used the limes off of the tree out front. I'm not entirely sure what variety they are. But the finished pie came out tasting somewhere in between "key lime" and "Persian lime" and I quite liked it!

I found the amount of filling somewhat skimpy on this recipe. That said, it actually works quite well if you're having it without the whipped cream. The filling is quite sharp and sweet, so I think a "properly" filled pie would actually be overwhelming without the whipped cream to cut it. I've doubled the filling recipe below. But if you want to have your pie without the cream, I'd recommend just doing half the amount of filling.

Sadly, I forgot to take a photo. I guess I'll just have to make it again!

Key Lime Pie

Slightly adapted from Pioneer Woman

Ingredients

Crust

  • 1 1/2 c. graham cracker crumbs
  • 2 Tbsp. sugar
  • 6 Tbsp. salted butter, melted

Filling

  • 1 c. lime juice
  • 2 Tbsp. grated lime zest
  • 2 cans (~400mL each) sweetened condensed milk
  • 4 large egg yolks

Topping

  • 300mL heavy (35%) cream
  • 2 Tbsp. icing (powdered/confectioners') sugar

Directions

  1. Preheat oven to 180°C (350°F).
  2. Combine the graham cracker crumbs and the sugar.
  3. Pour in the butter and mix until evenly dampened.
  4. Press mixture into a 23cm (9") pie plate.
  5. Bake at 180°C (350°F) for 10 minutes.
  6. Remove from oven and set aside to cool slightly.
  7. Meanwhile, combine lime juice, zest, condensed milk, and egg yolks. Mix well.
  8. Pour filling mixture into crust and smooth top.
  9. Bake at 180°C (350°F) for 10 minutes.
  10. Remove from oven and allow to cool completely. Cover and chill overnight if desired.
  11. Once completely cool, whip the cream with the icing sugar until stiff.
  12. Top pie with whipped cream, slice, and serve.

Tuesday, 12 May 2026

Apple-Feijoa Pie

We had to clear some things out of the freezer when we swapped the fridge over and that left me with a batch of sourdough pastry that needed using. In theory this pie is meant to have a spiced almond-spelt pastry, but I figured the sourdough pastry would work just fine. And I took the spices that were meant to go into the pastry and added them to the filling instead.

The result was okay, but not great. That said, it was the filling, not the pastry that was the issue. The recipe called for "apple purée". I had a can of unsweetened applesauce on hand, so I used that and then added a sliced apple to make up the missing volume. I don't like how mushy the filling came out though. I think next time I'd just use sliced apples rather than sauce or purée. The recipe also didn't make enough filling, so I ended up having to chop up a couple of extra feijoas to add to the mix. I also feel like it could've done with more spices and a little extra sweetener as well. So, all-in-all, probably not one that I'd bother making again. At least not in this form. But I'm glad that I tried it.

Apple-Feijoa Pie

Adapted from NZ Women's Weekly

Ingredients

Pastry

  • sourdough pastry
  • OR
  • 125g butter
  • 1 1/2 c. ground almonds
  • 1 1/2 c. spelt flour
  • 2/3 c. sugar
  • 1 tsp. vanilla extract
  • 1/2 Tbsp. ground cinnamon
  • 1/2 tsp. baking soda
  • 2 large eggs

Filling

  • 2 c. chopped feijoa flesh
  • 2 c. sliced apples
  • 1/3 c. honey
  • 1/4 c. brown sugar (optional)
  • 1 tsp. vanilla extract (if using sourdough crust)
  • 1/2 Tbsp. ground cinnamon (if using sourdough crust)

Topping

  • 1 egg, beaten
  • 2 Tbsp. sesame seeds or sugar

Directions

  1. For spelt pastry, add butter, almonds, flour, sugar, vanilla, cinnamon, and baking soda to a food processor and pulse until mixture looks sandy. Then, with processor running, add eggs, one at a time, and process until mixture comes together. For sourdough pastry, follow instructions for that recipe.
  2. For either pastry, chill for ~30 minutes before continuing.
  3. Preheat oven to 180°C (350°F).
  4. Roll out 1/2 to 2/3 of the pastry and use it to line a 23cm (9") pie plate.
  5. Combine the feijoas, apples, honey, brown sugar, vanilla, and cinnamon (if using) and dump into the pie shell.
  6. Roll out the remaining pastry and use it to make either a plain or a lattice top for your pie, then crimp the edges.
  7. Brush with egg and sprinkle with your choice of sesame seeds or sugar.
  8. Bake at 180°C (350°F) for 35-40 minutes.
  9. Serve with cream or ice cream.

Sunday, 4 May 2025

Feijoa and Custard Crumble Tart

My last feijoa recipe for the year! I managed to bring a few home with me and we've been enjoying them, but this tart used up the last few. Luckily, it was delicious, so I feel pretty good about using them up this way. And I doubt they would've kept much longer anyway. After a week, they were definitely reaching their "use by".

TF and I both liked this pie. Although, I have to admit that I found it a bit too sweet. I think I'd cut the sugar significantly next time. I might also try swapping out some of the flour for oats, since I do enjoy a crumble with oats in!


Feijoa and Custard Crumble Tart

Slightly adapted from NZ Woman's Weekly

Ingredients

  • 1/2 recipe sourdough pastry or sweet shortcrust pastry
  • 3 large eggs
  • 50g sugar
  • 1 tsp. vanilla extract
  • 1/2 c. heavy (35%) cream or half-and-half (10% MF)
  • 1/2 c. flour
  • 50g brown sugar
  • 100g butter
  • 1/2 c. rolled oats
  • 250g fejoas, scooped and sliced

Directions

  1. Make your pastry, wrap, and chill it for at least 30 minutes.
  2. Preheat oven to 190°C (375°F) and place a baking sheet in the oven.
  3. Roll out the pastry and use it to line a 23cm (9") pie plate, crimp the edges, and line it with baking paper and fill it with baking beans.
  4. Blind bake the pastry shell for 15 minutes, then remove the baking paper and pie weights and continue baking for another 5 minutes.
  5. Remove the pastry shell from the oven and set aside and reduce oven temperature to 160°C (325°F).
  6. Beat the eggs with the sugar, vanilla, and cream.
  7. In a separate bowl, combine the flour and brown sugar and cut in the butter. Then mix in the oats.
  8. Place the feijoas in the pastry shell and pour in the custard, then sprinkle with the crumble topping.
  9. Return to oven and bake at 160°C (325°F) until custard is just set (~25 minutes).
  10. Serve with whipped cream and or powdered sugar.

Monday, 31 March 2025

Feijoa Custard Tart

Apple-feijoa crumble and feijoa jam seem to be the two most popular ways to use up feijoas. That said, I've alredy done a couple of crumbles at this point, so I've been looking around for other feijoa recipes. There are lots of interesting options, but I settled on this feijoa custard tart to start with, both because it looked fairly easy to make and because Reiver loves custard.

I'm pretty happy with how this one came out! The custard set up nicely and the crushed gingernuts and whipped cream make a nice complement without overpowering the fruit.

I have scaled the recipe up slightly from the original because the pie plate that Reiver has is quite large, so I felt that it might want a bit of extra filling. I used an extra 1/4 c. of milk, one additional egg yolk, an extra teaspoon of cornstarch, and one more feijoa. This just filled the pie nicely. (Plus, the extra egg yolk meant that I had the right number of whites left over to make friands!) If you have a particularly large or small pie plate, you may wish to scale the recipe up or down somewhat.


Feijoa Custard Tart

Slightly adapted from NZ Woman's Weekly

Ingredients

  • 1 recipe sourdough pastry1
  • 1 c. heavy (35%) cream
  • 1/2 c. milk
  • 5 large egg yolks
  • 1/4 c. sugar
  • 1 Tbsp. cornstarch (cornflour)
  • 1 tsp. vanilla extract
  • 7-8 feijoas, halved (and sliced if large)
  • whipped cream, to serve
  • crushed gingernuts, to serve

Directions

  1. Preheat oven to 190°C (375°F).
  2. Roll out your pastry and use it to line your pie plate.
  3. Trim and crimp the edges.
  4. Prick with a fork, line with baking paper, and fill with pie weights (baking beans).
  5. Bake at 190°C (375°F) for ~15 minutes.
  6. Remove the baking paper and pie weights and bake for another 5 minutes to dry out the bottom.
  7. Meanwhile, heat the milk and cream until steaming and just beginning to tremble.
  8. Beat the egg yolks with the sugar, cornstarch, and vanilla until pale.
  9. Slowly pour the hot cream mixture into the eggs while wisking.
  10. Pour the custard into the par-baked pie shell.
  11. Arrange the feijoa slices in the custard.
  12. Reduce oven temperature to 160°C (325°F) and bake until custard is just set (~50 minutes).
  13. Remove from oven and allow to cool.
  14. Cover and chill for ~1 hour.
  15. Serve garnished with crushed gingernuts and whipped cream.


1 The original recipe calls for a sweet shortcrust pastry, which, to be fair, I'm sure would have been lovely here. But I also don't really feel like a sweet shortcrust is necessary most of the time. And I love my sourdough pastry so much that I will happily substitute it for most other varieties of shortcrust. Personally, I think it worked quite well here! Back

Tuesday, 26 November 2024

Cinnamon Apple Crumb Pie

I was initially planning on making a chocolate custard pie with the pastry that I had left over in the fridge. But it requires several hours of chilling to set the custard. And we're a bit low on fridge space at the moment. So I made a last-minute swap and did this apple crumble pie instead.

It was nice. Not, I don't think, a favourite for me, but definitely good nonetheless. Although I think I'd add an extra apple to the filling next time. The recipe called for seven and I think TF and the Kidlet prepped eight. But our apples were quite small, so I think nine or ten would have been more appropriate. I mean, this was still good, don't get me wrong. The filling was adequate. It just wasn't ample. And I would have liked it to have been.

I know apple pie à la mode is a classic regardless. But I think the crumb topping on this one makes it particularly well-suited to being served with ice cream (or whipped cream). It's a really great combo.


Cinnamon Apple Crumb Pie

Slightly adapted from Dessert of the Day by Kate McMillan

Ingredients

Topping

  • 1/2 c. flour
  • 1/3 c. brown sugar
  • 1 tsp. ground cinnamon
  • 1/4 tsp. coarse sea salt
  • 5 Tbsp. unsalted butter

Filling

  • 8-10 tart apples
  • 1 Tbsp. lemon juice
  • 1/3 c. sugar
  • 2 Tbsp. cornstarch (cornflour)
  • 1 tsp. ground cinnamon
  • 1/2 tsp. ground nutmeg
  • 1/8 tsp. coarse sea salt

Directions

  1. Make the pastry, wrap, and chill as directed.
  2. Combine the flour, brown sugar, cinnamon, and salt for the topping and mix well.
  3. Cut in the butter. Set aside.
  4. Peel, core, and slice the apples and toss with the lemon juice.
  5. Combine the sugar, cornstarch, cinnamon, nutmeg, and salt and toss with the apples.
  6. Roll out the pastry and use it to line a 23cm (9") deep dish pie plate. Trim and crimp edges.
  7. Dump the apple mixture into the pastry shell and spread out evenly.
  8. Sprinkle with crumb topping.
  9. Chill while oven preheats.
  10. Preheat oven to 190°C (375°F).
  11. Bake pie at 190°C (375°F) for 40-50 minutes.
  12. Transfer to wire rack to cool.
  13. Serve topped with ice cream and/or whipped cream.

Sunday, 17 November 2024

Buttermilk Pie

I needed to take a quick break from the poached fruit frenzy to use up some expired buttermilk. It was already just over a month past its best before, but... it's buttermilk. I figure as long as it still looks, smells, and tastes okay, it's probably fine. Especially if I'm going to be baking with it.

This also gave me the chance to use up the leftover pastry in the fridge as well. I'd used up half of it for a quiche about a week ago. But the remainder has been sitting in the fridge waiting for a purpose ever since. I had been planning on making this pie last weekend. But that's when the quince and pears arrived. So that became a priority override and the pie got pushed aside until we'd dealt with the fruit and cleared out a few other ingredients.

I finally had the time and the ingredients tonight though. And I couldn't do the next batch of poached fruit yet anyway. I haven't had a chance to get to the store to get either pears or apricots yet. So I figured I might as well get this done while I had the chance. (And before the buttermilk and pastry actually do go off.)

I was a bit skeptical of the idea of a buttermilk pie. I like buttermilk biscuits and pancakes, but I'm not necessarily a huge fan of straigh-up buttermilk. And I was worried that this would manage to be both too bland and too buttermilk-y at the same time. But I'm pleased to say that I was wrong! The buttermilk definitely comes through, but it's not overwhelming. And the vanilla, lemon, and brown sugar balance it out. You end up with a delicious, slightly tangy, baked custard in a flaky pie shell. So, all-in-all, no complaints from me! Especially not with the wonderful, slightly caramelized top. It really is quite lovely.


Buttermilk Pie

Slightly adapted from Dessert of the Day by Kim Laidlaw

Ingredients

  • 1/2 recipe sourdough pastry (or similar)
  • 1/2 c. unsalted butter, softened
  • 1 c. sugar
  • 1/4 c. brown sugar
  • 3 large eggs
  • 2 Tbsp. flour
  • 1/16 tsp. coarse sea salt
  • 1 c. buttermilk
  • 1/2 Tbsp. vanilla extract
  • 1/2 tsp. grated lemon zest

Directions

  1. Roll out pastry and use it to line a 23cm (9") pie plate. Chill for ~30 minutes.
  2. Preheat oven to 200°C (400°F) and place an empty baking sheet in the oven.
  3. Line pastry shell with parchment paper and fill with pie weights. Bake at 200°C (400°F) for 15 minutes.
  4. Remove paper and pie weights and cook for aonther 5.
  5. Meanwhile, beat butter with sugar and brown sugar until light.
  6. Mix in the eggs, flour, salt, buttermilk, vanilla, and lemon zest.
  7. Once pie shell is baked, reduce heat to 180°C (350°F) and pour filling into shell.
  8. Bake at 180°C (350°F) for 45 minutes.
  9. Allow to cool before slicing.
  10. Slice and serve topped with a fruit compote, icing sugar, or maple syrup.

Wednesday, 30 October 2024

Apple Pie

I took the Kidlet to the grocery store with me the other day and she wanted to get an apple pie. I told her that I usually find the budget grocery store apple pies somewhat disappointing and that we'd probably be better off making our own. And, as luck would have it, when TF and I went to the grocery store a few days later, they had bags of apples on the discount produce rack: 8 apples for $2!

Now, the catch with getting discount apples is that you don't get to choose (or even know) what variety you're getting. They looked like maybe macs or galas, but I'm not certain. I know they weren't red delicious, Granny Smith, or golden delicious, but that's about all I can say. I usually hear relatively tart apples (like Granny Smiths) recommended for baking, so this probably wasn't ideal. But they were cheap and I'm still quite happy with how the pie turned out and, most importantly, so is the Kidlet.

The book contains its own pastry recipe for the pie. Initially, I was going to use their recipe. But then I thought about how much sourdough starter I have going begging right now and figured that maybe going for a sourdough pastry would be better. I felt like it would complement the apples reasonably well and let me use up a little starter, so why not? I even managed to get a flakier, less bready result this time! I think the only change I'd make next time is to add slightly more sugar to the crust. Maybe a full tsp. rather than just half. It might also be fun to experiment with brushing the crust with a little egg or milk and then sprinkling on some turbinado sugar before baking. But I didn't want to mess around with that for this time. Possibly something to experiment with, but by no means necessary.


Apple Pie

Slightly adapted from Dish of the Day by Kate McMillan

Ingredients

  • 1 recipe sourdough pastry
  • 1/2 c. sugar
  • 1/2 tsp. ground cinnamon
  • 1/8 tsp. coarse sea salt
  • 1 Tbsp. cornstarch
  • 8 apples, peeled and sliced
  • 2 Tbsp. unsalted butter1
  • vanilla ice cream, to serve (optional)

Directions

  1. Prepare pastry, wrap, and chill for at least 30 minutes.
  2. Preheat oven to 180°C (350°F).
  3. Combine sugar, cinnamon, salt, and cornstarch.
  4. Add the apples and toss to mix.
  5. Divide the pastry into two equal portions and roll out each one into a 30cm (12") round.
  6. Use one pastry sheet to line a pie plate.
  7. Dump the apples into the pie shell.
  8. Dot the butter on top, then cover with remaining pastry sheet.
  9. Trim edges and fold the edge of top crust under the bottom crust, then crimp to seal.
  10. Cut a few slits in the top crust.
  11. Bake until crust is golden and apples are tender (~60 minutes).
  12. Transfer to wire rack to cool.
  13. Allow to cool for at least 30 minutes before serving.
  14. Serve with ice cream and or whipped cream (if desired).


1 I only just now realized that I forgot to add the butter. Whoops! Back

Sunday, 28 April 2024

Fresh Coconut Pie

This is a recipe for a delicious Bahamanian fresh coconut pie. The filling is pretty much pure coconut (and sugar). None of this coconut-flavoured custard and whipped cream nonsense. I mean, not that I don't also love coconut cream pie. But this Caribbean-style fresh coconut pie is on a whole 'nother level!

The filling is very simple: just coconut, water, sugar, and vanilla. It gets cooked and poured into an unbaked pie shell. It's then meant to be topped with a lattice crust. And that does sound lovely. Unfortunately, it's also meant to use the special Bahamanian sweet pastry, which I did make, but was having a lot of difficulty working with. After many attempts at rolling it out and making my pie shell, I finally settled on using it as a press-in crust for the bottom and then very carefully dropping a solid sheet of pastry over top for the upper crust. The top crust ended up tearing in half, so the finished pie had a big split down the centre, but it still baked up fine and was definitely easier than trying to mess about with a lattice top.

Anyway, despite my pastry fumbling, the pie turned out very nicely! Everyone seemed to like it and it definitely packs a much more concentrated coconut punch than a coconut cream pie.

Photo goes here.

Fresh Coconut Pie

From Mom's Bahamanian cookbook

Ingredients

Directions

  1. Combine coconut, sugar, and water and bring to a boil over medium heat.
  2. Reduce heat to medium-low and simmer, uncovered, until thickened (~30 minutes).
  3. Remove from heat, stir in vanilla, and set aside to cool.
  4. Meanwhile, preheat oven to 180°C (350°F) and roll out half the pastry (1/4 of the amount the recipe makes) and use it to line a 23cm (9") pie plate.
  5. Pour the filling into the uncooked pie shell.
  6. Roll out the remaining portion of pastry and either place it on top of the filled pie or cut it into strips and weave a lattice top over the pie.
  7. Crimp the edges to seal.
  8. Bake at 180°C (350°F) until filling is set and pastry is cooked through and well-browned (30-45 minutes).

Thursday, 11 April 2024

Chicken Pot Pie

The Kidlet was having a friend over for dinner the other day and I wasn't sure what they liked, so I tried to play it safe with this chicken pot pie. I hoped it would be a fairly... unintimidating dish without any overly strong flavours or unusual ingredients. The Kidlet certainly liked it! I may need to work on dailing things in with the friend a bit, but it was a decent start.

In theory this is meant to make one 9" pie. In practice, I ended up with more filling than would fit in a 9" pie plate, so I ended up making an additional 4 small pies by pouring the excess filling into ramekins and topping them with a bit of the extra pastry.


Chicken Pot Pie

Slightly adapted from Dish of the Day by Kate McMillan

Ingredients

Pastry

  • 210g all-purpose flour
  • 6 Tbsp. shortening or lard
  • 2 Tbsp. unsalted butter
  • 1/3 c. cold water

Filling

  • 1 c. sliced carrots
  • 1 c. fresh or frozen peas
  • 1 c. fresh or frozen corn kernels
  • 2 Tbsp. unsalted butter
  • 500g skinless boneless chicken thighs, cut into bite-sized pieces
  • salt and pepper, to taste
  • 1 small red onion, chopped
  • 1 clove garlic, minced
  • 1/4 c. all-purpose flour
  • 1 1/2 c. chicken stock
  • 1/2 c. dry white wine
  • 1/2 c. half-and-half (10% MF)
  • 2 Tbsp. chopped flat-leaf parsley
  • 1 small egg
  • 2 tsp. water

Directions

  1. Cut the butter and shortening into the flour.
  2. Mix in the water, 1 Tbsp. at a time, until the dough comes together.
  3. Shape into a ball, wrap tightly, and chill for at least 30 minutes.
  4. Meanwhile, cook the carrots in salted water until tender-crisp (~3 minutes).
  5. If using fresh peas and corn, boil them for ~1 minute. If using frozen, just add them to the boiling water and then immediately remove from heat. Drainth eveggies and set aside.
  6. Preheat oven to 200°C (400°F).
  7. Melt the butter over medium heat.
  8. Add the chicken, season to taste with salt and pepper, and cook until browned on all sides (8-10 minutes).
  9. Add the onion and garlic and cook until softened (2-4 minutes).
  10. Add the flour and cook for another minute or two.
  11. Pour in the broth, wine, cream, and parsley and bring to a simmer.
  12. Reduce heat to medium-low and simmer for 10 minutes.
  13. Add the veggies and adjust seasoning to taste.
  14. Pour the filling into a 23cm (9") deep dish pie plate. (You may have some extra.)
  15. Roll out the dough on a lightly floured surface.
  16. Beat the egg with the water and brush a little egg wash around the edges of the pastry, then place the pastry, egg-side-down, over the pie.
  17. Press pastry to adhere and crimp edges.
  18. Brush the top of the pie wiht more egg wash and cut one or more small holes or slits in the crust.
  19. Place on a baking sheet and bake at 200°C (400°F) for ~30 minutes.

Thursday, 22 February 2024

Pineapple Galette

I picked up a pineapple on a whim the other day. My intention had been to have it for dessert, just as is. Pineapples are so sweet and juicy on their own, they don't really need any gussying up to make them feel like a treat. But then I ran across this pineapple galette recipe. And while pineapples don't need any doctoring to make them tasty, this looked pleasingly simple and would allow me to check off another recipe int he dessert book so... why not?

This was pretty good and fairly simple to put together. That said, as long as the pineapple is properly ripe, I think I prefer a big bowl of freshly cut up pineapple chunks to the fruit in this galette form. Not that we didn't enjoy it, but the fresh fruit has a better effort:deliciousness ratio. Still... it was a fun experiment.


Pineapple Galette

Slightly adapted from Dessert of the Day by Kim Laidlaw

Ingredients

  • ~300g shortcrust pastry1
  • 1 pineapple
  • 1/4 c. brown sugar
  • 1 Tbsp. unsalted butter

Directions

  1. Mix up the pastry and chill as directed.
  2. Meanwhile, dissassemble your pineapple: trim off both ends, pare off the skin, and cut out the eyes2, then cut into 5mm thick slices and use a small round biscuit/cookie cutter to cut out the core from the centre of each slice.
  3. Line a baking sheet with parchment paper or a silicone baking mat.
  4. Roll out the pastry on a lightly floured surface. Aim for a circle ~35cm (14") in diameter.
  5. Transfer the pastry to the prepared baking sheet and arrange the pinapple rings on it, leaving a 5cm border.
  6. Sprinkle the brown sugar over the pinapple and dot with butter.
  7. Fold the pastry up and over the pinapple rings, leaving the centre open.
  8. Cover and chill for 15-20 minutes.
  9. Meanwhile, preheat the oven to 200°C (400°F).
  10. Uncover the galette and bake at 200°C (400°F) for 40-50 minutes.
  11. Let cool for at least 10 minutes before cutting into wedges and serving.
  12. Serve plain or with vanilla ice cream and/or whipped cream.3


1 I opted for a sourdough pastry, but any kind of shortcrust pastry (plain or sweet) would work. I think I only used ~250g of pastry for my galette, but I found a 30cm (12") circle to be a little too skimpy when trying to pleat it around the pineapple slices. Next time I'd just use the whole batch (which I think would've been ~325g). Back
2 The recipe suggested cutting spiral furrows following the path of the eyes around to remove them. TF found gouging out each eye individually to be more efficient. Do what works for you. Back
3 Coconut cream and/or ice cream could also be an interesting combination. Kind of a piña colada vibe. Back

Thursday, 25 January 2024

Lemon Chiffon Pie

I've been itching to try out this lemon chiffon pie recipe for a while. I love lemony desserts. And I even had some extra egg yolks to use up after making the last pavlova!

Ideally this would have been made with a freshly baked, home-made gingersnap crust. But when I spotted a bunch of "reduced for quick sale" ready-made gingerbread crumb crusts at the grocery store just after Christmas, I figured that would give the same ginger-y vibe as the gingersnap crust, but with a bit less effort on my part.

This was great in theory, but the recipe ended up making more filling than would fit in the store-bought crust, so I ended up whipping up a quick graham cracker crust to contain the excess. So now I've got two pies: one (slightly underfilled) with a home-made graham cracker crust and one with a store-bought gingerbread crust.

We've only tried the gingerbread one so far, but it was a hit. Although I found that the ginger notes were kind of drowned out by the lemon. The crust tastes gingery when eaten on its own, but it doesn't really come through when combined with the lemon filling. Maybe next time I can try it with a home-made gingersnap crust and see if that produces a punchier flavour.


Lemon Chiffon Pie

Slightly adapted from Dish of the Day by Kate McMillan

Ingredients

Crust

  • 125g gingersnaps, crushed
  • 3 Tbsp. sugar
  • 75g unsalted butter, melted

Filling

  • 1/4 c. cold water
  • 2 1/4 tsp. (1 packet) unflavoured gelatin
  • 3/4 c. sugar
  • 3/4 c. lemon juice
  • 4 large egg yolks1
  • 1 Tbsp. orange zest
  • 1/8 tsp. coarse sea salt
  • 1 1/4 c. heavy (35%) cream
  • 1/4 c. icing (powdered/confectioners') sugar

Directions

  1. Preheat oven to 180°C (350°F).
  2. Combine the gingersnap crumbs and sugar and mix well.
  3. Add the butter and thoroughly combine.
  4. Dump the crumb mixture into a pie plate and press firmly. Try to create and even layer of crumb mixture across the bottom and up the sides of the pie plate.
  5. Bake at 180°C (350°F) for ~7 minutes.
  6. Remove from oven and allow to cool completely.
  7. Meanwhile, sprinkle the gelatin over the cold water and allow to stand until softened (5-10 minutes).
  8. Add the sugar, lemon juice, egg yolks, orange zest, and sea salt and whisk to combine. It may be a bit lumpy and that's okay.
  9. Cook over medium-low to medium heat2, whisking constantly, until slightly thickened (~8 minutes). Do not let the mixture come to a boil!
  10. Remove from heat and place pot in ice bath and allow to cool to room temperature.
  11. Once custard mixture has cooled, in a separate bowl, beat the cream with the icing sugar until stiffened.
  12. Add the whipped cream to the custard and gently fold it in.
  13. Scoop the filling mixture into the prepared pie crust and smooth the top.
  14. Cover and chill until set (~4 hours in the fridge or 1 hour in the freezer).
  15. Let stand at room temperature for 10-15 minutes before serving.


1 My eggs were a little on the small side so I tossed in an extra yolk for my pie. Back
2 The recipe calls for cooking over medium heat, but also warns against boiling. I started mine off over medium heat, but gradually nudged the temperature down as it cooked to ensure that it stayed below a boil. Back

Wednesday, 16 November 2022

Scottish Smoked Salmon and Cucumber Cream Cheese Tart

I picked up some smoked salmon on sale a little while back, tossed it in the freezer, and kind of forgot about it. I recently remembered it existed and figured I'd give this salmon tart a go. I was dubious about using cucumbers in a cooked pie, but it actually worked really well! I love the cream cheese in the custard.


Scottish Smoked Salmon and Cucumber Cream Cheese Tart

Slightly adapted from the Book of Old Tarts by Elizabeth Hoder

Ingredients

  • 175g shortcrust pastry
  • 1 English cucumber, peeled and chopped
  • 3/4 tsp. coarse sea salt
  • 250g smoked salmon, broken into large pieces
  • 250g cream cheese, softened
  • 2 large eggs
  • 1 large egg yolk
  • 150mL heavy (35%) cream
  • 2 Tbsp. chopped fresh chives
  • 2 Tbsp. chopped fresh dill1
  • zest and juice of 1 lemon
  • 1/4 tsp. peppercorns, ground

Directions

  1. Line a shallow 25cm (10") tart tin2 with the pastry and blind bake it3.
  2. Toss cucumber with salt, place in colander, and place a plate and a heavy object on top. Set aside to drain for 30 minutes.
  3. Pat cucumber dry and toss with salmon.
  4. Preheat oven to 200°C (400°F).
  5. Blend cream cheese, eggs, egg yolk, cream, chives, dill, lemon zest, lemon juice, and pepper.
  6. Place cucumber-salmon mixture in pie crust.
  7. Pour the cheese mixutre over the filling.
  8. Bake at 200°C (400°F) for 30 minutes.
  9. Serve warm or cold with vegetable side of your choice.


1 I didn't have any fresh dill, so I ended up using an extra 2 Tbsp. of chives + 1/2 tsp. of ground dill seeds. Back
2 The original recipe called for a 9" tart tin, but I've had issues with having too much filling for pies in this book before, so I decided to go up one tin size. Back
3 Line with parchment paper and fill with pie beans and bake at 400°F for 15 minutes, then remove paper and beans, prick with a fork, and brush with egg white, then return to oven and bake for another 5 minutes. Back

Friday, 26 August 2022

Beef Bastila with Peppers, Raisins, and Olives

I've been wanting to try my hand at making bastila ever since I was given this book. It looks fascinating and delicious. But I always found the recipes a bit intimidating. First you have to make your warqa, which already looked pretty challenging to me, and then you have to assemble that into a pie! A pie that needs to be baked and flipped over multiple times! It all sounded a bit too daunting to me. Especially since I kept eyeing up the fancy "bastila of Fes with chicken or quail". Somehow it felt like I should start with that one -- it being the famous classic version and all. But it's also quite intricate and complicated. And eventually I realized that maybe it would be better to start with one of the simpler bastilas.

This bastila uses ground beef (rather than chicken, quail, squab, or lamb like many of the others do) and the filling can be prepared in advance, so you don't have to do everything the day of. And, aside from feeling like I need to work on my warqa-making technique, I was very happy with the results. So now I have finally made a bastila!


Beef Bastila with Peppers, Raisins, and Olives

Slightly adapted from The Food of Morocco by Paula Wolfert

Ingredients

  • 225g ground beef
  • 2/3 c. chopped onion
  • 2-3 cloves garlic, minced
  • 2 1/2 tsp. la kama spice mixture
  • 1/2 tsp. ras el hanout
  • 3 Tbsp. chopped flat-leaf parsley
  • 1/4 c. chopped fresh cilantro
  • 1 tsp. coarse sea salt
  • 55g vermicelli pasta or rice vermicelli
  • 1 large (or 2 small) bell peppers, grilled or broiled, peeled and diced
  • 1 c. chopped tomato
  • 1/2 tsp. harissa or biber salçasi (Turkish red pepper paste)
  • 3 Tbsp. golden raisins
  • 10-12 Picholine or green olives, pitted and sliced
  • 1 Tbsp. lemon juice
  • black pepper, to taste
  • 24 warqa leaves or 225g fillo leaves
  • 1 Tbsp. oil
  • 1 egg yolk
  • 1 tsp. water1
  • 2-3 Tbsp. melted ghee2 (2 Tbsp. for warqa; 3 Tbsp. for fillo)
  • lemon slices and/or parsley sprigs, for garnish

Directions

  1. Combine the beef, onion, garlic, la kama spice mix, ras el hanout, parsley, cilantro, and salt and cook, covered, on low heat for ~20 minutes.
  2. Meanwhile, boil the vermicelli in salted water until al dente (probably 1-4 minutes depending on your pasta).
  3. Drain the pasta/noodles, shock with cold water, and then cut into 5cm pieces and set aside.
  4. Add the bell pepper, tomato, harissa, raisins, and olives to the pan with the meat and increase heat to medium.
  5. Cook the meat mixture, uncovered, over medium heat for ~5 minutes.
  6. Remove from heat and add the vermicelli to the pan along with the lemon juice. Toss to combine.
  7. Season to taste with salt and pepper.
  8. Chill until ready to use. (Can be made a day in advance.)
  9. Preheat oven to 200°C (400°F) and brush the bottom and sides of a 25cm (10") tart tin or pizza pan with the oil.
  10. Beat the egg yolk with the water and set aside.
  11. If using warqa:
    • Arrange all but 5 or 6 of the leaves, shiny-side-down, overlapping, and overhanging the sides of the pan.
    • Spread the filling over the pastry leaves, lightly pressing down, then fold the edges of the pastry leaves up over the filling to enclose it.
    • Brush the folded leaves with some of the egg yolk mixture.3
    • Place the remaining leaves shiny-side-up and overlapping on top of the bastila. Tuck in the edges to create a fully-enclosed pie.
    • Brush the top of the pie with the melted ghee followed by a light coating of the egg yolk mixture.
    If using fillo:
    • Arrange half the fillo leaves, one on top of the other, so that they cover the bottom and overhang the edges of the pan. As you arrange the pastry, brush every second leaf/sheet with melted ghee.
    • Spread the filling over the pastry leaves, lightly pressing down, then fold the edges of the pastry up over the filling to enclose it (or nearly so).
    • Brush the folded leaves with some of the egg yolk mixture.
    • Cover with the remaining fillo leaves and tuck the edges under the pie.
    • Brush the top with a light coating of egg yolk.
  12. Bake at 200°C (400°F) for 20 minutes.
  13. Shake the pan a bit to loosen tthe pie.
  14. If necessary, tilt the pan to pour off any excess fat.
  15. Invert the pie onto a greased baking sheet.
  16. Brush the pie with the remaining egg yolk.
  17. Return to the oven and take at 200°C (400°F) for another 10 minutes.
  18. Remove the pie from the oven and, if necessary, tilt to pour off any excess fat.
  19. Put a serving platter or cutting board over the pie and invert the pie onto the platter/board.
  20. Decorate the top with lemon slices and/or sprigs of parsley.
  21. Cut into wedges and serve hot (with extra harissa)!


1 I forgot to add the water to my egg yolk, which made it a bit too thick to easily brush onto the pastry. Back
2 I got a little discombobulated and just ended up using melted butter for this instead of melted ghee. It still seemed to work out alright, but I think the ghee would've been even better. Back
3 I totally missed this step when building my bastila. It was buried in a long paragraph of instructions and I think my eyes just skipped a line and it didn't get done. This is why I tend to break the instructions down a bit more when I do recipe write-ups: less chance of missing a step. Back

Monday, 7 February 2022

Mississippi Mud Pie

I've had my eye on this recipe for weeks! First I didn't have all the ingredients, then I didn't have the energy, and then I ended up using up half the ingredients I'd gotten in other recipes. But I finally managed to get both the energy and the ingredients yesterday and decided to give it a go (with the Kidlet's help). She says it's the most delicious thing she's ever tasted. I'm not sure I'd go that far, but it is very good and very chocolate-y.

I did have some issues with the baking times for the brownie layer, but I think that could probably be solved by nudging the oven temperature up a bit. And, other than that, everything worked very well.

Since I've been feeling pretty "low battery" the last few weeks, I decided to simplify my life by buying a ready-made chocolate cookie crumb pie crust. I've included the instructions to make it from scratch below, but I just skipped this step and went straight to preparing the brownie layer. I'm sure a homemade crust would've been even better, but it was still plenty good with a store-bought crust and it made for an easy way to shave a bit of time and effort from the recipe, so I went with that.


Mississippi Mud Pie

Slightly adapted from Cook's Country June/July 2016

Ingredients

Crust

  • 25 chocolate wafer cookies, broken into coarse pieces
  • 4 Tbsp. unsalted butter, melted

Brownie Layer

  • 114g dark chocolate, chopped
  • 3 Tbsp. unsalted butter
  • 3 Tbsp. oil
  • 1 1/2 Tbsp. Dutched cocoa
  • 2/3 c. brown sugar
  • 2 large eggs
  • 2 tsp. vanilla extract
  • 1/8 tsp. coarse sea salt, ground
  • 3 Tbsp. all-purpose flour

Topping

  • 10 chocolate wafer cookies
  • 2 Tbsp. icing (powdered/confectioners') sugar
  • 1 Tbsp. Dutched cocoa
  • 2 Tbsp. unsalted butter, melted

Mousse

  • 170g milk chocolate, chopped
  • 1 c. heavy (35%) cream, chilled
  • 2 Tbsp. Dutched cocoa
  • 2 Tbsp. icing (powdered/confectioners') sugar

Directions

Crust

  1. Preheat oven to 180°C (350°F)1.
  2. Process cookie pieces in food processor until finely ground2.
  3. Add melted butter and pulse until combined.
  4. Press the crumbs firmly into the bottom and up the sides of a 23cm (9") pie plate. (The bottom of a dry measuring cup works well for this.)
  5. Bake until set (~15 minutes).
  6. Transfer to wire rack and set aside.

Brownie Layer

  1. If the oven isn't already hot from baking the pie crust, preheat it to 180°C (350°F).
  2. Combine chocolate, butter, oil, and cocoa and microwave in short bursts, stirring frequently, until melted and well-combined.
  3. In a separate bowl, combine sugar, eggs, vanilla, and salt and mix well with a whisk.
  4. Add chocolate mixture and whisk until combined.
  5. Stir in flour.
  6. Pour brownie mixture into pie crust. (It's okay if the crust is still warm.)
  7. Bake until edges are set and toothpick/cake tester comes out with a thin layer of batter when poked into the centre (15-20 minutes).
  8. Transfer to wire rack to cool for 1 hour, then transfer to fridge to chill for another hour.

Topping

  1. Meanwhile, line a baking sheet with parchment paper or a silicone baking mat.
  2. Place cookies in a Ziploc bag and crush them with a rolling pin. Aim for most of the pieces to be around 1cm (1/2") across.
  3. Add sugar and cocoa to the bag and shake it up to mix.
  4. Add the cookie mixture to the melted butter and stir to combine and moisten all the dry ingredients.
  5. Spread cookie mixture onto prepared baking sheet and bake at 180°C (350°F) for 5-10 minutes.
  6. Set aside to cool.

Mousse

  1. Once brownie layer is chilled, melt the chocolate for the mousse. Set aside to cool for ~10 minutes.
  2. Microwave 3 Tbsp. of the cream for ~20 seconds.
  3. Mix the cocoa into the warm cream until smooth and homogeneous.
  4. Stir in sugar and remaining cream.
  5. Whip the cream until soft peaks form.
  6. Once the chocolate has cooled to ~30°C (90°F), mix in ~1/3 of the whipped cream. This is just to loosen the chocolate, so don't worry too much about whether or not the cream gets deflated.
  7. Now that the chocolate has been loosened, you should be able to carefully fold in the remaining cream.
  8. Spoon the mousse over the pie and spread right to the edges.
  9. Sprinkle with the cooled cookie chunk topping.
  10. Cover and chill for at least 3 hours3.
  11. Cut into slices and serve.
  12. Totally optional but very good: Top each slice with a little sweetened whipped cream before serving.


1 The original recipe calls for a 325°F oven, but I found that I had to bake my brownie layer for nearly twice as long as the recipe called for, so I've upped the temperature a bit here in the hopes of coming closer to the recommended baking times. If you find your oven tends to run hot or cold you may need to adjust differently. Back
2 It may also be possible to do this in a blender. I don't know, I didn't try it. I think food processor would probably work better though. If in doubt you can always do what I did and bypass the issue with a pre-made crust. Back
3 We were feeling impatient so we tossed our pie in the freezer to chill. I found that 20 minutes in the freezer was enough to set the mousse firmly enough to be sliceable. Back

Thursday, 5 August 2021

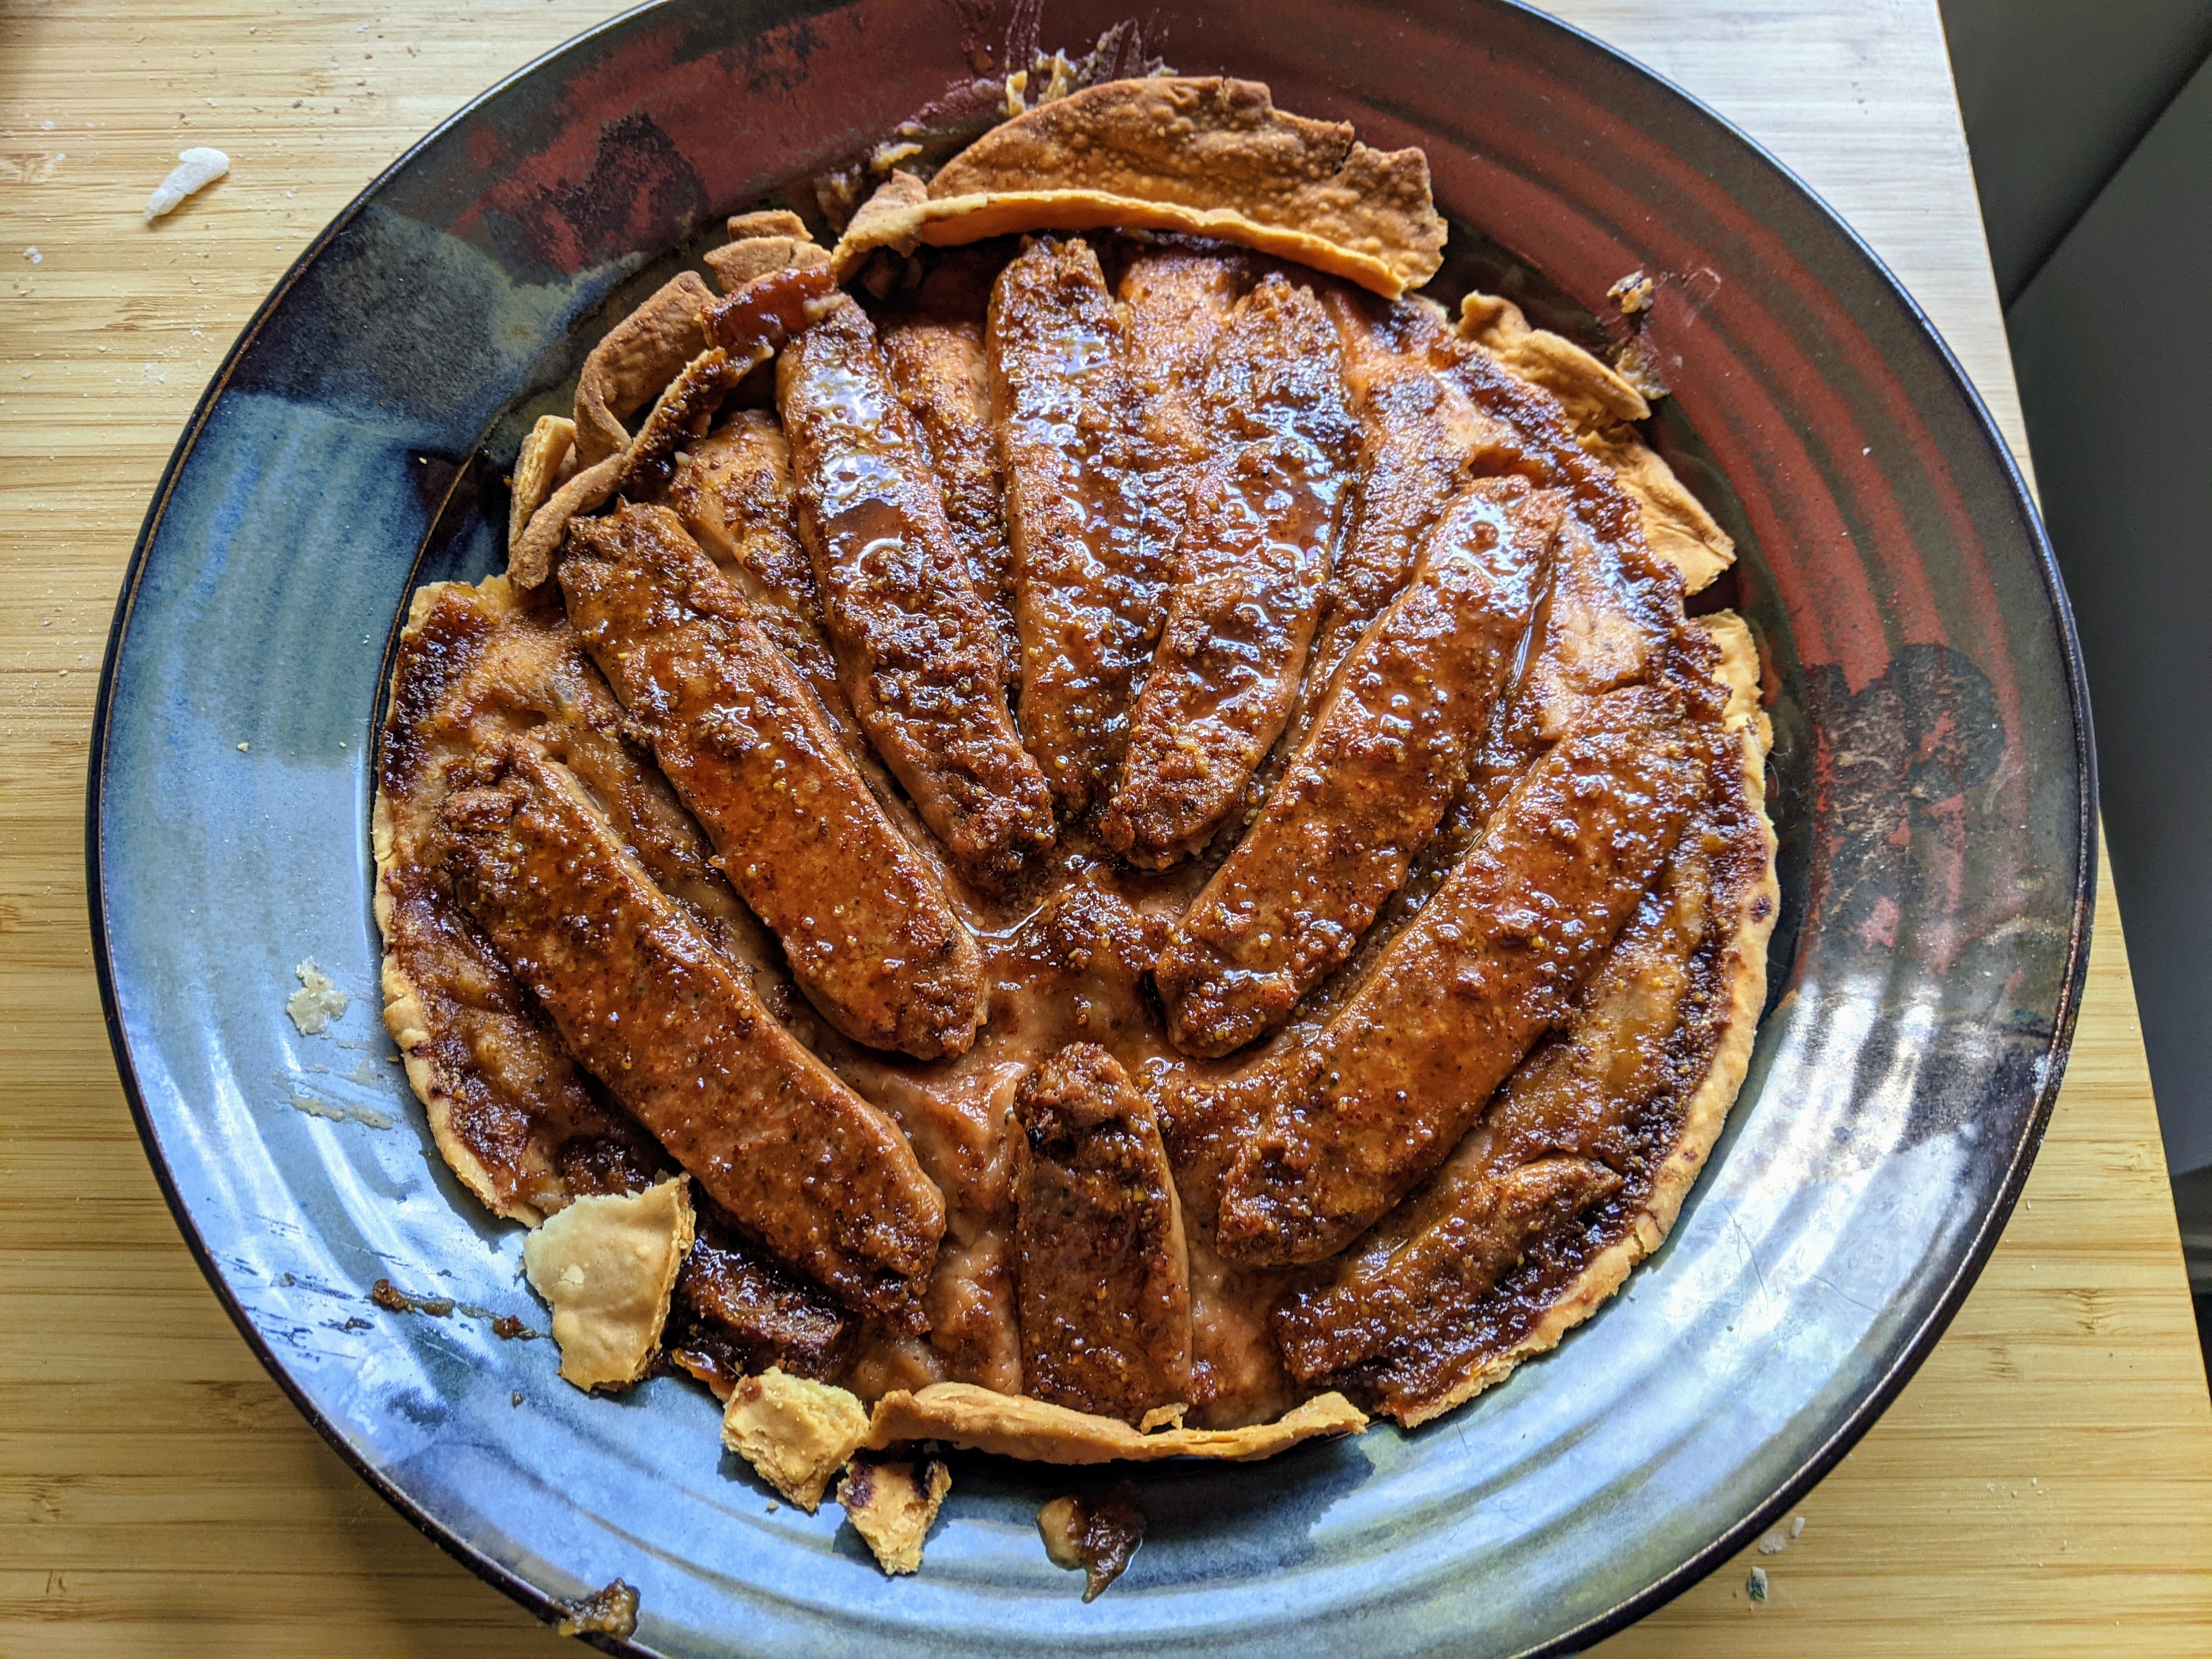
Sausage and Mustard Tart

This has been a very busy week; lots of appointments and running around. I was tired today and really didn't feel much like cooking, but I know that tomorrow is going to be another busy day and I may not get a chance to cook, so I figured I'd better cobble something together for dinner tonight.
I had some ready-made pie crusts in the freezer that really want used, so I decided to peruse the Book of Old Tarts to see if it held any inspiration. I've been buying Beyond Meat sausages whenever they go on sale and stashing them in the freezer for later use and I've finally restocked on cream as well, so this sausage and mustard tart caught my eye. I didn't have the right kind of beans, but I figured I'd swap in gigantes and give it a try anyway.

The original recipe calls for a "shallow 9-inch tart tin". I have a shallow 9" tart tin, so I baked it in that. This worked fine, but only, I think, because I was a little shy on the beans and didn't press the sausages down into the filling as directed. The sausages were also a bit too long to fit neatly in the tin. I think I'd be inclined to try it with a 10" tin next time.


As you can see, the tart lacked some structural integrity. I'm not sure if the filling was too wet or the crust was too thin or if it needed more time in the oven or what. That said, the flavour was excellent!

Sausage and Mustard Tart

Slightly adapted from the Book of Old Tarts

Ingredients

  • 175g pastry
  • 4 c. cooked butter beans or great northern beans (haricot beans)1
  • 3 Tbsp. Roman Mustard, divided
  • 2 Tbsp. ketchup
  • 3 Tbsp. table (18%) cream
  • salt and pepper, to taste2
  • 8 chipolata sausages or 4 mild Italian sausages, halved
  • 2 Tbsp. brown sugar
  • 1 Tbsp. lemon juice
  • 2 tsp. Worcestershire sauce

Directions

  1. Roll out the pastry and use it to line a 23 or 25cm (9 or 10") shallow tart tin.3
  2. Blind bake at 200°C (400°F) for 15 minutes. Ideally you would then remove the pie weights, brush with egg, and bake for another 5 minutes. I skipped the brushing with egg step.
  3. Meanwhile, purée the beans with 2 Tbsp. of the mustard, ketchup, cream, salt, and pepper.
  4. Pour the bean purée into the baked pie shell.
  5. Place the sausages (or sausage halves) on top in a wheel spoke pattern, pressing them down into the filling.
  6. Cover the pie with foil and bake at 180°C (350°F) for 35 minutes.
  7. Meanwhile, combine the remaining 1 Tbsp. mustard, brown sugar, lemon juice, and Worcestershire sauce and mix well.
  8. After 35 minutes, uncover the pie and brush with the mustard mixture.
  9. Return to oven and bake for another 10 minutes.
  10. Serve with fried onions, gravy, and/or creamed kale.


Variations

Vegetarian Version

This makes for an easy vegetarian meal. Just use vegetarian sausages and Worcestershire sauce.


1 I didn't have either, so I used gigantes (mature lima beans). I cooked them in mixture of water and chicken stock with onion, garlic, bay leaves, peppercorns, chili flakes, and a Parmesan rind. Back
2 I didn't add any salt and pepper since there was already some in the cooking liquid from the beans. When I drained the beans, I removed the bay leaves and the Parmesan rind but left the peppercorns in. Back
3 The original recipe calls for a 9" tin, but that size seemed a bit small to me. I'll probably use a 10" tin the next time I make this recipe. Back

Friday, 30 April 2021

Vegetarian Hot Dog Pie

The Kidlet has been asking for hotdogs recently, so when I ran across this recipe I figured I might as well give it a try. I ended up making quite a few changes, but I'm happy with how it came out (even if TF finds it completely inedible).

I used veggie dogs and vegan immitation beef crumbles instead of regular hot dogs and ground beef. I also omitted the sugar and salt and added barbecue sauce and worcestershire sauce instead. I also used cheddar in place of both the Velveeta and the American cheese. Oh! And I swapped out the rolled shortcrust pastry for a heartier press-in crust. I think next time I'd be tempted to omit the ground beef entirely and add some tomatoes and corn instead.


Hot Dog Pie

Adapted from Taste of Home

Ingredients

Crust

  • 2 C flour
  • ½ C cold butter
  • 1 tsp salt
  • cold water

Filling

  • 1 Tbsp. oil
  • 1 onion, chopped
  • 1 clove garlic, minced
  • 200g veggie beef crumbles (optional)
  • 1 large tomato, cubed (optional)
  • 8 veggie dogs, sliced crosswise
  • 1 can baked beans1
  • 1 Tbsp. ketchup
  • 1 Tbsp. worcestershire sauce2
  • 1 Tbsp. barbecue sauce
  • 2 Tbsp. prepared yellow mustard
  • 60g cheese of your choice, cubed
  • 60g cheese of your choice, grated

Directions

  1. Mix together the flour, butter, and salt. Add enough water for it to come together dry but packable; 3 tbsp is a good starting point but you may need to add more.
  2. Press the crust into a 23cm (9") square pan and blind bake it at 200°C (400°F) for ~15 minutes.
  3. Meanwhile, prepare the filling.
  4. Heat the oil over medium heat.
  5. Add the onion and garlic and cook until softened.
  6. Add the veggie crumbles (if using) and cook until browned.
  7. Add the tomato (if using) and hotdog slices and cook until heated through.
  8. Stir in the baked beans, ketchup, worcestershire sauce, and mustard and cook until heated through.
  9. Stir in the cheese cubes and remove from heat.
  10. Once the crust is baked, scoop the filling into the crust and top with shredded cheese.
  11. Bake at 200°C (400°F) for 5-10 minutes.
  12. Serve with salad or a veggie platter.


Variations

Vegan Version

Ingredients

Crust

  • flour
  • shortening
  • salt

Filling

  • 1 Tbsp. oil
  • 1 onion, chopped
  • 1 clove garlic, minced
  • 200g veggie beef crumbles (optional)
  • 1 large tomato, cubed (optional)
  • 8 veggie dogs, sliced crosswise
  • 1 can baked beans3
  • 1 Tbsp. ketchup
  • 1 Tbsp. vegan worcestershire sauce
  • 1 Tbsp. barbecue sauce
  • 2 Tbsp. prepared yellow mustard
  • 60g non-dairy cheese, cubed
  • 60g non-dairy cheese, grated


1 I used molassess baked beans. I think baked beans in tomato sauce would also work for this. Maple might also be interesting. Back
2 If you're trying to keep this vegetarian, be sure to check the ingredients on your worcestershire sauce; the regular recipe contains anchovies. Back
3 Check the label to make sure the baked beans don't contain pork or lard. Back

Friday, 4 September 2020

Seitan Curry Pot Pie

I've been deep in the madness place trying working on kitchen renovation stuff lately and haven't exactly been keeping up with the blog(s). I've hit a bit of a lull for the moment though and figured I really should write this up.

This recipe seemed a bit unusual, but it produced delicious results. I do feel that the soy sauce somewhat overpowered the curry powder though. Next time I think I'd try it with just half the quantity of soy sauce. The original recipe calls for 1/4 c., but I think 2 Tbsp. would be plenty!

Seitan Curry Pot Pie

Slightly adapted from Bon Appetit

Ingredients

  • 1/4 c. unsalted butter
  • 1 large onion, chopped
  • 1 Granny Smith apple, chopped
  • 1 delicata or 1 small butternut squash, peeled and cut into bite-sized pieces
  • 3-4 carrots, peeled and cut into bite-sized pieces
  • 1 small daikon or 6-7 red radishes, trimmed and cut into bite-sized pieces
  • 1 medium or 2 small russet (or other floury) potatoes, cut into bite-sized pieces
  • 250g cremini mushrooms, coarsely chopped
  • 6-7 cloves garlic, sliced thin
  • 1-2 bay leaves (optional)
  • 1 Tbsp. ginger paste
  • 2 Tbsp. Madras curry powder
  • 2 Tbsp. flour
  • 2 c. vegetable broth
  • 3 Tbsp. cornstarch
  • 2 Tbsp. light soy sauce
  • 450g seitan, cut into bite-sized pieces
  • 1/4 c. chopped fresh cilantro (optional)
  • 400g puff pastry
  • 1 egg, lightly beaten

Directions

  1. Melt butter over medium heat in a 12" braising pan or shallow pot.
  2. Add onion and apple and cook for 8-10 minutes.
  3. Add squash, carrots, radish, potato, mushrooms, garlic, and bay leaves (if using) and cook for another 12-15 minutes.
  4. Add ginger, curry powder, and flour and cook for another 1-2 minutes.
  5. Whisk cornstarch into broth until smooth.
  6. Add broth mixture to vegetable mixture.
  7. Stir in soy sauce.
  8. Bring to a simmer and cook, stirring frequently until thickened.
  9. Add seitan and cilantro and mix well.
  10. Set aside to cool for 20-30 minutes.
  11. Preheat oven to 220°C (425°F).
  12. Roll out pastry to slightly larger dimensions than the pot.
  13. Place the pastry over the pot with ~2cm overhang on all sides.
  14. Seal the edges and brush with egg.
  15. Cut a few slits in the pastry and transfer the whole assembly to the hot oven.
  16. Bake at 220°C (425°F) for 18-22 minutes.
  17. Reduce temperature to 180°C (350°F) and bake for another 30-45 minutes.

Tuesday, 23 June 2020

Pork and Egg Pie

Having never worked with hot water crust before, I found this recipe a bit less intimidating than some of the more traditional ones that called for shaping the pies with a dolly and baking them without any supports. With this one, you bake it in a loaf tin. The only trick is unmolding it at the end. Often when recipes advise making a sling to help lift your baked goods out of the tin, I ignore it. I definitely don't recommend doing that here. You will need the sling!


I didn't get the eggs quite centred in the pie this time, but I'm pretty happy with it as a first attempt! And it tasted lovely. I was worried that all the ground pork/sausage would make it too fatty, but it was quite nice! And I appreciate that this pie didn't require adding gelatin. It's one less thing to worry about, plus I don't enjoy the texture of gelatin in pies anyway.


Pork and Egg Pie

Slightly adapted from BBC Food

Ingredients

Filling

  • 300g ground pork
  • 300g sausages, casings removed
  • 150g cooked ham hock1, chopped
  • 2-3 shallots, chopped
  • 3 Tbsp. chopped fresh flat-leaf parsley
  • 4 hard-boiled eggs2, shelled
  • salt and white pepper, to taste

Crust

  • 450g soft (plain/standard/pastry) flour
  • 100g hard (strong/high grade/bread) flour
  • 75g unsalted butter, softened
  • 200mL water
  • 100g lard
  • 1/2 tsp. coarse sea salt
  • 1 egg, beaten

Directions

Filling

  1. Combine ground pork, sausage meat, ham, shallots, and parsley and mix well.
  2. Season with salt and white pepper.
  3. If desired, pinch off a small amount of filling and cook it in a pan, taste and adjust seasonings as desired.
  4. Set filling aside.

Crust

  1. Grease a 20x10cm (8x4") loaf pan with lard.
  2. Make a sling out of parchment paper and place it in the pan. Make sure that the sling overhangs the sides of the pan. It will work best if the overhang is on on the long sides. This way the bottom and long sides are covered and only the two short ends will be in direct contact with the pan.
  3. Combine soft and hard flours and mix well.
  4. Cut in butter until crumbly.
  5. Heat water with lard and salt until just boiling.
  6. Pour hot lard mixture into flour mixture and mix to form a soft dough.
  7. Working quickly, divide the dough into two unequal portions with about 1/3 of the dough in the smaller portion.
  8. Quickly roll out the larger portion of dough and use it to line the prepared loaf pan. Be careful not to tear it as any leaks will cause it to stick to the pan. Do not trim the overhang.
  9. Place about half the filling into the pie.
  10. Line the eggs up down the middle of the pie. Lay them end-to-end. (Trimming off the tops and bottoms may make them fit better if your eggs are particularly large.
  11. Pack in the rest of the filling around the eggs.
  12. Brush the top edge of the crust/overhanging dough with the beaten egg.
  13. Roll out the remaining portion of dough and place it on top.
  14. Press and pinch to seal the top and bottom crusts together. Now any excessive overhang may be trimmed.
  15. Cut three holes in the top crust to allow steam to escape.
  16. Brush top crust with beaten egg.
  17. Bake at 200°C (400°F) for 30 minutes (to put some colour on it).
  18. Reduce temperature to 180°C (350°F) and bake for another 60-90 minutes.
  19. To remove the pie from the pan, turn it on its side and use the sling to slide it out.
  20. Serve in thick slices. Honey mustard and Branston pickle both go very well with it.


1 I couldn't get any ham hocks, so I substituted 150g of chopped ham steak. I'm reasonably happy with the results this produced. Back
2 I recommend going for "medium-boiled" eggs for this. They'll be getting cooked more when the pie bakes anyway. I boiled mine for ~7 minutes. Back

Saturday, 30 May 2020

Lancaster Tart

I had some lemon filling/curd left over after making my kolaches last weekend. I also had some frozen pastry kicking around the chest freezer that wanted to be used. It wasn't the "rich sweet shortcrust pastry" called for by the recipe, but I'm not really bothered by that. I don't generally find sweet shortcrust worth the extra effort. (And neither does anyone else if North American recipes and grocery stores are anything to judge by. Recipes here don't tend to call for sweet shortcrust and grocery stores don't sell it. I could make it from scratch and I have done before but, as noted, I don't generally feel it's worth it. It doesn't make that much of a difference and it's a lot harder to handle than standard pie pastry.)

With the pastry and the lemon curd already sorted, this pie was pretty easy to throw together. The author calls it a cousin of the Bakewell Tart, and I can definitely see the family resemblance. The jam has been replaced with lemon curd over which a lemon-almond custard is poured. It doesn't have as strong an almond flavour as a standard Bakewell tart, but I enjoy the burst of lemon you get in its place. TF and the Kidlet both loved it as well.

The original recipe is written for a shallow 23cm (9") tart tin. I absent-mindedly grabbed my 9" American-style pie plate which is much deeper than the shallow tin called for. I ended up doubling the amount of lemon curd called for (1/2 c. rather than 1/4 c.) and used an extra tablespoon of brown sugar over it (2 Tbsp. vs. 1), but left the amount of almond custard the same. I'm happy with the results this gave me. You may want to adjust the proportions if you're using a different sized tin though.

Lancaster Tart, assembled and decorated by the Kidlet

Lancaster Tart

Slightly adapted form the Book of Old Tarts by Elizabeth Hodder

Ingredients

  • 175g of sweet shortcrust pastry
  • 1/2 c. lemon curd
  • 2 Tbsp. brown sugar
  • zest of 2 lemons
  • 115g unsalted butter, softened
  • 150mL heavy (35%) cream
  • 55g ground almonds
  • 115g sugar
  • 2 large egg yolks
  • 1 large egg

Directions

  1. Blind bake your pie crust according to your favourite method.
  2. Preheat oven to 170°C (325°F).
  3. Spread the lemon curd in the bottom of the baked pie shell.
  4. Sprinkle with brown sugar.
  5. Combine lemon zest, butter, cream, almonds, sugar, egg yolks, and egg and mix very well. (I used an immersion blender.)
  6. Pour almond mixture into the pie shell and smooth the top.
  7. Decorate with sliced almonds and/or any extra bits of pastry.
  8. Bake at 170°C (325°F) for 40-50 minutes.
  9. Warm with extra lemon curd and/or whipped cream.

Thursday, 23 April 2020

Banana Pudding Pie

This pie did not go as planned. Just about everything that could go wrong, did. I mixed the gelatin in at the wrong point. The meringue didn't whip up properly. I had to ditch the whole batch and start over again. I ended up making a French meringue rather than the Swiss one called for in the recipe. And then, because the French meringue is uncooked, I had to try to bake it in the oven rather that giving it a quick blast under the broiler to brown it. On top of that, I ended up baking it to at too high a temperature which then required me to take it out before the meringue had fully set. And heating the pie back up caused filling to liquefy, so then I had to toss it back in the fridge to try to get it to set again. By the time I'd reached the end of the whole process and managed to assemble the pie, I felt like it was cursed.

Even with all that, this pie was amazing! Seriously, so delicious. I can't even imagine what it would've been like if I'd managed to do it right. Definitely one to try again.

Banana Pudding Pie

Adapted from Cook's Country April/May 2020

Ingredients

Crust

Original Recipe

  • 4 c. Nilla Wafer cookies
  • 3 Tbsp. brown sugar
  • 1 Tbsp. flour
  • 1/4 tsp. salt
  • 6 Tbsp. unsalted butter, melted

Lazy Way

  • 1 ready-made graham cracker pie crust

Filling

  • 2 tsp. unflavoured gelatin
  • 1 3/4 c. half-and-half (10% cream), divided
  • 3/4 c. sugar
  • 5 large egg yolks
  • 2 Tbsp. flour
  • 1/8 tsp. coarse sea salt, ground
  • pinch ground cinnamon
  • pinch ground allspice
  • 2 Tbsp. unsalted butter, chilled
  • 1 Tbsp. vanilla extract
  • 2 ripe bananas, peeled and sliced

Meringue

Swiss Meringue1

  • 1/4 c. sugar
  • 1/4 c. brown sugar
  • 4 large egg whites
  • 1/4 tsp. cream of tartar

French Meringue

  • 4 large egg whites
  • 1/4 tsp. cream of tartar
  • 1/2 c. sugar

Directions

Crust

Original Recipe

  1. Pulse cooies, sugar, flour, and salt in food processor for ~10 pulses.
  2. Add melted butter and pulse until combined, scraping down sides of bowl as needed.
  3. Transfer to 9" pie plate and use your hands to press the crumbs firmly up the sides of the plate. The walls should be at least 5mm thick and go all the way up to the top edge of the plate.
  4. Press the remaining crumbs into an even layer on the bottom of the plate. Be sure to firmly press into the corners.
  5. Bake at 160°C (325°F) for 18-20 minutes.
  6. Transfer to wire rack to cool.

Lazy Way

  1. No prep needed. Crust is ready to use.

Filling

  1. Sprinkle gelatin over 1/2 c. of the half-and-half and set aside.
  2. Whisk sugar, egg yolks, flour, salt, cinnamon, allspice, and remaining 1 1/4 c. half-and-half until fully combined.
  3. Cook over medium heat, whisking constantly and scraping corners, until mixture thickens (5-7 minutes).
  4. Remove from heat and whisk in butter, vanilla, and gelatin mixture.
  5. Stir bananas into hot filling.
  6. Pour filling into crust.
  7. Cover and chill for 4-24 hours.

Meringue

Swiss Meringue

  1. Whisk all ingredients together in a heatproof bowl.
  2. Place bowl over saucepan filled with a couple inches of boiling water.
  3. Whisking gently but constantly, cook until mixture reaches 71-73°C (160-165°F). This should take ~8 minutes.
  4. Remove from heat and whisk on high speed until meringue forms stiff peaks (2-3 minutes).
  5. Uncover pie and spread meringue over filling. Make sure to spread it all the way to the edges.
  6. Heat broiler and broil until meringue is well-browned (1-2 minutes).

French Meringue

  1. Combine egg whites and cream of tartar and beat until frothy.
  2. Add sugar 1 Tbsp. at a time while continuing to beat on high speed.
  3. Continue beating until stiff peaks are formed.
  4. Uncover pie and spread meringue over filling. Make sure to spread it all the way to the edges.
  5. Bake at ?? for ??. I tried baking it at 450°F (230°C), but had to take it out after only 8 minutes as the top had become excessively brown and was in danger of burning. I'll try 400°F (200deg;C) next time and see how that goes.


1 The original recipe calls for 2/3 c. sugar total (1/3 c. granulated, 1/3 c. brown). This did NOT work at all for me. I don't know if the problem was too much sugar or something else, but it certainly seemed like A LOT of sugar for the amount egg and the mixture was thick and sticky and syrupy, almost like molasses. I didn't want to try the Swiss meringue again after one failed attempt, so I just whipped up a quick French meringue since they're reliable and I've never had one fail. If I were going to try the Swiss meringue again, I'd start by adding less sugar and see if that helped at all. Hence the reduced sugar quantities above. Back