Wednesday, 12 June 2024

Waffles with Sausage Gravy

With this, I am finally done with all of this savoury recipes in the waffle cookbook1! (Although, now that I think about it, I don't think I ever got around to doing the fried chicken and waffles write-up. I should probably get on that!)

This recipe is a take on souther biscuits and gravy. Rather than a more traditional brown gravy, it uses "country gravy", which is a milk-based sauce. It's basically a b&eactue;chamel sauce with sausage in it.

The recipe recommends one of several different types of waffle as a stand-in for the biscuits: classic waffles, buttermilk waffles, or cornmeal waffles. I had intended to make cornmeal waffles to go with the fried chicken and buttermilk waffles for this one. But I didn't have enough cornmeal left, so I ended up flipping them around and making the buttermilk waffles to go with the chicken and made cornmeal waffles for this one.


Waffles with Sausage Gravy

Slightly adapted from Waffles: Sweet, Savory, Simple by Dawn Yanagihara

Ingredients

Directions

  1. Cook the sausage over medium heat, breaking it up as it cooks.
  2. Once fully cooked, remove the sausage from the pan with a slotted spoon.
  3. If the pan contains less than 2 Tbsp. of fat, add a little butter, lard, or bacon grease to the pan to bring the total amount of fat up to ~2 Tbsp.
  4. Add the flour and cook, stirring, until flour is cooked (~2 minutes).
  5. Pour in milk, whisking until smooth.
  6. Add bay leaf, nutmeg, salt, and pepper and cook, stirring frequently, until thickened (~5 minutes).
  7. Return the sausage to the pan and cook until heated through (2-3 minutes).
  8. Cover and keep warm until ready to use.
  9. Make or reheat the waffles.
  10. Pour ~1/4 of the gravy over each waffle, top with green onions, and serve.


1 Except for the one seafood recipe. Back

Tuesday, 11 June 2024

Khoya (Milk Solids)

Khoya isn't particularly difficult to make. It's just time-consuming. It requires boiling down milk until most of the liquid is gone and you're left with a doughy mass of milk solids. And you have to keep stirring it lest it stick or scortch. This means that, on the rare occasions that I use khoya in my cooking, I normally buy ready-made bricks of it from the Indian grocery rather than making my own. This week, however, I wanted to throw together a last-minute curry and decided that the long cooking was preferrable to having to run out to the store. (It also meant that I could easily make it lactose-free for TF.)

Khoya

From 660 Curries by Raghavan Iyer

Ingredients

  • 2 c. whole (3.25%) milk

Directions

  1. Bring the milk to a boil and cook, uncovered, stirring frequently, until very thick (~30 minutes). Lumps may form, but if you stir well, they should soften and mix back in to form a smooth mass.
  2. Once the mixture is molasses-thick, reduce heat very slightly and continue cooking and stirring for another 5 minutes or so, then remove from heat and allow to cool.
  3. 2 c. of milk should produce ~1/4 c. of khoya. It can be stored in the fridge for up to a week before use.

Monday, 10 June 2024

Toovar Mandvishing nu Dal (Pigeon Pea and Peanut Dal)

I have not been very good about keeping on top of the meal planning and groceries lately. I had been trucking along with the "<x> of the Day" cookbooks pretty well so far. But... I kind of lost my momentum and I've been having trouble getting back in the groove again. So, when dinner time rolled around and I still hadn't gotten together any of the supplies I needed for the other recipes I'd been looking at, I turned to my trusty copy of 660 Curries and paged through the legume section until I found something suitable.

Although this dal couldn't hold a candle to the green pea curry I ended up making to go with it, it was still very nice. The legumes made it filling enough to serve as a main course and the fenugreek added enough greens that it felt like we were getting our veggies as well.

Photo goes here.

Toovar Mandvishing nu Dal

Slightly adapted from 660 Curries by Raghavan Iyer

Ingredients

  • 1 c. skinned, split pigeon peas
  • 1/2 c. raw peanuts, skinned
  • 4 c. water
  • 2 c. chopped fresh or frozen fenugreek leaves
  • 1/4 c. shredded, unsweetened dried coconut (or 1/2 c. fresh)
  • 1 Tbsp. crumbled jaggery
  • 1 tsp. coarse sea salt
  • 1 tsp. tamarind concentrate
  • 1/4 tsp. ground turmeric
  • 4-6 fresh green Thai, finger, or serrano chilies, halved lengthwise
  • 2 Tbsp. ghee
  • 1 tsp. mustard seeds
  • 1/4 tsp. ground asafetida

Directions

  1. Combine the pigeon peas and peanuts and rinse well and drain.
  2. Add the water and bring to a boil over medium-high heat.
  3. Skim off and foam and add the fenugreek.
  4. Reduce heat to medium-low, cover, and cook, stirring occasionally, until the peas are tender (20-25 minutes).
  5. Add the coconut, jaggery, salt, tamarind, turmeric, and chilies and continue to simmer, uncovered, stirring occasionally, for 5 minutes.
  6. Melt the ghee over medium-high heat.
  7. Add the mustard seeds, cover, and cook until they've stopped popping (30-60 seconds).
  8. Stir in the asafetida and immediately remove from heat.
  9. Pour the ghee mixture over the dal and serve.


Variants

Vegan Version

Ingredients

  • 1 c. skinned, split pigeon peas
  • 1/2 c. raw peanuts, skinned
  • 4 c. water
  • 2 c. chopped fresh or frozen fenugreek leaves
  • 1/4 c. shredded, unsweetened dried coconut (or 1/2 c. fresh)
  • 1 Tbsp. crumbled jaggery
  • 1 tsp. coarse sea salt
  • 1 tsp. tamarind concentrate
  • 1/4 tsp. ground turmeric
  • 4-6 fresh green Thai, finger, or serrano chilies, halved lengthwise
  • 2 Tbsp. coconut oil or vegetable ghee
  • 1 tsp. mustard seeds
  • 1/4 tsp. ground asafetida

Saturday, 8 June 2024

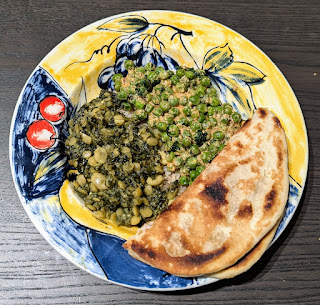
Khoya Elaichi Mutter (Green Peas with Khoya-Cardamom Sauce)

I almost didn't make this curry. It was late. I'd already made a dal and TF had cooked some rice. And it was even a somewhat vegetably dal with lots of fenugreek leaves in it. So, in theory, I didn't actually need another curry. But I wanted one. And I've been eyeing this one for ages.

Unfortunately, it calls for khoya (milk solids). I've never made my own khoya. It involves a very long process of boiling milk down until it ceasing being milk and forms a solid, dough-like mass. It's simple, but time-consuming. So, on the rare occasions that I do cook with khoya, I usually buy it in ready-made bricks from the Indian grocery.

This is fine when I've planned ahead. But on days like today when I'm just trying to throw something together last-minute, I really don't want to have to deal with either option. Making the khoya or buying it are both too much hassle for me for a quick meal or side dish.

Hence, almost not making this curry. In the end though, I decided that I was alright with the prospect of a very late dinner and measured out some milk and started cooking it down.

It did, indeed, take quite a while, but the results were delicious! TF is completely in love with this sauce. She just wants to eat it on everything! And I have to admit, I am also a big fan. It's so good it kind of outshone the dal that was meant to be the main dish! I would definitely make this one again. That delicious creamy-spicy sauce is worth the effort!


Khoya Elaichi Mutter

Slightly adapted from 660 Curries by Raghavan Iyer

Ingredients

  • 1/2 c. plain yogurt
  • 1/4 c. khoya
  • 1/2 tsp. green cardamom seeds
  • 1-2 Tbsp. ghee
  • 1 tsp. cumin seeds
  • 2 tsp. ground Deggi chilies1
  • 1 tsp. coarse sea salt
  • 1/2 c. water
  • 450g frozen green peas
  • 1/2 tsp. Punjabi garam masala
  • 2 Tbsp. chopped fresh cilantro

Directions

  1. Combine the yogurt, khoya, and cardamom in a blender and purée until smooth.
  2. Heat the ghee over medium-high heat.
  3. Add the cumin seeds and sizzle for 15-30 seconds.
  4. Pour in the yogurt sauce and add the ground chilies and sea salt.
  5. Reduce heat to medium and simmer, uncovered, stirring occasionally, until some of the ghee starts to separate (~5 minutes).
  6. Add the water and the pease and bring to a boil.
  7. Cook, uncovered, boiling vigorously (increase heat if necessary), and stirring occasionally, until sauce thickens (~15 minutes).
  8. Stir in the garam masala.
  9. Sprinkle with cilantro and serve.


1 Iyer suggests that if you can't find Deggi chilies, then 1 tsp. of ground cayenne + 1 tsp. of sweet paprika will make a reasonable substitute. I opted to use 1 tsp. of ground Kashmiri chilies + 1 tsp. of sweet paprika for mine. This produces a slightly milder result than using cayenne, but I really enjoy the flavour of the Kashmiri chilies. Back

Monday, 3 June 2024

Brown Rice, Asparagus, and Egg Salad

Lunch time rolled around today and TF and I were both feeling ravenous. Unfortunately, we didn't really have any leftovers in the fridge. And no bread or other quick and easy lunch options. We were considering having some sort of ramen. But I decided to take a quick look through the egg book before resorting to instant noodles. Luckily I ran across this recipe and remembered that we still had some asparagus in the fridge that needed to be used up.

The original recipe called for basmati rice, but we swapped it out for long-grain brown rice. It takes a little longer to cook, but it's a bit healthier and more filling than white rice. We also swapped out the fresh ginger for ginger paste1 and halved the oil called for. This worked quite well and made a tasty and relatively easy lunch option!


Brown Rice, Asparagus, and Egg Salad

Slightly adapted from The Good Egg by Marie Simmons

Ingredients

Salad

  • 1 c. long-grain brown rice
  • 1 c. water2
  • peanut (or other neutral) oil
  • 4 large eggs
  • 1/2 tsp. ginger paste
  • 1 clove garlic, minced
  • 1/4 tsp. coarse sea slat, ground
  • 340g asparagus, trimmed
  • 1-2 tsp. sesame oil
  • 1/2 c. sliced green onions
  • 1 Tbsp. sesame seeds, toasted

Dressing

  • 1/2 c. rice vinegar
  • 1 tsp. sugar
  • 1 tsp. ginger paste
  • 1 clove garlic, minced
  • 1/2 tsp. coarse sea salt
  • 3 Tbsp. neutral oil
  • 1 Tbsp. sesame oil

Directions

  1. Cook the rice by your preferred method.
  2. Meanwhile, heat a few mm of oil in a 6" frying pan over medium-high heat.
  3. Beat the eggs with the ginger, garlic and salt.
  4. Once the oil is hot, pour in the egg mixture and cook, without stirring, for 2 minutes.
  5. Lift the edges of the egg and let the uncooked mixture flow underneath. Cook for 1 more minute.
  6. Flip and cook for 1 minute longer.
  7. Transfer to a strainer or paper towel to drain.
  8. Cut or tear the omelette into bite-sized pieces. Set aside.
  9. Place a steamer basket over a few cm of boiling water and steam the asparagus for 3-4 minutes.
  10. Rinse the asparagus under cold water, transfer to serving bowl, toss with sesame oil, and set aside.
  11. Combine the vinegar, sugar, ginger, garlic, and sea salt for the dressing and mix well.
  12. Whisking constantly, add the oil in a thin, steady stream.
  13. Continue whisking and drizzle in the sesame oil. Set aside.
  14. Once the rice is done, add it to the bowl with the asparagus along with the green onions and toss to combine.
  15. Pour over the dressing, add the omelette pieces, and stir to mix.
  16. Sprinkle with toasted sesame seeds and serve.


1 I doubled the quantity of ginger paste since I find it doesn't tend to have quite as much presence as fresh ginger. If you are using grated fresh ginger, then halve the quantities called for here. Back
2 The amount of water needed to cook the rice will vary depending on the method used to cook it. The proportions shown here are appropriate for pressure cooking in an InstantPot. Back

Sunday, 2 June 2024

Malted Waffles

I have been mostly going through the waffle cookbook in order so far. (And I'm now more than half-way through the book!) I did, however, have to skip over a couple recipes. One got left out because it calls for shellfish and we're still waiting to see if it's safe for the Kidlet to have shellfish. And the other was this malted waffle recipe. I ended up skipping it because I just couldn't find non-diastatic malt powder anywhere. Malted milk? Sure! Malt syrup? Already have some! And I'm pretty sure I could make myself some diastatic malt powder/flour if I cared to. But plain old (non-diastatic) malt powder? That's trickier.

I had already checked the local grocery stores and the health food store. No dice. I figured, if anywhere in town was going to have it, it'd be the Flour Barrel. Unfortunately, things have been so busy that I haven't had a chance to actually go to the Flour Barrel recently!

But I was downtown for a haircut last week and actually both had time and remembered to go have a look before heading home. Sure enough, they had a whole shelf of the stuff! So now I've finally been able to go back and fill in that little gap in my waffle coverage.

I served these with raspberries and chocolate sauce, but I think they'd also be good with maple syrup. Or even ham, eggs, and other savoury toppings.

I don't think these beat out a classic buttermilk waffle for me. But I'm still glad I tried them. It's nice to have a little variety from time-to-time.


Malted Waffles

Slightly adapted from Waffles: Sweet, Savory, Simple by Dawn Yanagihara

Ingredients

  • 280g all-purpose flour
  • 90g non-diastatic malt powder
  • 2 Tbsp. sugar
  • 1/2 tsp. coarse sea salt, ground
  • 2 1/4 tsp. baking powder
  • 2 large eggs
  • 2 c. milk
  • 1/2 tsp. vanilla extract
  • 6 Tbsp. unsalted butter, melted

Directions

  1. Preheat your waffle iron.
  2. Combine the flour, malt powder, sugar, and salt.
  3. Sift in the baking powder and stir to combine.
  4. Beat the eggs and vanilla into the milk.
  5. Stir the melted butter into the milk mixture.
  6. Pour the wet ingredients into the dry ingredients and mix until just combined.
  7. Once the waffle iron is preaheated, pour in 1 portion of batter and cook according to manufacturer directions. Repeat until all batter has been used.
  8. Serve with fresh fruit, chocolate sauce, whipped cream, and/or maple syrup. Or make them savoury and serve with ham, eggs, bacon, chicken and/or Hollandaise sauce.

Tuesday, 28 May 2024

Strawberry-Rhubarb Slump Oatmeal

I've been waiting for rhubarb season so that I could try out this recipe. It's the last oatmeal recipe in the Breakfast Bible that I hadn't tried yet. I love strawberry-rhubarb pie and crumble. So the idea of bringing those flavours to oatmeal for breakfast was very appealing!

I kept pretty much to the recipe. But I did add a small amount of vanilla to the topping and swapped out the granulated sugar for brown sugar. I also used significantly less milk/cream than called for. But that was all it really needed.


Strawberry-Rhubarb Slump Oatmeal

Slightly adapted from the Breakfast Bible by Kate McMillan

Ingredients

  • 2 stalks rhubarb
  • 1 c. strawberries
  • 1/3 c. brown sugar
  • 4 c. water, divided
  • 1/8 tsp. coarse sea salt
  • 2 c. rolled oats
  • 1/2 tsp. vanilla extract
  • 1/2 c. milk or cream

Directions

  1. Wash the rhubarb well and chop it into 1cm pieces.
  2. Combine the rhubarb, strawberries, sugar, and 1/4 c. of the water and bring to a boil.
  3. Reduce heat to medium and cook, stirring occasionally, until tender (~15 minutes).
  4. Meanwhile, bring the remaining water to a boil in a second pot.
  5. Add the salt and oats and reduce heat to medium.
  6. Cook, stirring occasionally, until soft and creamy (5-8 minutes).
  7. Once the rhubarb is soft, remove from heat and stir in the vanilla.
  8. Spoon some oatmeal into a bowl and top with some of the strawberry-rhubarb mixture.
  9. Pour a little milk or cream over top and serve.